Beginner Hand Tool Woodworking Kit: What to Buy & How Much It Costs
A good set of hand tools costs far less than most beginners expect, a functional starter kit can be assembled for as little as $150 to $300, and yet many newcomers spend weeks paralyzed by indecision over which tools to buy first. This guide cuts through that confusion.
Whether you’re just discovering the craft or you’ve been browsing tool catalogs for months without pulling the trigger, this beginner hand tool woodworking kit guide and cost breakdown gives you a clear, practical path forward. You’ll learn exactly which tools to buy, what to spend, which brands to trust, and what projects you can realistically tackle from day one.
Key Takeaways

- A beginner hand tool woodworking kit requires roughly 8 to 12 core tools and can cost between $150 and $400 depending on brand and quality level.
- Hand tools are quieter, more portable, and lower in startup cost than power tools, making them ideal for apartments, small spaces, and beginners.
- The essential tools for starting out are a bench plane, tenon saw, set of chisels, mallet, marking gauge, combination square, and a workbench or vise.
- Brands like Stanley, Narex, Veritas, and Lie-Nielsen offer reliable options across a range of budgets.
- Hand tool woodworking has a learning curve, but most beginners can produce their first finished project within a few weeks of consistent practice.
- Sharpening skills matter as much as buying good tools, a sharp chisel outperforms an expensive dull one every time.
- Beginners with no experience can absolutely start with hand tools; many instructors recommend them as the best way to learn wood behavior and joinery fundamentals.
Find this useful? Add us as a preferred source on Google and more of what we publish will show up in your results.
What Hand Tools Do You Actually Need to Start Woodworking
For most beginners, a core set of 8 to 10 hand tools covers the majority of starter projects. You don’t need a full workshop catalog, you need the right tools for the tasks you’ll actually do first.
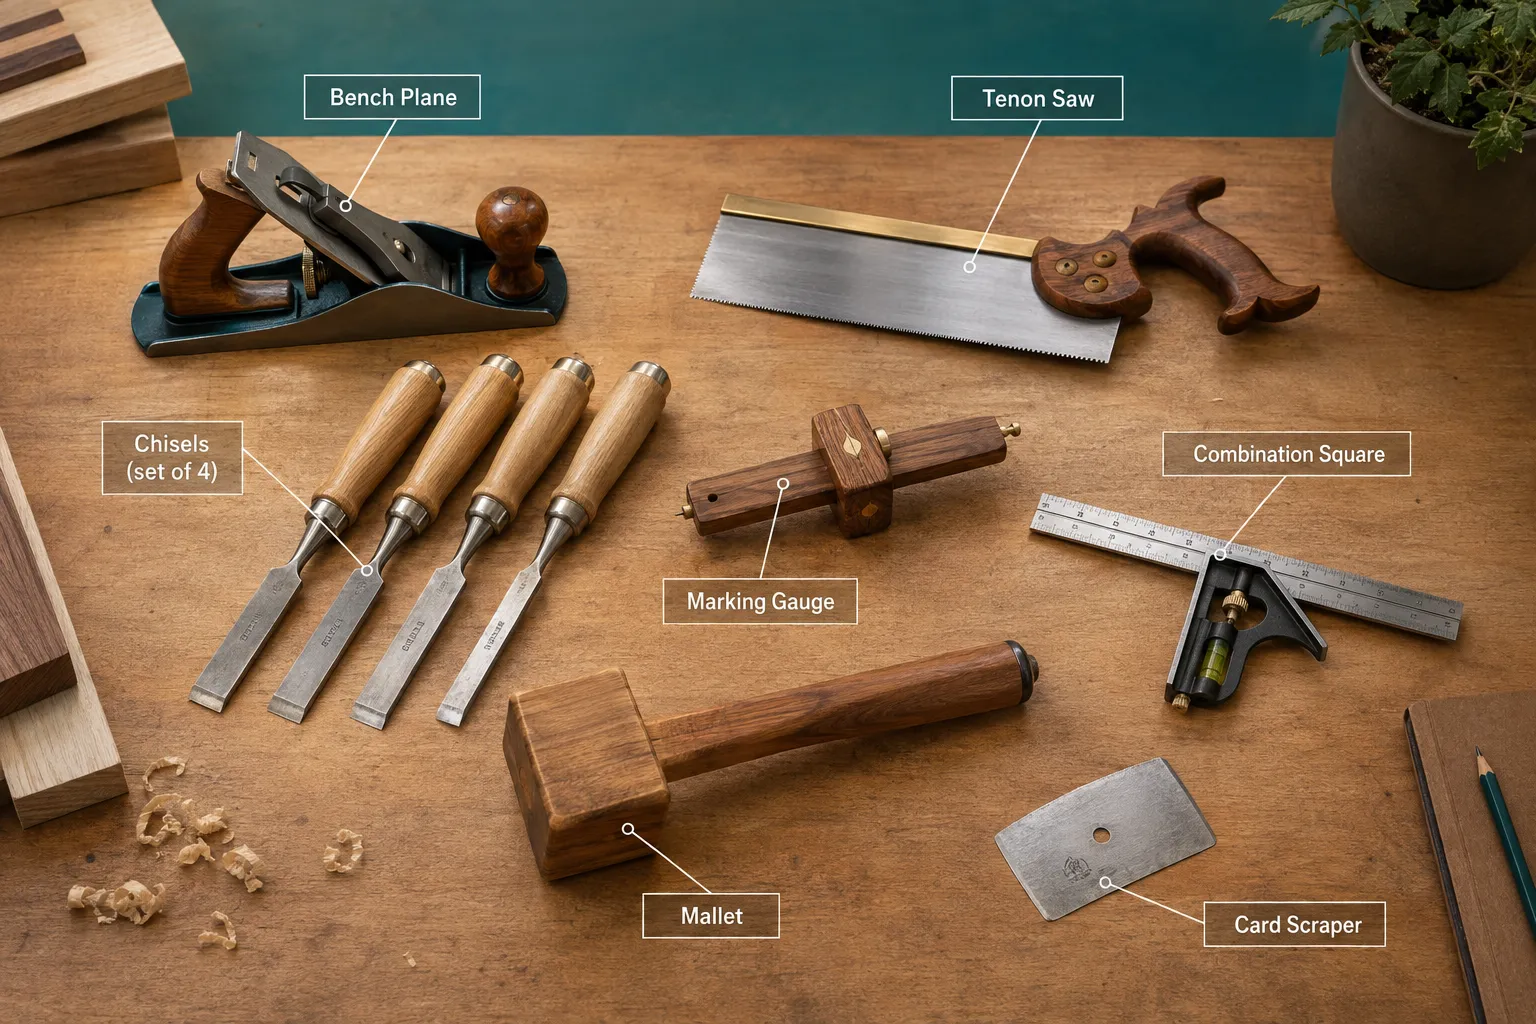
Here’s what belongs in a genuine starter kit:
- Bench plane (No. 4 or No. 5): Flattens and smooths wood surfaces. The No. 4 smoothing plane is the most versatile starting point.
- Tenon saw (or dovetail saw): Makes accurate crosscuts and rip cuts. A tenon saw with 14 to 16 teeth per inch handles most joinery work.
- Set of bench chisels (4-piece): Used for chopping mortises, cleaning joints, and paring. A 6mm, 12mm, 19mm, and 25mm set covers most needs.
- Wooden or rubber mallet: Drives chisels without damaging handles. A 16 oz wooden mallet is a reliable choice.
- Marking gauge: Scores precise lines parallel to an edge. Essential for joinery layout.
- Combination square (6-inch or 12-inch): Checks 90-degree and 45-degree angles. One of the most-used tools in any hand tool shop.
- Marking knife: Scribes accurate lines that a pencil can’t match for precision joinery.
- Card scraper: Removes tearout and smooths surfaces without sandpaper. Inexpensive and highly effective.
- Workbench or portable vise: Not a hand tool per se, but you need a stable surface to work against. A basic bench vise clamped to a table works for beginners.
- Sharpening stones (combination or diamond): Keeping tools sharp is non-negotiable. A 1000/6000 grit combination waterstone is a practical starting point.
For a broader look at how these tools fit into a complete beginner setup, the various tools used for woodworking: the complete beginner’s guide covers the full picture well.
Common beginner mistake: Buying too many tools before understanding what each one does. Start with this core list, learn each tool thoroughly, then add as specific project needs arise.
How Much Does a Beginner Woodworking Hand Tool Kit Cost
A practical beginner hand tool kit costs between $150 and $400 for mid-range quality tools. Budget options (around $100 to $150) exist but often require more setup and tuning out of the box. Premium kits from brands like Veritas or Lie-Nielsen can push $800 or more, but that level of investment isn’t necessary to start.
Here’s a realistic cost breakdown by tier:
| Tool | Budget ($) | Mid-Range ($) | Premium ($) |
|---|---|---|---|
| Bench Plane (No. 4) | $25,$40 | $60,$90 | $250+ |
| Tenon Saw | $20,$35 | $50,$80 | $150+ |
| Chisel Set (4-piece) | $25,$40 | $50,$80 | $150+ |
| Mallet | $15,$25 | $30,$50 | $60+ |
| Marking Gauge | $10,$20 | $30,$50 | $80+ |
| Combination Square | $15,$25 | $40,$70 | $100+ |
| Sharpening Stones | $20,$35 | $40,$70 | $100+ |
| Marking Knife + Card Scraper | $15,$25 | $25,$45 | $60+ |
| Estimated Total | $145,$245 | $325,$535 | $950+ |
Practical advice: The mid-range tier offers the best value for beginners. Tools in this range arrive reasonably sharp, hold their edge well, and don’t require extensive tuning before first use. Budget tools can work, but expect to spend more time setting them up.
Used tools are also worth considering. Vintage Stanley planes and older chisels found at estate sales or online marketplaces can be excellent quality at a fraction of new prices, provided you know what to look for.
Hand Tools vs Power Tools for Woodworking: Which Is Better for Beginners
Neither is objectively better, the right choice depends on your space, budget, noise tolerance, and learning goals. That said, hand tools have specific advantages for beginners that power tools simply can’t match.
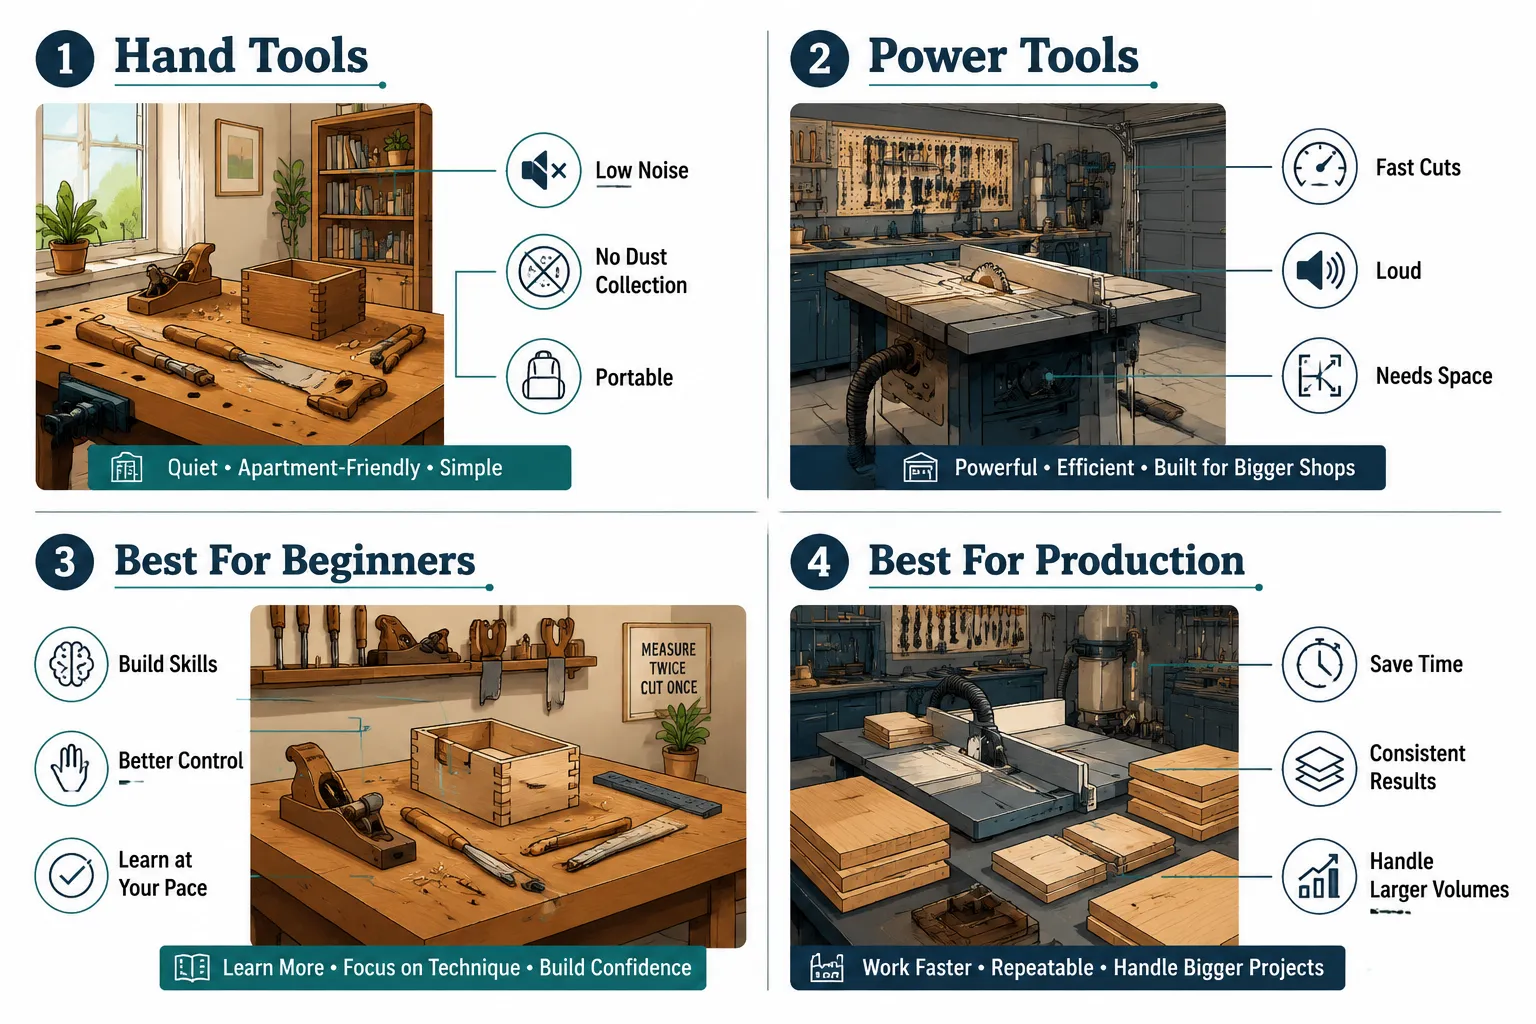
Hand tools are better when:
- You work in an apartment, small garage, or shared space where noise matters
- Your startup budget is under $500
- You want to develop a deep understanding of wood grain, joinery, and technique
- Portability matters, hand tools travel easily and need no power source
Power tools are better when:
- You need to process large volumes of material quickly
- Repetitive cuts and dimensioning are a regular part of your workflow
- You have a dedicated workshop space with dust collection
For most beginners building furniture, boxes, shelving, or small decorative pieces, hand tools are genuinely sufficient. Many experienced woodworkers use hand tools exclusively and produce exceptional work. For more on how power tools fit into a broader setup, see this guide to beginner woodworking tools and equipment: what you need and why.
Best Hand Tool Brands for Woodworking Beginners
The best beginner-friendly hand tool brands are Stanley (for budget), Narex (for mid-range chisels), Veritas (for mid-to-premium planes and layout tools), and Lie-Nielsen (for premium). Each brand has a clear role depending on budget.
- Stanley: The classic entry-level choice. Their No. 4 bench plane and basic chisels are widely available and work well once properly tuned. Look for older Stanley tools (pre-1970s) for better steel quality.
- Narex: A Czech manufacturer known for producing excellent bench chisels at mid-range prices. Widely recommended by instructors for beginners.
- Veritas (Lee Valley): Canadian brand offering well-engineered planes, marking gauges, and layout tools at mid-to-premium prices. Exceptional out-of-the-box performance.
- Lie-Nielsen: American premium manufacturer. Tools are expensive but are often described as lifetime purchases. Best for woodworkers who are serious about the craft long-term.
- WoodRiver (Woodcraft): A solid mid-range option for planes and chisels, particularly for those in the United States with access to Woodcraft stores.
- Two Cherries: A German brand respected for high-carbon steel chisels that hold an edge well.
Decision rule: Start with Narex chisels and a mid-range Stanley or WoodRiver plane. Once you know the craft is for you, invest in Veritas or Lie-Nielsen as upgrades.
Can You Do Woodworking with Just Hand Tools
Yes, absolutely. A skilled hand tool woodworker can build furniture, cabinetry, boxes, shelving, and decorative objects entirely without power tools. Hand tool woodworking is a complete discipline, not a limitation.
Traditional furniture makers worked exclusively with hand tools for centuries before power tools existed. Mortise and tenon joints, dovetails, dadoes, and rabbets, all the foundational joints of furniture making, can be cut cleanly and accurately with a saw, chisels, and a mallet.
The main trade-off is time. Dimensioning rough lumber by hand (flattening, thicknessing, and jointing) takes considerably longer than running boards through a planer and jointer. Many hand tool woodworkers buy pre-dimensioned lumber (S4S, surfaced on four sides) to sidestep this, which is a practical solution for beginners.
For project inspiration and skill-building steps, the step-by-step guide to woodworking projects for beginners offers a solid starting point.
Hand Tool Woodworking for Small Spaces and Apartments
Hand tools are genuinely well-suited to small spaces and apartments. They produce far less noise than power tools, require no dust collection systems, and can be stored compactly when not in use.
A workbench doesn’t have to be a permanent fixture. A portable Workmate-style bench or a sturdy table with a clamped vise is enough to get started. Many apartment woodworkers work on a folding table and store their tools in a single toolbox.
Practical setup tips for small spaces:
- Use a shooting board for accurate end-grain planing instead of a full-size bench stop
- Keep a hand-held dust pan nearby, hand tool shavings are easy to sweep up
- A wall-mounted tool cabinet keeps the floor clear and tools accessible
- Work near a window for natural light and ventilation when finishing
The noise profile of hand tools is worth emphasizing: a hand saw, chisel, and mallet produce roughly the same sound level as normal household activity. That’s a meaningful advantage in a shared building. For workspace planning ideas, the guide to best shed size for suburban lots is useful if a backyard workshop is ever in the plan.
How to Maintain and Sharpen Hand Tools for Woodworking
Sharpening is the single most important skill in hand tool woodworking. A sharp tool cuts cleanly, safely, and with far less effort than a dull one. Most beginners underestimate how frequently tools need sharpening, and how much it changes the experience.
Basic sharpening process for chisels and plane irons:
- Flatten the back of the blade on a 1000-grit stone until a consistent scratch pattern covers the full width.
- Hone the bevel at the correct angle (25 degrees for chisels, 25 to 30 degrees for plane irons) on a 1000-grit stone.
- Move to a 6000-grit or finer stone to refine the edge.
- Strop on leather with honing compound to polish the edge to a mirror finish.
Maintenance habits that matter:
- Wipe metal surfaces with a lightly oiled cloth after each session to prevent rust
- Store chisels in a roll or rack so edges don’t contact each other
- Check plane irons for sharpness before every session, a quick strop often restores the edge
- Keep wooden handles lightly oiled with linseed oil to prevent cracking
Sharpening systems range from basic combination waterstones (a good starting point) to diamond plates and guided honing jigs. A guided honing jig like the Veritas Mk.II is helpful for beginners who are still developing a consistent freehand angle.
How Long Does It Take to Learn Hand Tool Woodworking
Most beginners can complete their first simple project (a small box, a shelf, or a stool) within 4 to 8 weeks of regular practice. Developing genuine proficiency, meaning accurate joinery and consistent results, typically takes 6 to 18 months of consistent work.
The learning curve is real, but it’s not steep in a discouraging way. Each skill builds on the last: marking leads to sawing, sawing leads to paring, paring leads to fitting joints. Progress is visible and satisfying at every stage.
Factors that speed up learning:
- Practicing on inexpensive softwood (pine, poplar) before moving to hardwoods
- Following structured plans rather than improvising early on
- Watching experienced woodworkers demonstrate technique (video courses are particularly effective)
- Joining a local woodworking club or makerspace for in-person feedback
For structured learning resources, the woodworking online training: the complete beginner’s guide covers the best courses and platforms available in 2026.
Hand Tool Woodworking Mistakes Beginners Make
The most common beginner mistakes in hand tool woodworking are working with dull tools, skipping layout and marking steps, and choosing wood that’s too difficult for early projects.
Here are the mistakes that show up most often:
- Skipping sharpening: Dull tools require more force, cause tearout, and make accurate cuts nearly impossible. Sharpen before every session.
- Not marking out carefully: Rushing past the layout stage leads to joints that don’t fit. Use a marking knife, not a pencil, for joinery lines.
- Choosing difficult wood too soon: Figured maple or hard oak is beautiful but unforgiving. Start with pine, poplar, or soft maple.
- Gripping tools too tightly: A relaxed grip gives better control and reduces fatigue. Chisels and saws work better with a firm but not white-knuckled hold.
- Ignoring grain direction: Planing against the grain causes tearout. Always read the grain and work with it.
- Buying tools without learning to use them: A workbench full of tools doesn’t replace focused practice with a few.
For a broader look at building skills from the ground up, the beginner woodworking guide: tools, projects, and tips to start today is worth bookmarking.
What Projects Can You Make with Just Hand Tools
With a basic starter kit, beginners can build a wide range of functional and decorative projects. Hand tools are capable of producing everything from simple boxes to complex furniture.
Beginner-friendly projects (first 3 months):
- Small wooden box with a fitted lid
- Wall shelf with simple dadoed joints
- Wooden mallet (a classic first project, you make the tool you’ll use)
- Cutting board (primarily sawing and planing)
- Picture frame with mitered corners
Intermediate projects (3 to 12 months):
- Step stool or small bench
- Bookcase with dadoed shelves
- Small cabinet with a door
- Mortise and tenon side table
Advanced hand tool projects:
- Dovetailed drawer boxes
- Windsor chair
- Blanket chest with hand-cut joinery
- Full dining table
The key is matching the project to your current skill level. A project that’s slightly challenging but achievable builds skills faster than one that’s either too easy or too frustrating. For plans that match skill levels, the how to read and use woodworking plans: beginner’s complete guide explains how to interpret and follow project plans effectively.
Where to Buy Affordable Hand Tool Woodworking Kits
Affordable hand tool kits are available from specialty woodworking retailers, general hardware stores, and online marketplaces. The best sources depend on whether you’re buying new or used.
New tools:
- Woodcraft and Rockler (US): Both carry a curated range of beginner-friendly tools and often bundle starter kits.
- Lee Valley / Veritas (US and Canada): Premium quality with excellent customer service and detailed product information.
- Amazon: Convenient for budget and mid-range tools, but quality varies, read reviews carefully and stick to known brands.
Used tools:
- eBay: Large selection of vintage Stanley planes and older chisels. Learn what to look for before buying.
- Estate sales and antique markets: Often the best prices on quality vintage tools.
- Facebook Marketplace and Craigslist: Local sellers sometimes offer entire tool collections at low prices.
What to avoid: Generic unbranded “starter kits” that bundle 20 or more tools for under $50. These are almost always made from low-grade steel, arrive dull, and can’t be sharpened to a usable edge. They’re false economy.
FAQ
Do I need a workbench to start hand tool woodworking?
A proper workbench helps significantly, but it’s not required on day one. A sturdy table with a clamped portable vise works for most beginner projects. Many woodworkers build their first workbench as an early project.
Is hand tool woodworking cheaper than power tool woodworking overall?
Yes, the startup cost is considerably lower. A functional hand tool kit runs $150 to $400, compared to $1,000 or more for a basic power tool setup including a table saw, router, and drill press.
What’s the difference between hand tool woodworking and traditional carpentry?
Hand tool woodworking typically refers to furniture making, joinery, and decorative woodwork using non-powered tools. Traditional carpentry covers structural building work, framing, flooring, roofing, which often uses power tools even in traditional practice. The overlap is in the hand tools used, but the applications and skill sets differ.
Can kids learn hand tool woodworking?
Yes, with supervision and age-appropriate tools. Children as young as 8 or 9 can safely use a coping saw, mallet, and bench chisels under adult guidance. Many woodworking educators recommend starting children with hand tools specifically because the slower pace builds patience and precision.
How often do I need to sharpen my tools?
More often than most beginners expect. A chisel or plane iron used for 30 to 60 minutes of active work will benefit from a quick strop or touch-up on a fine stone. Full resharpening from a 1000-grit stone is needed less frequently, perhaps every few sessions of heavy use.
Is hand tool woodworking harder than using power tools?
It’s different, not necessarily harder. Power tools remove material faster but demand respect for safety and setup. Hand tools require more physical technique and sharpening discipline. Many woodworkers find hand tools more intuitive once basic sharpening and cutting skills are established.
What wood should a beginner start with?
Pine and poplar are the most forgiving and widely available. Both are soft enough to cut and plane easily, inexpensive, and available at most lumber yards and home improvement stores. Avoid hardwoods like oak or maple until basic technique is solid.
Can I learn hand tool woodworking from online videos?
Yes, and there are excellent resources available. Video instruction is particularly effective for seeing technique in motion, sharpening angles, saw strokes, and chisel paring are all easier to understand visually than from written descriptions alone.
Do hand tools require any electricity or special setup?
No. Hand tools require no power source, no dust collection, and minimal setup. This makes them ideal for renters, apartment dwellers, and anyone without a dedicated workshop.
What’s the single most important hand tool to buy first?
A sharp set of bench chisels and a combination square. These two items cover layout, marking, paring, and checking, the core tasks of almost every woodworking project.
Conclusion
Hand tool woodworking is one of the most accessible and rewarding ways to start working with wood. The startup cost is manageable, the tools are portable, and the skills transfer directly to a deep understanding of the craft. This hand tool woodworking complete starter kit guide and cost breakdown gives beginners a clear, honest path: buy a focused set of quality tools, learn to sharpen them properly, start with forgiving wood and simple projects, and build from there.
The craft rewards patience and practice more than it rewards expensive equipment. A $200 kit in skilled hands will always outperform a $2,000 kit in unpracticed ones.
Actionable next steps:
- Choose your budget tier and assemble the core 8-tool kit outlined above.
- Buy a combination waterstone (1000/6000 grit) and practice sharpening before your first project.
- Start with pine and a simple box project to learn sawing, paring, and fitting.
- Follow structured plans, improvising comes later, once the fundamentals are solid.
- Invest in a course or structured resource to accelerate the learning curve.
Products, Tools, and Resources
Recommended starter tools (2026):
- Narex bench chisel set (4-piece): Consistently recommended by instructors for beginners. Good steel, comfortable handles, reasonable price.
- WoodRiver No. 4 bench plane (Woodcraft): A well-tuned mid-range plane that performs well out of the box.
- Veritas combination square: Precise, durable, and a tool you’ll use on every project for years.
- King KW-65 combination waterstone (1000/6000 grit): A practical, affordable sharpening stone for beginners.
- Veritas Mk.II honing guide: Takes the guesswork out of sharpening angles while technique develops.
Learning resources:
- Woodworking online training: the complete beginner’s guide covers the best structured courses for 2026.
- Woodworking joinery and techniques: build skills that last is an excellent next step once the basic kit is assembled.
These resources and tools aren’t the only path, but they represent a well-tested starting point that has worked for countless beginners. Start simple, stay consistent, and the results will follow.