
Step-by-Step Guide to Woodworking Projects for Beginners
Hey there! Some links on this page may be affiliate links, which means that if you choose to make a purchase, I may earn a commission at no extra cost to you. I greatly appreciate your support!
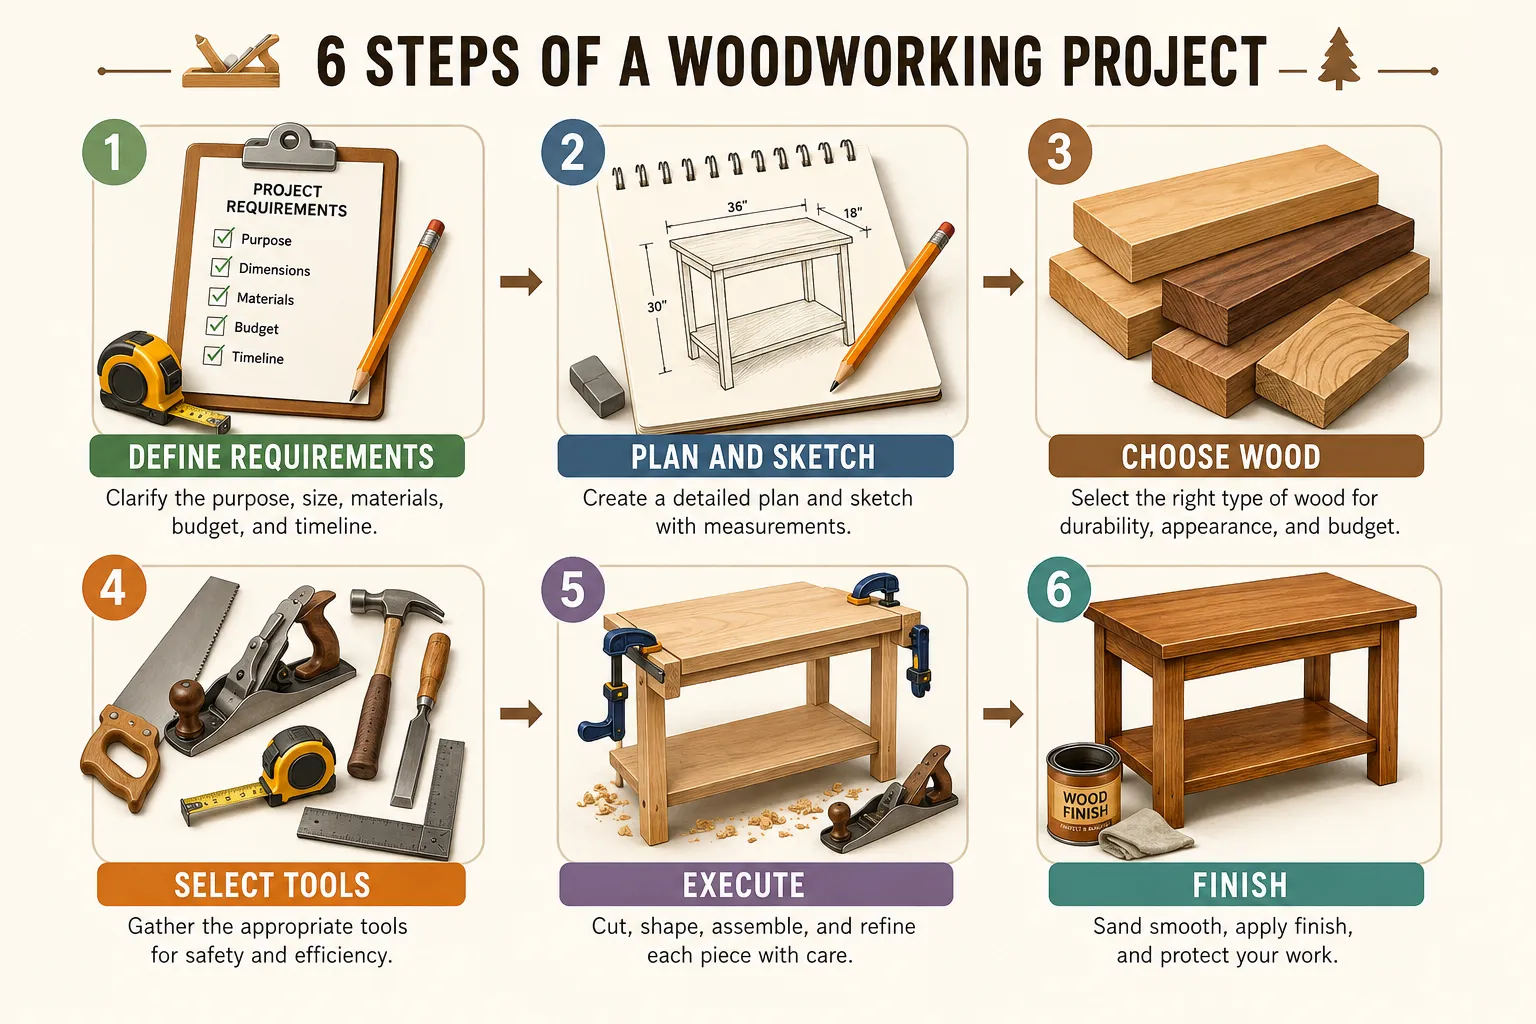
Woodworking projects are structured builds that take a piece of raw timber from concept to finished product. For beginners, the process involves defining what you want to build, sketching a plan with measurements, choosing the right wood and tools, executing the build carefully, and applying a finish. Starting small, staying organized, and using proper plans dramatically reduces mistakes and wasted materials.
Key Takeaways
- Define your project’s purpose and dimensions before buying a single board
- A hand-drawn sketch with measurements is one of the most underrated planning tools available

- Pine, poplar, and plywood are the most forgiving (and affordable) wood choices for beginners
- You don’t need a full workshop or expensive power tools to complete most beginner projects
- Blunt tools cause more damage than sharp ones, so tool maintenance matters from day one
- Finishing (staining, sealing, painting) changes the entire look of a piece, so plan it early
- Most beginner projects cost between $20 and $150 in materials, depending on size and wood species
- Common beginner mistakes include skipping the plan, choosing the wrong wood, and rushing the finish
- You can learn woodworking skills through structured online courses, YouTube, and community classes
- Woodworking projects make excellent gifts and can generate real income with the right approach
What Are Easy Woodworking Projects for Beginners?
Easy woodworking projects for beginners are builds that use basic cuts, minimal joinery, and common materials available at any hardware store. They’re designed to teach core skills without overwhelming someone who is just starting out.
Some of the best beginner woodworking projects include:
- A simple wooden shelf requires only straight cuts and a few screws. Great for learning how to measure and level.
- A small step stool: Introduces basic angles and load-bearing construction.
- A wooden planter box teaches you how to work with cedar or pine and practice simple butt joints.
- A picture frame: Excellent for learning miter cuts and wood glue techniques.
- A bedside table or nightstand: A slightly more advanced beginner project that introduces dados or pocket screws.
- A storage crate or box: One of the fastest builds, using plywood and basic assembly.
The best starting point depends on your space, tools, and why you want to build. If you want to make something functional for your home, a shelf or storage box gives you a fast win. If you want to develop technique, a picture frame forces precision. You can explore a wider range of popular woodworking projects to find the right fit for your skill level.
How Much Does It Cost to Start Woodworking?
Starting woodworking costs roughly $100 to $500 for a basic beginner setup, depending on whether you already own any tools. The wood itself for a single beginner project typically runs between $20 and $80.
Here’s a realistic cost breakdown for a beginner:
- Basic hand tools (saw, hammer, chisels, tape measure, square): $50 to $150 as a starter set
- A beginner power tool (like a circular saw or jigsaw): $40 to $100 for a reliable entry-level model
- Wood for a first project (pine or plywood): $15 to $60 depending on size
- Sandpaper, wood glue, screws, and finish: $20 to $40
You don’t need to buy everything at once. Many experienced woodworkers recommend starting with just a handful of hand tools and one power saw, then adding to your kit as projects demand it. Buying cheap tools that break or bind is a false economy. Mid-range brands like Ryobi, WEN, or Stanley offer solid performance without the professional price tag.
If budget is a concern, check Facebook Marketplace or estate sales for used tools. A secondhand table saw in good condition can cost a fraction of its retail price.
What Tools Do I Actually Need for Woodworking?
For most beginner woodworking projects, you need fewer tools than you think. A tape measure, a square, a hand saw or jigsaw, a drill or driver, sandpaper, and clamps will get you through the majority of starter builds.
Here’s a practical starter list:
Essential hand tools:
- Tape measure (25 ft)
- Combination square
- Hand saw or pull saw
- Hammer and nail set
- Chisels (a basic 3-piece set)
- Clamps (at least 4, in various sizes)
Recommended power tools for beginners:
- Cordless drill or driver
- Jigsaw or circular saw
- Random orbital sander
Nice to have later:
- Miter saw (for accurate angle cuts)
- Router (for edge profiles and dados)
- Table saw (for ripping boards)
Avoid buying specialty tools before you need them. One of the most common beginner mistakes is spending $300 on tools for a $40 project. Build the project first, then identify which tools would have made it easier. For a deeper look at what’s worth owning, the guide on various tools used for woodworking is a solid reference. You can also explore woodworking jigs once you’re ready to improve accuracy and repeatability.
Best Wood Types for Different Projects
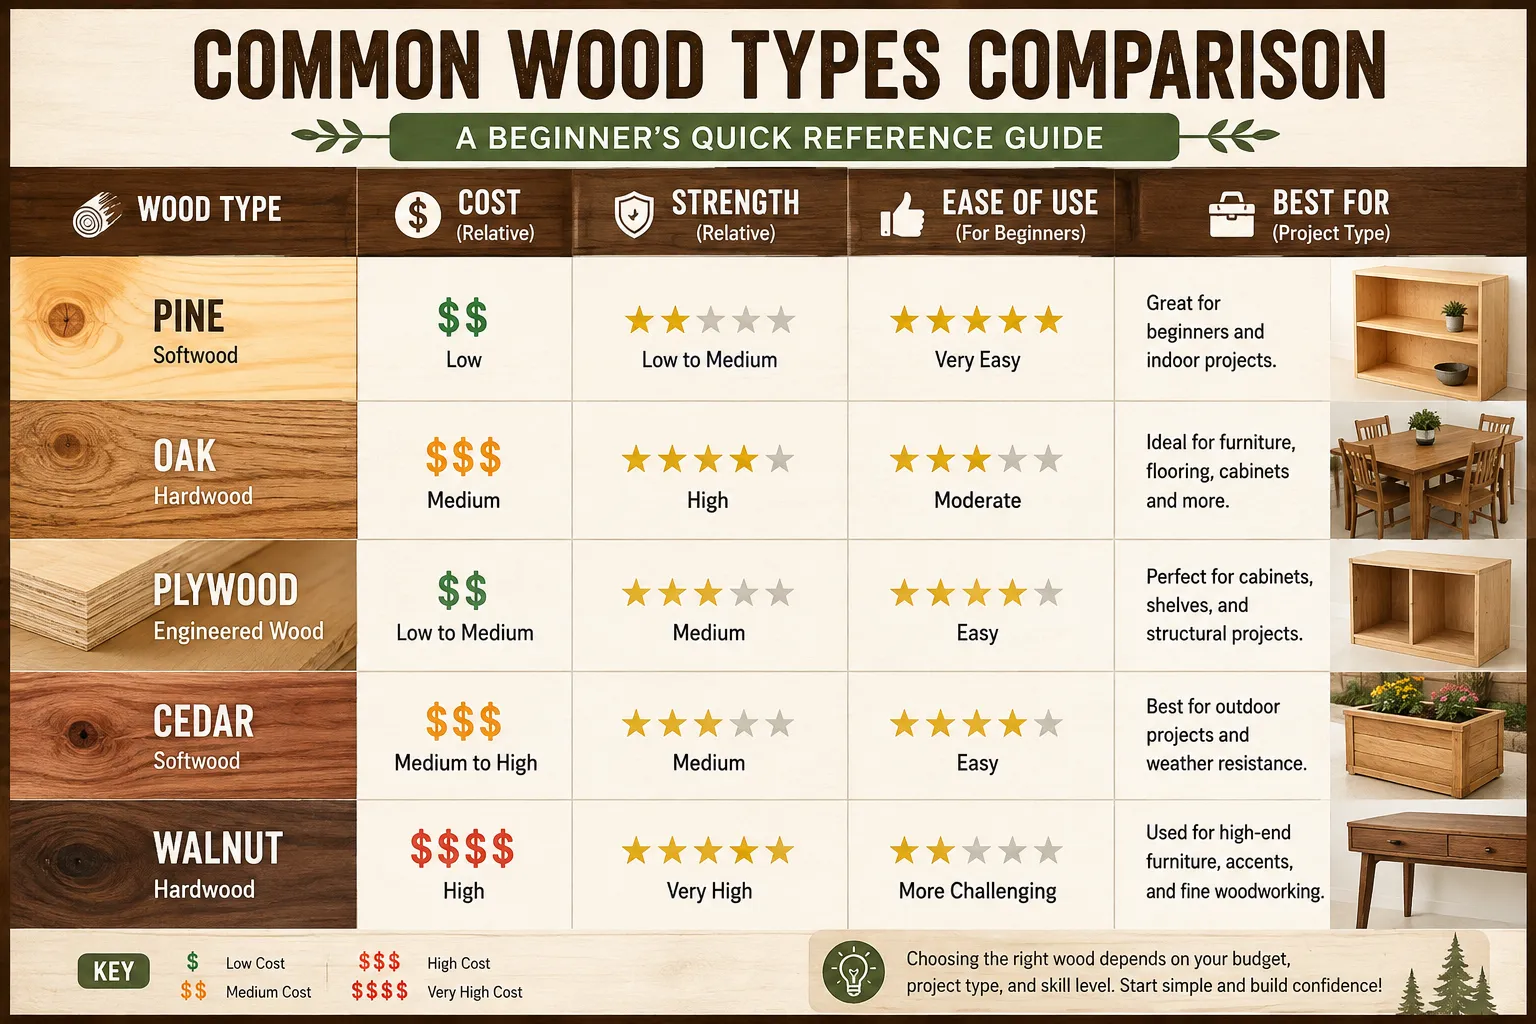
The best wood for a beginner woodworking project is pine, poplar, or plywood. These species are affordable, widely available, and easy to cut, sand, and finish. Hardwoods like oak or walnut are beautiful but less forgiving and more expensive.
Here’s a practical guide to common wood choices:
| Wood Type | Cost | Workability | Best For |
|---|---|---|---|
| Pine | Low | Easy | Shelves, frames, crates |
| Poplar | Low-Med | Easy | Painted furniture, boxes |
| Plywood | Low | Easy | Cabinets, flat panels |
| Cedar | Med | Easy | Outdoor planters, decking |
| Oak | Med-High | Moderate | Tables, chairs, floors |
| Walnut | High | Moderate | Decorative pieces, gifts |
| Maple | High | Moderate | Cutting boards, countertops |
Choose pine or poplar if you’re painting the final piece. Choose oak or walnut if you want a natural wood grain to show through a clear finish. Avoid exotic or reclaimed woods as a beginner because they often have unpredictable grain patterns and moisture content.
Woodworking Projects vs. Carpentry: What’s the Difference?
Woodworking projects typically refer to smaller, crafted builds like furniture, boxes, shelves, and decorative items, where the focus is on precision, finish quality, and design. Carpentry usually refers to structural or construction work, like framing walls, installing floors, or fitting doors and windows.
The skills overlap, but the mindset differs. Woodworking tends to be more detail-oriented and craft-focused. Carpentry is often about speed, structural integrity, and working within building codes. A beginner hobbyist is almost always doing woodworking, not carpentry, even if both involve cutting and joining wood.
Woodworking Projects for Small Spaces and Apartments
You can absolutely do woodworking in a small space or apartment. The key is choosing projects that use compact tools, generate manageable dust, and don’t require a permanent workshop setup.
Practical approaches for small-space woodworking:
- Work outdoors or on a balcony for cutting and sanding, then bring pieces inside for assembly
- Use a folding workbench (like a Black and Decker Workmate) instead of a fixed bench
- Stick to hand tools for quieter, lower-dust work inside
- Focus on small projects: cutting boards, small shelves, wall-mounted organizers, and decorative boxes
- Use a shop vac connected to your sander to control dust at the source
The biggest limitation in an apartment is noise and dust, not space. A jigsaw and orbital sander with dust collection is a surprisingly capable setup that won’t disturb neighbors the way a table saw would.
Can You Do Woodworking Without a Workshop?
Yes. Most beginner woodworking projects don’t require a dedicated workshop. A garage, a backyard, a covered patio, or even a kitchen table can work for smaller builds.
What you actually need is a stable work surface, decent lighting, and a place to store your tools and materials safely. A portable workbench solves most of the stability problem. Natural light or a good LED work light handles visibility. A single large plastic tote or a rolling tool cart handles storage.
Community makerspaces and woodworking clubs are also worth considering. Many cities have shared workshop spaces where you can pay a monthly membership fee and access full shop equipment, including table saws, planers, and jointers, without owning any of it yourself.
Woodworking Projects That Don’t Require Power Tools
Hand-tool woodworking is a legitimate and rewarding approach, not a compromise. Projects like small boxes, frames, carved spoons, and hand-cut joints can all be completed with nothing more than a hand saw, chisels, a mallet, and a hand plane.
Good beginner projects for hand-tool woodworking include:
- Wooden spoons or spatulas (carving)
- Small jewelry or keepsake boxes
- Wooden picture frames (miter box and hand saw)
- Simple shelves with hand-cut dadoes
- Mortise and tenon practice joints
Hand tools are quieter, cheaper to start with, and teach you more about how wood actually behaves. Many experienced woodworkers return to hand tools after years with power equipment because of the control and satisfaction they offer.
How Long Does It Take to Complete a Woodworking Project?
A simple beginner project like a small shelf or wooden box typically takes 2 to 6 hours of active work, spread across one or two sessions. More complex builds like a coffee table or bookcase can take 10 to 30 hours, depending on skill level and how much time you spend on planning and finishing.
Finishing is often the most time-consuming phase because most finishes require multiple coats with drying time in between. A two-coat polyurethane finish, for example, might add 24 to 48 hours to a project timeline even if the application itself takes only 30 minutes per coat.
As a beginner, plan for projects to take longer than you expect. Measuring twice, fixing mistakes, and learning as you go all add time. That’s normal and actually valuable.
Common Mistakes Beginners Make in Woodworking
The most common beginner woodworking mistakes are skipping the planning phase, buying the wrong wood for the project, and rushing the finish. Each of these is easy to avoid once you know to watch for them.
Here are the mistakes that come up most often:
- No plan or sketch: Building without a drawing leads to dimension errors and wasted wood
- Skipping wood acclimation: New lumber needs 24 to 72 hours to adjust to your home’s humidity before you cut it
- Using dull tools: A dull saw blade or chisel tears wood instead of cutting it cleanly, and it’s also more dangerous
- Ignoring wood grain direction: Cutting or planing against the grain causes tearout
- Rushing the glue-up: Not clamping long enough or using too little glue leads to weak joints
- Skipping sanding grits: Jumping from 80-grit to 220-grit leaves visible scratches under the finish
- Applying finish to unsanded wood: Even one missed spot shows up clearly once stain or varnish goes on
Most of these mistakes come from impatience. Woodworking rewards people who slow down. Take time to review woodworking plans before starting any new build.
Best Woodworking Projects to Make Money
The best woodworking projects to sell are small, giftable items with high perceived value relative to material cost. Cutting boards, serving boards, wooden signs, small shelves, and custom furniture pieces consistently sell well at craft markets and on platforms like Etsy.
Items that tend to perform well:
- Cutting boards and charcuterie boards: Low material cost, high demand, easy to personalize
- Wooden signs and home decor: Especially personalized or seasonal pieces
- Small shelves and floating wall organizers: Popular with apartment dwellers
- Plant stands and pot holders: High demand, relatively simple construction
- Custom furniture: Higher price point but requires more skill and time
Pricing is where most beginners undercharge. Calculate your material cost, multiply by three to four for a starting price, then add your hourly rate on top. If a cutting board costs $12 in materials and takes two hours to make, it should sell for at least $50 to $70, not $20. If you’re thinking about turning woodworking into a business, the guide on running a woodworking business covers pricing and selling in more detail.
Woodworking Projects as Gifts: What Sells and What People Love
Handmade wooden gifts consistently rank among the most appreciated personal presents because they signal time, skill, and intention. The most popular wooden gifts include personalized cutting boards, engraved serving trays, small keepsake boxes, and custom name signs for nurseries or home entryways.
What makes a wooden gift land well:
- Personalization (names, dates, initials)
- Practical function (something they’ll actually use)
- Clean finish (a rough or unfinished piece reads as incomplete)
- Appropriate scale (something that fits their home and lifestyle)
If you’re making gifts to sell, focus on items that are easy to personalize and quick to produce in small batches. Laser engravers paired with simple wooden blanks have become a popular hybrid approach, though traditional hand-lettering and carving still carry more perceived craftsmanship.
How Do I Know If Woodworking Is Right for Me?
Woodworking is a good fit if you enjoy working with your hands, appreciate tangible results, and don’t mind a learning curve that takes months rather than days. It’s not the right hobby if you need immediate results or have no tolerance for measuring, adjusting, and occasionally starting over.
Ask yourself these questions:
- Do you enjoy problem-solving with physical materials?
- Are you comfortable with a project taking several sessions to complete?
- Do you have (or can you create) a basic workspace, even a small one?
- Are you willing to invest $100 to $300 upfront in tools and materials?
If you answered yes to most of those, woodworking will likely stick. The best way to find out is to complete one small project, a simple shelf or a small box, before investing heavily in tools or space. If you finish it and immediately want to start the next one, you have your answer.
Where Can I Learn Woodworking Skills Online?
Online woodworking education has improved significantly and now covers everything from beginner hand-tool technique to advanced furniture joinery. The best platforms combine video instruction with downloadable plans so you can follow along in real time.
Good places to start:
- YouTube channels like Paul Sellers, Stumpy Nubs, and The Wood Whisperer offer free, high-quality instruction
- Skillshare and Udemy have structured beginner courses with project-based learning
- Dedicated woodworking platforms offer more depth, especially for joinery and furniture building
- Local community colleges often run evening woodworking classes with access to shop equipment
For structured learning with plans included, woodworking online training is worth exploring. Pairing video instruction with actual woodworking patterns gives you both the technique and the blueprint to practice it immediately.
Frequently Asked Questions
What is the easiest woodworking project for an absolute beginner?
A simple wooden shelf or storage crate is the easiest starting point. Both require only straight cuts, basic assembly, and minimal tools, and they produce something immediately useful.
How much wood do I need for my first project?
For a small shelf or box, one or two 8-foot pine boards (typically sold as 1×6 or 1×8) is usually enough. Always buy about 10 to 15 percent more than your cut list requires to account for mistakes and waste.
Do I need to join a woodworking class before starting?
No. Many beginners teach themselves through YouTube videos and free online plans. A class helps accelerate learning and gives you access to better equipment, but it’s not a prerequisite.
Is woodworking dangerous for beginners?
Woodworking carries real risks, especially with power tools. The most important safety habits are keeping tools sharp (dull tools slip), using push sticks near saw blades, wearing eye and ear protection, and never rushing a cut.
What’s the difference between hardwood and softwood?
Hardwood comes from deciduous trees (oak, maple, walnut) and is generally denser and more durable. Softwood comes from conifers (pine, cedar, fir) and is easier to cut and cheaper. Softwoods are better for beginners; hardwoods are better for fine furniture.
Can I do woodworking with just hand tools?
Yes, completely. Hand-tool woodworking is a full discipline with a dedicated following. It’s quieter, cheaper to start, and teaches fundamental skills that make you a better woodworker overall.
How do I choose a wood finish?
Choose based on the project’s use. For cutting boards, use food-safe mineral oil or beeswax. For furniture, polyurethane or Danish oil works well. For painted pieces, a water-based primer and latex paint is the simplest approach.
What’s the best way to practice cuts before working on real wood?
Practice on scrap wood or cheap pine first. Many hardware stores sell short offcuts cheaply, and these are ideal for practicing saw technique, chisel work, and joint fitting before committing to your actual project material.
How do I prevent wood from splitting when I screw into it?
Always pre-drill a pilot hole slightly smaller than your screw’s shank diameter. This is especially important near the ends of boards, where splitting is most likely.
What does “wood grain direction” mean and why does it matter?
Wood grain refers to the direction the wood fibers run. Cutting or planing with the grain produces smooth results. Going against the grain causes tearout, where fibers lift and break instead of cutting cleanly.
Conclusion
Woodworking projects are one of the most satisfying hobbies you can pick up, because every finished piece is something real, something you made with your own hands. The process is straightforward once you break it down: define what you want, plan it properly, choose the right materials and tools, build carefully, and finish well. None of those steps are complicated on their own. The challenge is doing all of them with patience and attention.
Start small. Finish what you start. Learn from each build. The skills compound quickly, and within a few projects, you’ll notice your cuts getting cleaner, your joints fitting tighter, and your confidence growing. That progression is what keeps most woodworkers hooked for life.
Products, Tools, and Resources
These are practical recommendations based on what actually helps beginners get started without overspending:
Starter tools worth buying:
- Stanley FatMax tape measure (25 ft): Reliable, wide blade that doesn’t flop on long measurements
- Irwin Quick-Grip clamps (4-pack): One of the most useful beginner purchases you can make
- Ryobi 18V cordless drill: Solid entry-level performance, widely available, and battery packs are interchangeable across the Ryobi line
- WEN random orbital sander: Affordable, effective, and compatible with standard dust bags
Materials to keep on hand:
- A selection of sandpaper grits (80, 120, 180, 220)
- Titebond II wood glue (the standard for most woodworking joints)
- Minwax Wipe-On Poly (one of the easiest beginner finishes to apply evenly)
- A box of 1-1/4″ and 2″ wood screws in coarse thread
Learning resources:
- Paul Sellers on YouTube for hand-tool fundamentals
- The Wood Whisperer for furniture-focused technique
- Woodworking plans and project guides for structured builds with cut lists
- Equipment used in woodworking for a broader look at what tools do what
None of these are the only options, but they’re all genuinely useful starting points. Buy what your next project actually requires, and build your toolkit one project at a time.