
Best Woodworking Workshop Shed Plans: Layout and Ventilation Tips

A poorly planned workshop doesn’t just slow you down; it can become genuinely dangerous. Sawdust accumulating near a heat source, a table saw with no outfeed clearance, or a shed with zero airflow: these are the mistakes that turn a hobby space into a hazard. Getting your woodworking workshop shed plans right from the start saves money, frustration, and potentially your health.
Key Takeaways
- A 12×16 ft shed is the practical minimum for a functional woodworking shop; 16×20 ft or larger is ideal for stationary power tools.
- The table saw should anchor the layout, positioned at the center with at least 4 feet of clearance on all four sides.

- Ventilation and dust collection are not the same thing; a good workshop needs both working together.
- An exhaust fan paired with a passive intake vent handles heat and fumes; a dust collector handles fine wood particles at the source.
- Free shed plans work for basic builds, but paid plans typically include electrical layouts, material lists, and workshop-specific details.
- Building a basic workshop shed costs roughly $3,000 to $15,000+ depending on size, materials, and whether you hire help.
- Climate control matters more than most beginners expect; temperature and humidity directly affect both your tools and your wood.
- Always position the dust collector close to the table saw and planer, since those two tools generate the most debris.
Find this useful? Add us as a preferred source on Google and more of what we publish will show up in your results.
What Size Workshop Shed Do You Actually Need for Woodworking
For most hobbyist woodworkers, a 12×16 ft shed (192 sq ft) is the realistic minimum. Anything smaller makes it difficult to safely operate a table saw, move sheet goods around, or keep a dedicated workbench. A 16×20 ft or 16×24 ft footprint gives you room to grow without feeling cramped from day one.
The right size depends on three things: the tools you plan to use, how you work, and your available yard space.
General size guidelines by use case:
- Occasional hand tool work: 10×12 ft can work, but it’s tight.
- Hobbyist with a few power tools: 12×16 ft is the starting point.
- Full stationary tool setup (table saw, bandsaw, planer, jointer): 16×20 ft minimum.
- Semi-professional or growing shop: 20×24 ft or larger.
One thing beginners consistently underestimate is the space that lumber storage, an assembly area, and tool outfeed require. A table saw alone needs 8 feet of clearance in front and behind to safely rip an 8-foot board. Plan for that before you pour the slab.
For a detailed look at matching shed dimensions to your lot, the best shed size for suburban lots guide breaks down the numbers clearly.
How to Layout a Small Woodworking Shop for Maximum Efficiency
The most efficient small shop layouts follow one rule: anchor the layout around your largest, least-movable tool, then build outward. For most woodworkers, that anchor is the table saw.
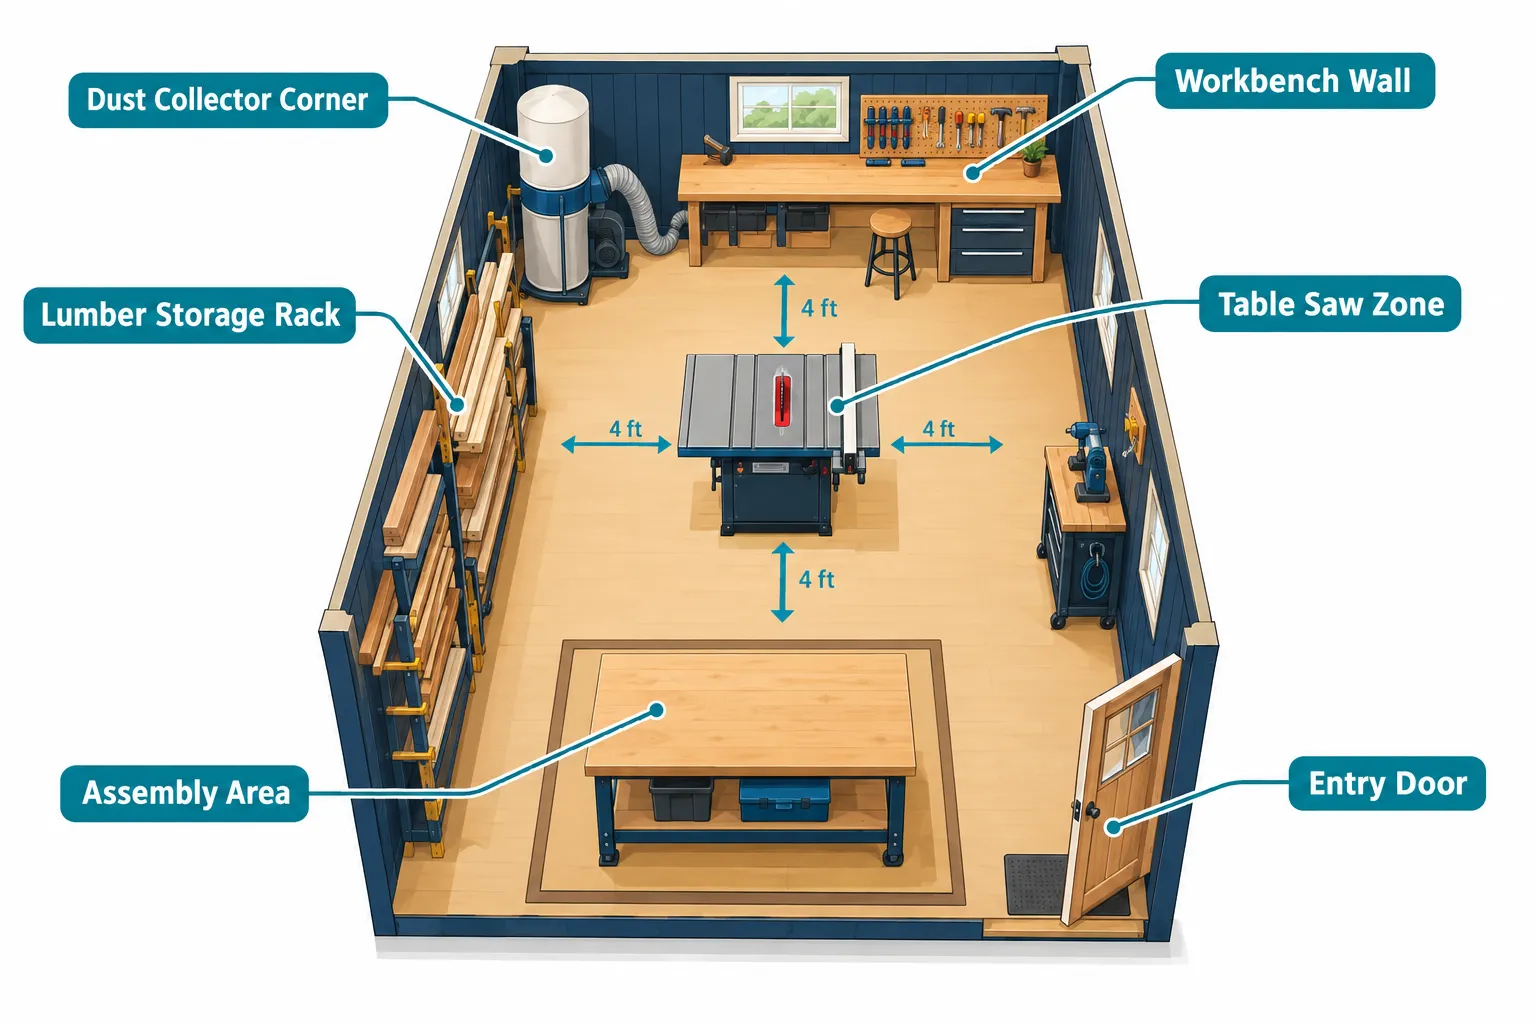
A practical layout sequence for a 12×16 or 16×20 shed:
- Place the table saw first, center it in the room or slightly off-center, with the blade parallel to the longest wall. Confirm 4 feet of clearance on all sides.
- Workbench along the back or side wall, keeps it out of the main traffic path while staying accessible.
- Lumber storage rack, near the entry door so you’re not dragging 8-foot boards through the whole shop.
- Assembly area, in front of the workbench or near the center, wherever floor space allows.
- Dust collector, within 6 feet of the table saw and planer, since those are the primary hose connections.
- Wall-mounted tools and storage, pegboards, French cleats, and shelving go on every available wall to keep the floor clear.
Common layout mistakes to avoid:
- Putting the workbench directly under the only window (blocks natural light from the work surface).
- Placing the table saw against a wall (eliminates outfeed space).
- Forgetting to account for door swing when positioning large tools.
For more structured guidance on reading and using shop plans, the beginner’s complete guide to woodworking plans is a useful companion resource.
Best Ventilation System for a Woodworking Workshop Shed
The best ventilation setup for a woodworking shed combines a powered exhaust fan with a passive intake vent on the opposite wall. This creates cross-ventilation that removes heat, solvent fumes, and residual airborne dust that a dust collector misses.
For a shed under 300 sq ft, a single 12-inch wall-mounted exhaust fan rated at 1,000-1,500 CFM (cubic feet per minute) handles most conditions. Pair it with a louvered intake vent on the opposite wall, positioned low to draw fresh air across the floor where dust tends to settle.
Ventilation components worth knowing:
| Component | Purpose | Placement |
|---|---|---|
| Exhaust fan | Removes hot air and fumes | High on the wall, opposite intake |
| Passive intake vent | Supplies fresh air | Low on the wall, opposite exhaust |
| Ceiling-hung air filtration unit | Captures fine airborne particles | Center of ceiling |
| Operable windows | Supplemental airflow | Side walls |
In warmer climates or during summer, a small window AC unit or mini-split system dramatically improves comfort and keeps humidity in check. Humidity above 60% can warp lumber and rust tool surfaces, a real concern if you’re storing wood in the same space. The workshop shed insulation guide covers how insulation and vapor barriers work alongside ventilation to manage moisture.
Dust Collection vs. Ventilation: Do You Need Both
Yes, dust collection and ventilation solve different problems, and a woodworking shed needs both. Dust collection captures particles at the source (directly from the tool), while ventilation handles ambient air quality, heat, and fumes throughout the space.
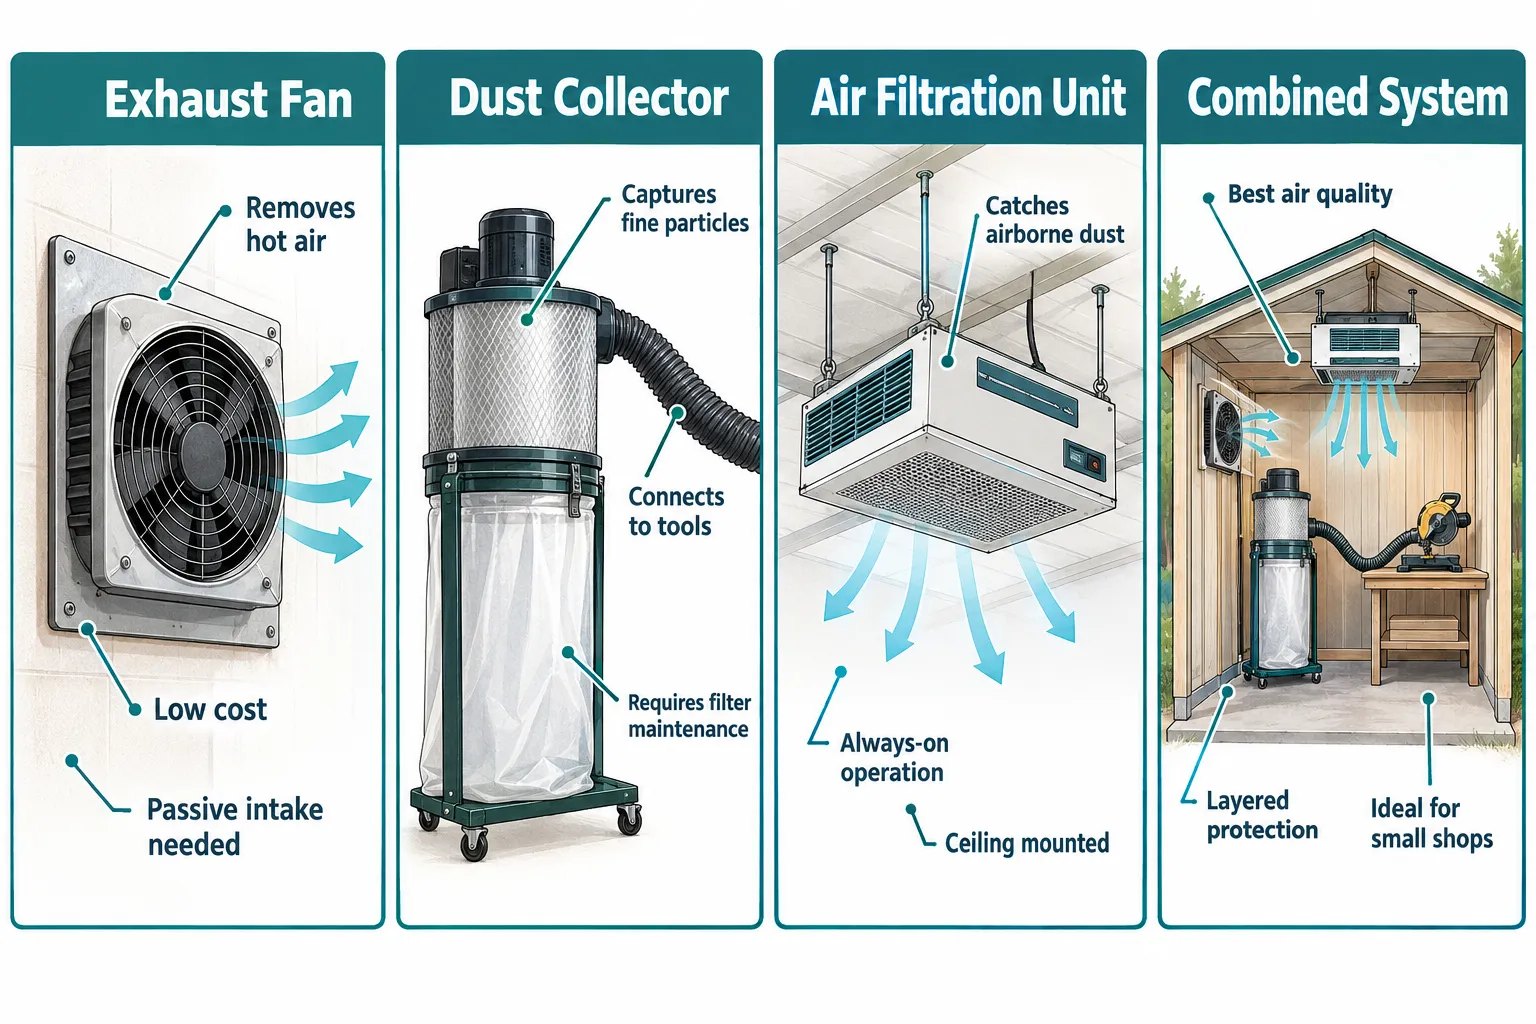
The key distinction:
- A dust collector connects directly to your table saw, planer, or router table via a hose. It captures the bulk of chips and coarse dust before they ever reach the air.
- An exhaust fan moves air volume through the shed, reducing heat buildup and diluting any fumes from finishes or adhesives.
- An ambient air filtration unit (ceiling-hung) catches the fine particles that escape the dust collector and float in the air for hours.
Running a table saw without any dust collection is not just messy, fine wood dust is a respiratory hazard with cumulative health effects. A single-stage dust collector is affordable and sufficient for most hobby shops. Add a ceiling-hung filter unit if you do a lot of sanding or routing.
Where to Put the Table Saw and Dust Collector in a Workshop Layout
The table saw belongs at the center of the shop floor, with its infeed side facing the entry door and its outfeed side pointing toward open space or the back wall. The dust collector should sit within 6 feet of the table saw, positioned to the side (not behind) so it doesn’t block outfeed movement.
Placement logic for key tools:
- Table saw: Center of the room, blade parallel to the longest wall, 4-foot clearance all around.
- Dust collector: Adjacent to the table saw, close enough for a short 4-inch hose connection.
- Planer and jointer: Along one wall, with the dust collector hose able to reach both.
- Bandsaw: Near a wall, but not in a corner, you need room to rotate long stock.
- Workbench: Against the back or side wall, under a window if possible for natural light.
The goal is a workflow triangle: rough lumber comes in the door, gets processed at the table saw and planer, then moves to the workbench for detail work and assembly. If you have to carry stock across the shop multiple times, the layout is working against you.
For a broader look at the tools that belong in a beginner’s setup, the beginner woodworking tools and equipment guide covers what’s essential and what can wait.
Free vs. Paid Woodworking Shed Plans: Which Is Better
Free shed plans are a reasonable starting point for a basic storage shed, but they rarely include the workshop-specific details that matter most: electrical outlet placement, ventilation cutout locations, workbench height specs, or material lists optimized for workshop use. Paid plans typically include all of that.
Choose free plans if:
- You’re building a simple shell and planning the interior yourself.
- You have construction experience and can adapt a basic plan.
- Budget is the primary constraint.
Choose paid plans if:
- You want a complete blueprint with dimensions, materials, and electrical layout.
- You’re new to building and need step-by-step guidance.
- You want a design specifically engineered for workshop use.
The free vs. paid shed plans comparison on Woodworking Guru walks through the real trade-offs in detail. For a beginner-friendly starting point, the best shed plans for beginners page is worth reviewing before committing to a design.
How Much Does It Cost to Build a Woodworking Workshop Shed
Building a basic woodworking workshop shed typically costs between $3,000 and $15,000, depending on size, materials, foundation type, and whether you hire labor or build it yourself. A 12×16 ft DIY build using standard lumber framing sits toward the lower end; a 16×24 ft insulated, wired, and ventilated shed built by a contractor sits toward the higher end.
Rough cost breakdown (DIY, mid-range materials):
- Foundation (gravel pad or concrete): $500,$2,000
- Framing lumber and sheathing: $1,500,$4,000
- Roofing: $400,$1,200
- Doors and windows: $500,$1,500
- Insulation and vapor barrier: $300,$800
- Electrical wiring and panel: $500,$2,000 (more if hiring an electrician)
- Ventilation (exhaust fan, vents): $150,$500
These are estimates based on typical material costs in 2026 and will vary by region. The DIY shed building cost comparison and the cost to build a small shed guide both provide more granular breakdowns.
Can You Use a Regular Shed for Woodworking
A standard storage shed can be converted into a woodworking shop, but it will need modifications. Most off-the-shelf sheds lack adequate electrical service, insulation, ventilation, and floor load capacity for stationary power tools.
What a standard shed typically needs before it’s workshop-ready:
- Electrical upgrade: A dedicated 20-amp or 30-amp circuit for power tools. A table saw alone draws 15 amps at startup. See the guide on how to wire a workshop shed for power tools for safe wiring practices.
- Ventilation cutouts: Install at least one exhaust fan and one intake vent.
- Insulation: Bare wood walls and a metal roof create extreme temperature swings. Insulation stabilizes the environment for both you and your lumber.
- Reinforced floor: Sheet goods and cast-iron machinery are heavy. A concrete slab or reinforced wood floor is safer than a standard shed floor.
A prefab shed kit can work as a starting shell, the prefab shed kits vs. building from scratch comparison helps you decide which approach makes more sense for your situation.
Do You Need Climate Control in a Woodworking Shop
Climate control is not strictly required, but it makes a significant difference in both comfort and wood quality. Temperature extremes affect how wood moves and how finishes cure. Humidity above 60% causes lumber to swell and warp; below 30%, it can crack.
Minimum climate management for a woodworking shed:
- Ventilation handles heat and fumes (covered above).
- Insulation buffers against temperature swings and reduces condensation.
- A dehumidifier is often more practical than full HVAC in mild climates.
- A mini-split system is the best all-in-one solution for shops in regions with hot summers or cold winters, it heats, cools, and dehumidifies.
If you’re in a climate with mild year-round temperatures, good insulation plus a ventilation fan may be all you need. If you’re in a region with 90°F summers or freezing winters, a mini-split pays for itself in comfort and wood quality within the first season.
What Tools Do You Actually Need in a Basic Woodworking Workshop Shed
A functional beginner workshop doesn’t require every tool in a catalog. Start with the tools that cover the most common tasks, then add as specific projects demand it.
Essential tools for a basic woodworking shed:
- Table saw, the most versatile stationary tool for ripping and crosscutting.
- Miter saw, fast, accurate crosscuts and angle cuts.
- Random orbital sander, surface finishing on nearly every project.
- Drill/driver, assembly, hardware, and pilot holes.
- Workbench with vise, the foundation of hand tool work.
- Router and router table, edge profiles, joinery, and decorative work.
- Hand planes, smoothing and fitting, especially for furniture work.
- Measuring and marking tools, tape measure, combination square, marking gauge.
For a deeper look at machinery options, the essential woodworking machinery guide covers stationary tools in detail. If you’re just getting started, the beginner woodworking guide is a practical first stop before investing in equipment.
Common Mistakes People Make When Designing a Workshop Layout
The most common layout mistake is designing around the shed dimensions rather than around the workflow. The shed is a container; the workflow is what determines where everything goes.
Other mistakes that show up repeatedly:
- Underestimating outfeed space. A table saw needs clearance in all four directions, not just the front.
- No dedicated finishing area. Applying stain or lacquer next to a running table saw is a fire and contamination risk.
- Poor lighting placement. A single overhead bulb creates shadows exactly where you need to see clearly. Plan for task lighting at the workbench and table saw.
- Ignoring the door swing. A standard outward-swinging door can block tool access or force awkward traffic patterns.
- Too little wall storage. Every tool on the floor is a trip hazard and a space waster. French cleats and pegboards are inexpensive and highly adaptable.
- No electrical planning before building. Retrofitting outlets after the walls are closed is expensive. Plan outlet placement, especially 240V circuits for larger tools, before framing.
Woodworking Workshop Shed Plans for Beginners: A Step-by-Step Starting Point
Starting with a clear plan prevents the most expensive mistakes. Here’s a practical sequence for beginners working through their first woodworking workshop shed plans.
Step 1: Define your tool list. Write down every tool you own and every tool you plan to add within two years. This determines the minimum floor area you need.
Step 2: Check local building codes. Most municipalities require a permit for structures over a certain square footage (commonly 120-200 sq ft). Setback requirements from property lines also apply.
Step 3: Choose your foundation. A concrete slab is the most durable option for a permanent workshop. A gravel pad with pressure-treated skids works for a semi-permanent structure.
Step 4: Select a plan. Use the tool list and floor area to choose a shed size, then find a plan that matches. Paid plans with workshop-specific layouts save time at this stage.
Step 5: Plan electrical and ventilation before framing. Mark outlet locations, circuit requirements, exhaust fan placement, and intake vent positions on the plan before a single board goes up.
Step 6: Insulate before finishing walls. Once the framing is done, insulation goes in before drywall or plywood wall sheathing. It’s much harder to add later.
Step 7: Set up the layout before moving tools in. Use painter’s tape on the floor to mark tool footprints and clearance zones. Walk through the workflow before committing to positions.
FAQ
How much space do I need around a table saw in a workshop shed?
Allow at least 4 feet on all four sides of the table saw. This gives you room to safely handle an 8-foot sheet of plywood in any direction without hitting a wall or another tool.
Can I use a regular exhaust fan from a hardware store for workshop ventilation?
Yes, a standard wall-mounted exhaust fan works well. Look for one rated at 1,000 CFM or higher for sheds under 300 sq ft. Make sure to also install a passive intake vent on the opposite wall, the fan needs a source of incoming air to move air effectively.
What’s the minimum ceiling height for a woodworking workshop shed?
Eight feet is the practical minimum. Ten feet is better if you plan to use a drum sander, tall drill press, or need to stand sheet goods vertically. Lower ceilings also trap dust and heat more readily.
Do I need a permit to build a woodworking workshop shed?
In most areas, yes, if the structure exceeds 120 to 200 square feet or has electrical service. Requirements vary by municipality, so check with your local building department before starting.
Is a concrete floor necessary for a woodworking shop?
Not strictly necessary, but it’s the best option. Concrete is durable, easy to clean, and handles the weight of cast-iron machinery without flexing. If a concrete slab isn’t feasible, a reinforced wood floor on a solid foundation is a reasonable alternative.
How do I reduce dust in a small woodworking shed without a full dust collection system?
Start with a shop vacuum connected directly to your sander and router. Add a ceiling-hung ambient air filter to catch fine particles. Even without a dedicated dust collector, these two steps dramatically reduce airborne dust compared to no collection at all.
What’s the best way to store lumber in a workshop shed?
A wall-mounted horizontal lumber rack near the entry door keeps stock accessible and off the floor. Store sheet goods vertically in a dedicated panel rack or lean them against a wall with a protective strip at the base. Keep lumber away from exterior walls where humidity fluctuates most.
Can I build a woodworking workshop shed myself with no construction experience?
Yes, but start with a straightforward plan and be realistic about the electrical work. Framing, roofing, and siding are learnable skills with good plans and patience. Electrical wiring, especially 240V circuits for large tools, is worth hiring a licensed electrician for if you’re uncertain.
How do I prevent my workshop shed from getting too hot in summer?
Insulate the roof and walls, install a powered exhaust fan, and add a ridge vent or gable vent for passive airflow. A mini-split system is the most effective solution if passive ventilation isn’t enough for your climate.
What’s the difference between a single-stage and two-stage dust collector?
A single-stage collector pulls all debris, chips and fine dust, directly into one bag or canister. A two-stage collector separates heavy chips into a lower drum before fine dust reaches the filter, which extends filter life and improves efficiency. For most hobby shops, a single-stage collector is sufficient to start.
Conclusion
A well-planned woodworking workshop shed is one of the most satisfying investments a hobbyist woodworker can make. The difference between a shop that works for you and one that frustrates you comes down to decisions made before a single board is cut: sizing the space for your actual tools, anchoring the layout around workflow rather than walls, and building in proper ventilation and dust collection from the start.
Actionable next steps:
- Write down your current and planned tool list, then use that to determine the minimum floor area you need.
- Sketch a rough layout using the table saw as the anchor point, and mark clearance zones with tape before committing.
- Research your local permit requirements before choosing a shed size or foundation type.
- Decide between free and paid plans based on how much workshop-specific detail you need.
- Plan electrical and ventilation placement on paper before any framing begins.
Recommended Resources and Tools
- The best shed plans for beginners page is the best starting point for choosing a plan that matches your skill level and budget.
- For electrical planning, the guide on how to wire a workshop shed for power tools walks through safe wiring practices step by step.
- The workshop shed insulation guide covers materials, R-values, and vapor barriers, all of which affect both comfort and tool longevity.
- For tool selection, the essential woodworking machinery guide helps beginners understand which stationary tools are worth the investment early on.
- A single-stage dust collector (Jet, Rikon, or Grizzly are well-regarded brands at the hobbyist price point) and a ceiling-hung ambient air filter (WEN and Jet both make reliable units under $200) are the two ventilation investments that make the biggest immediate difference in shop air quality.
Building with a plan, choosing the right tools, and setting up your space correctly from day one — that’s how a backyard shed becomes a real woodworking workshop.