
Workshop Shed Insulation Guide: Best Materials & R-Values Explained

A poorly insulated workshop shed can swing from freezing cold in January to unbearably hot in July, making it nearly impossible to enjoy your craft year-round. Choosing the best workshop shed insulation is one of the most impactful upgrades you can make to your space, and it’s far more straightforward than most beginners expect.
Key Takeaways
- Rigid foam board (XPS or polyiso) is the top choice for metal sheds; fiberglass batts work best in wood-framed sheds with standard stud bays.
- For year-round comfort in most U.S. climates, aim for R-13 to R-21 in walls and R-30 to R-49 in the ceiling.

- Closed-cell spray foam delivers the highest R-value per inch and acts as its own vapor barrier, but costs significantly more than batts or rigid foam.
- Moisture control matters as much as thermal performance. A vapor barrier on the warm side of the insulation prevents condensation and mold.
- Ventilation is still necessary even after insulating. A sealed shed without airflow traps humidity and fumes from finishes and adhesives.
- Most DIYers can install fiberglass batts and rigid foam boards without professional help. Spray foam is the exception.
- Insulation in a well-built shed typically lasts 20 to 80 years depending on the material and moisture exposure.
- Avoid open-cell spray foam, kraft-faced batts in high-humidity climates, and any insulation installed without an air gap in metal sheds.
What Types of Insulation Work Best for Workshop Sheds
The four most practical insulation types for a year-round workshop shed are fiberglass batts, rigid foam board, mineral wool batts, and spray foam. Each suits different shed constructions, budgets, and climates.
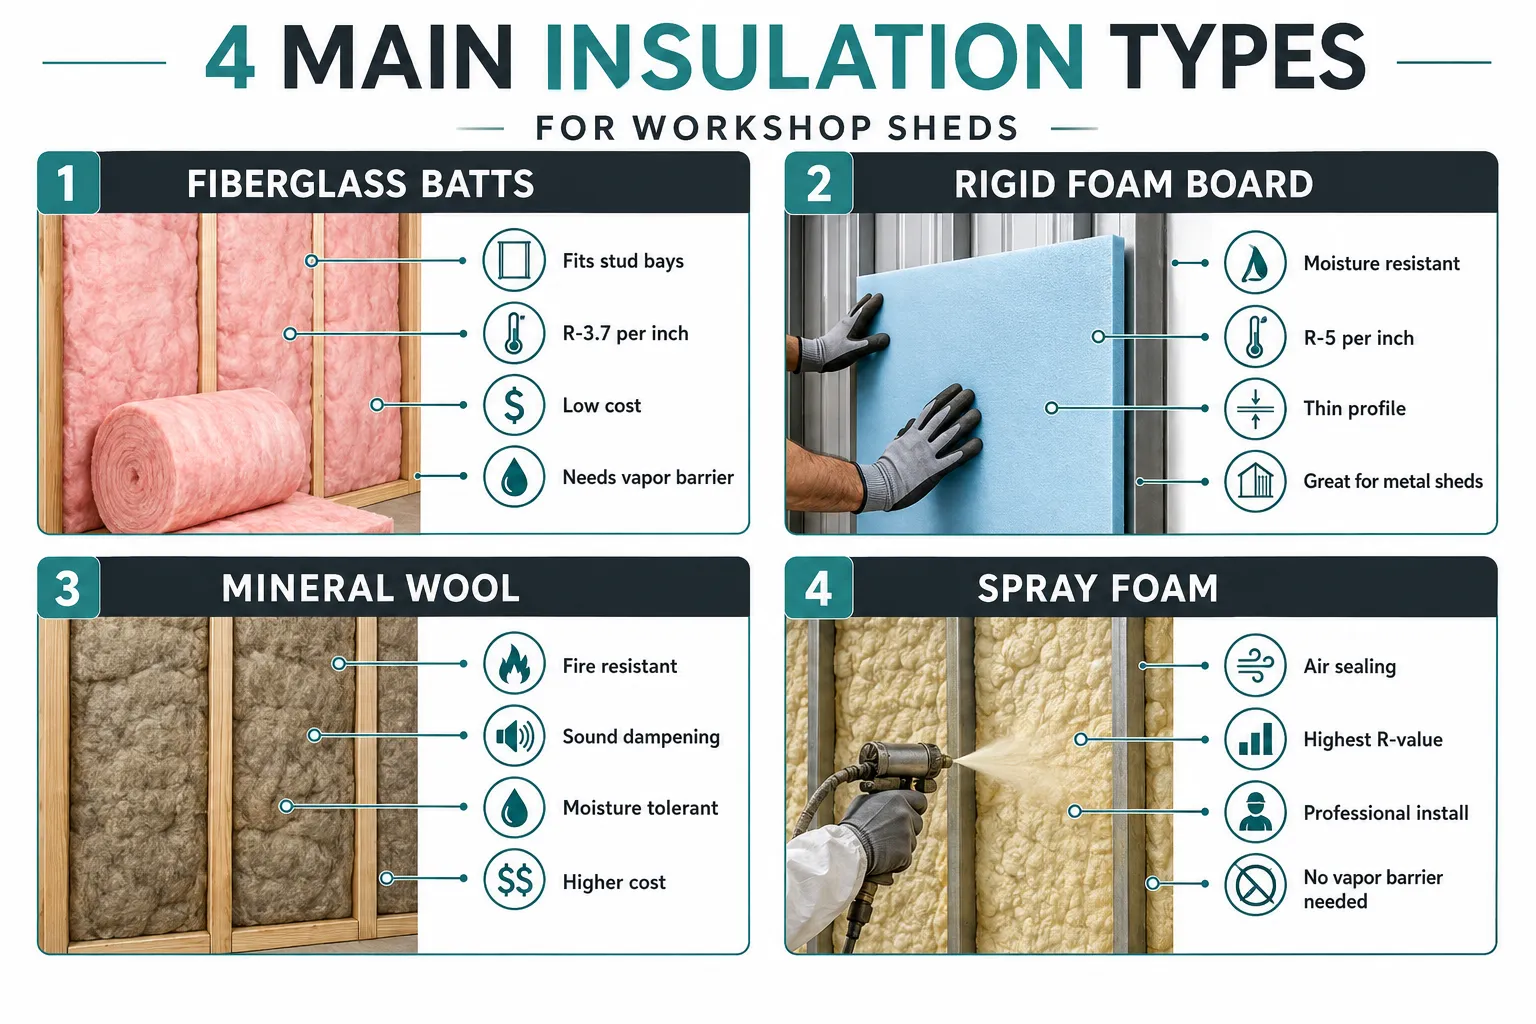
Here’s how they stack up at a glance:
| Type | R-Value per Inch | Best For | DIY Friendly |
|---|---|---|---|
| Fiberglass Batts | R-3.2 to R-3.7 | Wood-framed sheds | Yes |
| Rigid Foam (XPS/Polyiso) | R-3.8 to R-6.5 | Metal sheds, limited space | Yes |
| Mineral Wool Batts | R-3.0 to R-3.3 | Fire/sound resistance | Yes |
| Closed-Cell Spray Foam | R-6.0 to R-7.0 | Air sealing, metal sheds | Limited |
Choose fiberglass batts if your shed has standard 2×4 or 2×6 stud walls and you want the most affordable option. Choose rigid foam if you have a metal shed, limited wall depth, or need moisture resistance. Choose mineral wool if fire resistance or sound dampening matters (common in workshops near living spaces). Choose closed-cell spray foam if you want maximum performance and air sealing in one step and budget isn’t a constraint.
How Much R-Value Do You Need for a Workshop Shed
The right R-value depends on your climate zone, but for most year-round workshops in the continental United States, R-13 to R-21 in walls and R-30 to R-49 in the ceiling is a solid target. The U.S. Department of Energy publishes climate zone maps that break down recommended R-values by region, so checking your zone before buying materials is worthwhile.
As a practical rule: the ceiling loses more heat than walls, so prioritize ceiling insulation if budget is tight. In mild climates (zones 1-3), R-13 walls and R-30 ceiling will keep a workshop comfortable. In colder climates (zones 5-7), push walls to R-21 and ceiling to R-49.
Don’t forget the floor. An uninsulated concrete slab or bare ground floor can pull heat out faster than poorly insulated walls. Even a layer of rigid foam under a plywood subfloor makes a noticeable difference in winter.
Fiberglass vs. Foam vs. Mineral Wool: Which Is Best for a Year-Round Workshop Shed
For most wood-framed workshop sheds, fiberglass batts offer the best balance of cost, availability, and performance. Rigid foam wins in metal sheds or anywhere moisture is a concern. Mineral wool earns its place when fire safety or acoustic comfort matters.
Fiberglass batts are widely available at every home improvement store, easy to cut with a utility knife, and cost roughly $0.40 to $0.60 per square foot (R-13, estimate based on 2025-2026 retail pricing). The downside: they absorb moisture if exposed, lose R-value when compressed, and require a vapor barrier in most climates.
Rigid foam boards (XPS, EPS, or polyiso) are denser, moisture-resistant, and deliver more R-value per inch. XPS (the blue or pink boards) runs around R-5 per inch and is the go-to for metal shed walls. Polyiso performs even better per inch but can lose R-value in very cold temperatures.
Mineral wool (also sold as rock wool or stone wool) is denser than fiberglass, naturally moisture-resistant, and won’t burn. It’s heavier and costs more, but it’s worth considering for a workshop where you’re running power tools and finishing products near the walls.
Common mistake: Mixing insulation types without thinking about vapor control. If you layer rigid foam over fiberglass batts, the vapor barrier placement changes. Get the order right or you’ll trap moisture inside the wall assembly.
What’s the Difference Between Rigid Foam and Batts for Sheds
Rigid foam boards are solid panels cut to fit flat surfaces; batts are flexible rolls or pre-cut sections designed to friction-fit between framing members. The practical difference comes down to where and how you’re installing.
Batts go between studs. Rigid foam goes on top of studs, on flat surfaces, or directly against metal shed walls where there are no stud bays at all. In many workshop shed builds, the best approach is to combine both: rigid foam on the exterior or interior face of the framing (to break thermal bridging through the studs), with batts filling the stud cavities.
Edge case: If your shed has 2×3 walls instead of 2×4, standard R-13 batts won’t fit properly. Use R-11 batts or switch to rigid foam for the whole wall.
Best Insulation for a Metal Shed Workshop
Metal sheds require a different approach because the metal walls conduct heat and cold directly, and they’re prone to condensation on the interior surface. Rigid foam board or closed-cell spray foam are the best insulation choices for a metal shed workshop.
The key issue with metal is thermal bridging and condensation. When warm, humid workshop air hits a cold metal wall, moisture condenses on the surface, leading to rust and mold. Closed-cell spray foam solves this by coating the metal directly and acting as both insulation and vapor barrier. Rigid foam boards glued to the metal interior (with furring strips added for drywall or paneling) are the DIY-friendly alternative.
Do not use fiberglass batts directly against a metal shed wall without an air gap or vapor barrier. Batts trap moisture against the metal surface, which accelerates corrosion.
If you’re still planning your shed structure, reviewing options like shed roof styles and their insulation implications can save you significant rework later.
How to Insulate a Shed for Both Winter and Summer
Good year-round insulation does two jobs: it keeps heat in during winter and keeps heat out during summer. The same materials handle both, but the installation details matter.
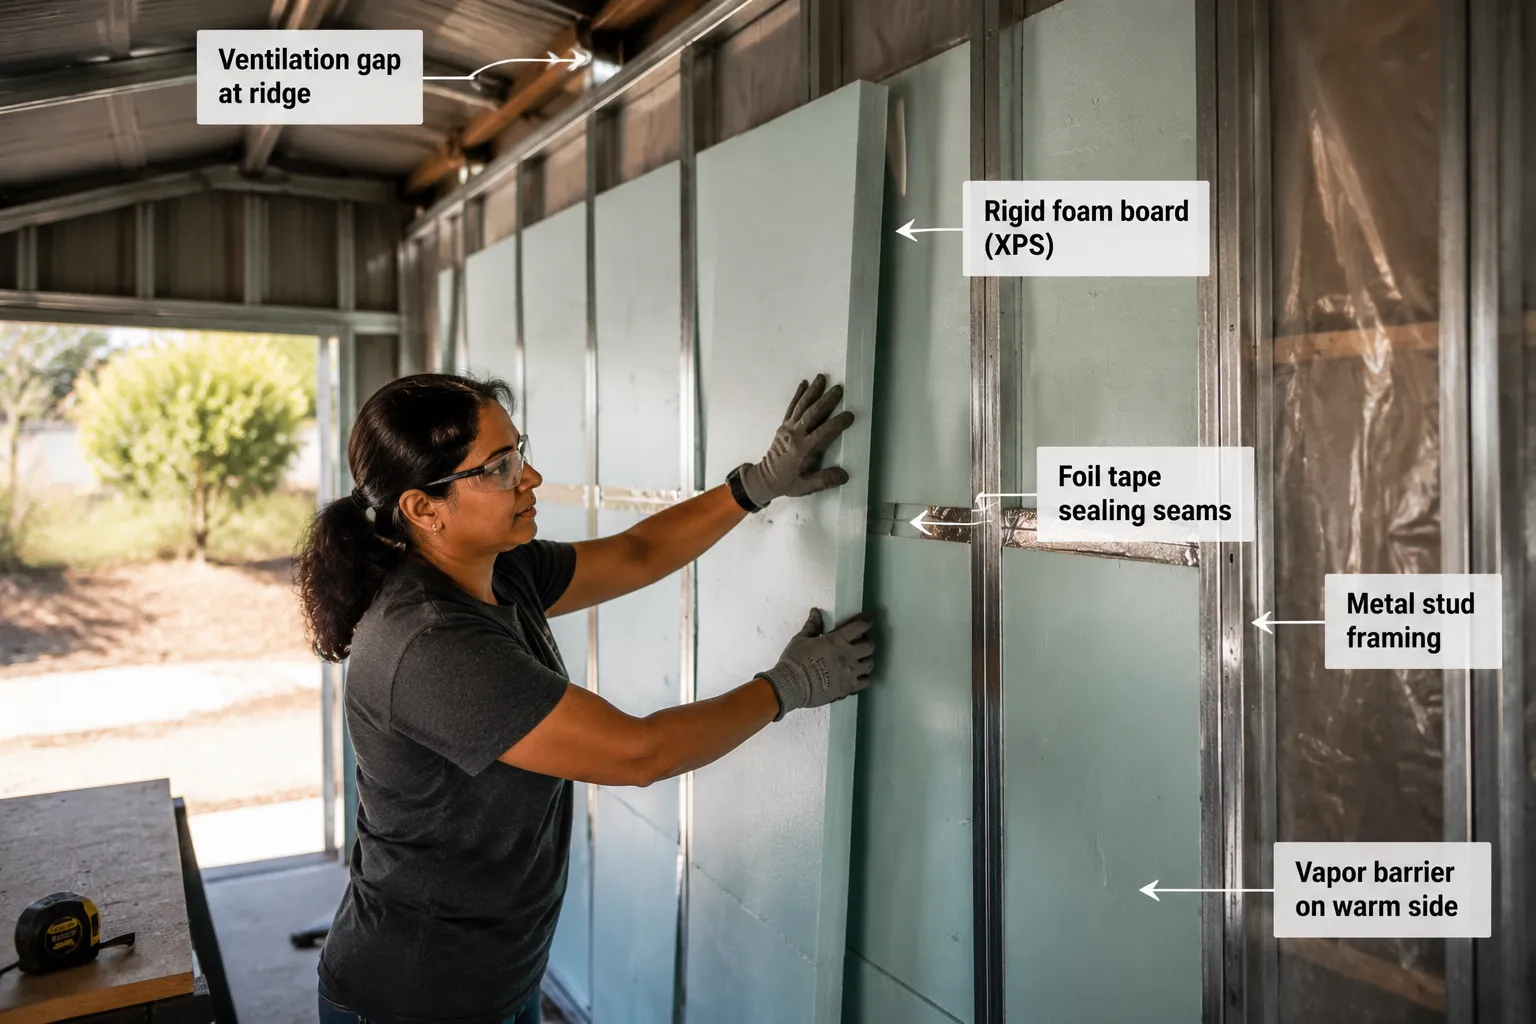
For winter: Focus on sealing air gaps first. Air leaks around doors, windows, and where the wall meets the floor account for a large share of heat loss. Caulk and weatherstripping before you add a single batt of insulation.
For summer: Radiant heat through the roof is the bigger problem. A radiant barrier (a reflective foil layer) under the roof decking or rafters reflects solar heat before it enters the shed. Pair it with ventilation (ridge vent plus soffit vents) to exhaust hot air.
Step-by-step approach for a wood-framed shed:
- Seal all penetrations and gaps with caulk or spray foam sealant.
- Install a vapor barrier on the warm-in-winter side (interior in cold climates).
- Fill stud bays with fiberglass or mineral wool batts.
- Add rigid foam to the ceiling rafters for extra R-value.
- Install a radiant barrier under the roof if summer heat is a concern.
- Add weatherstripping to the door and any operable windows.
How Much Does It Cost to Insulate a Workshop Shed
Insulating a typical 10×12 or 12×16 workshop shed costs between $200 and $800 for materials if you do it yourself, or $600 to $2,000+ if you hire a contractor (estimates based on 2026 retail and labor averages; actual costs vary by region and material choice).
Cost breakdown by material (DIY, per square foot of wall/ceiling area):
- Fiberglass batts: $0.40 to $0.60 per sq ft
- Rigid foam (XPS, 2-inch): $0.70 to $1.00 per sq ft
- Mineral wool batts: $0.80 to $1.20 per sq ft
- Closed-cell spray foam (professional): $1.50 to $3.00 per sq ft
The biggest variable is labor. Spray foam almost always requires a professional, which adds significantly to the total. For a full breakdown of shed construction costs, the cost to build a small shed guide covers materials and labor in detail.
Can You Install Shed Insulation Yourself or Do You Need a Professional
Fiberglass batts, mineral wool batts, and rigid foam boards are all realistic DIY projects for a beginner with basic tools. Spray foam is the exception and typically requires professional equipment for anything beyond small canned applications.
For a standard wood-framed shed, a motivated beginner can insulate walls and ceiling in a weekend. You’ll need a utility knife, tape measure, staple gun (for vapor barrier), and safety gear (gloves, goggles, and a dust mask for fiberglass). Rigid foam boards require a circular saw or scoring knife.
When to call a professional: If your shed has complex framing, you want spray foam throughout, or you’re dealing with an existing moisture problem that needs remediation before insulating.
For those building from scratch, the complete guide to building your own backyard shed walks through the full construction process, including framing that makes insulation easier.
How to Prevent Moisture and Condensation in an Insulated Shed
Moisture is the biggest long-term threat to shed insulation. The solution is a combination of vapor barriers, proper insulation placement, and ventilation.
A vapor barrier (typically 6-mil polyethylene sheeting) goes on the warm side of the insulation. In a cold climate, that’s the interior face of the wall. In a hot, humid climate, it may be on the exterior side. The goal is to stop warm, moist air from reaching the cold surface where it would condense.
Do you need a vapor barrier with shed insulation? In most climates, yes. The exception is closed-cell spray foam, which is itself a vapor retarder and doesn’t require a separate barrier. Fiberglass batts and mineral wool batts always need one.
Common mistake: Installing a vapor barrier on both sides of the wall. Trapping moisture inside the wall assembly is worse than having no barrier at all. One side only.
What Insulation Should You Avoid in a Workshop
Open-cell spray foam, unfaced fiberglass batts without a vapor barrier, and cellulose in high-humidity sheds are the materials most likely to cause problems in a workshop setting.
- Open-cell spray foam absorbs moisture and has a lower R-value per inch than closed-cell. It’s not well-suited for unheated or intermittently heated sheds.
- Kraft-faced batts in very humid climates can trap moisture at the facing if the climate dynamics reverse seasonally.
- Cellulose is a good insulation in homes but can settle and absorb moisture in a shed that isn’t climate-controlled year-round.
- Fiberglass batts left exposed (no drywall or sheathing cover) degrade faster and pose an ongoing skin and lung irritant risk in a workshop where you’re moving around constantly.
Do You Need Ventilation If You Insulate Your Workshop Shed
Yes, absolutely. Insulation reduces heat transfer but does nothing to manage air quality or humidity. A well-insulated shed without ventilation will accumulate moisture from your breath, wood finishing products, and temperature swings, leading to condensation, mold, and unhealthy air.
At minimum, install a ridge vent and soffit vents for passive airflow. For a workshop where you use stains, lacquers, or adhesives, add an exhaust fan wired to a switch. This is both a comfort issue and a safety issue: solvent fumes from finishing products build up quickly in a sealed space.
Rule of thumb: Aim for one air change per hour in a working workshop. A small box fan or dedicated exhaust fan handles this in most shed sizes.
How Long Does Shed Insulation Last
Fiberglass and mineral wool batts can last 80 to 100 years in dry, undisturbed conditions, according to the North American Insulation Manufacturers Association. Rigid foam boards have a similar lifespan when protected from UV exposure and physical damage. Spray foam, once cured, is also extremely durable.
The real enemy is moisture. Any insulation that gets wet repeatedly will degrade, compress, or grow mold long before its theoretical lifespan. This is why vapor barriers, proper ventilation, and a weathertight shed envelope matter more than the insulation material itself.
Inspect insulation every few years by checking for discoloration, sagging, or musty odors. If batts show signs of moisture damage, replace them rather than covering them up.
Best Insulation for a Workshop Shed With Limited Headroom
When ceiling height is tight, every inch of insulation thickness counts. Rigid foam board (polyiso or XPS) delivers the highest R-value per inch of any DIY-installable material, making it the best choice when headroom is limited.
Polyiso boards achieve R-6 to R-6.5 per inch. A 2-inch layer gets you to R-13 while only sacrificing 2 inches of headroom. Compare that to fiberglass batts, which need 3.5 inches for the same R-13.
Alternative: Closed-cell spray foam also performs at R-6 to R-7 per inch and can be applied in tight spaces where rigid boards are hard to cut and fit. For a shed with 7-foot ceilings or lower, this trade-off is worth the higher cost.
If you’re still in the planning stage and haven’t settled on a shed design, considering the best shed size for suburban lots can help you build in enough ceiling height from the start.
FAQ: Workshop Shed Insulation Guide
Can I insulate an existing shed, or does it need to be built with insulation in mind?
Most existing sheds can be insulated after the fact. Wood-framed sheds with exposed studs are the easiest. Metal sheds and sheds with finished interior walls are harder but still doable with rigid foam or spray foam applied to interior surfaces.
Is spray foam worth the extra cost for a small workshop shed?
For a small shed (under 200 sq ft), the cost premium for closed-cell spray foam is significant. It makes sense if moisture is a persistent problem or if you want the highest R-value in the least thickness. For most beginners, rigid foam plus batts delivers 90% of the performance at a fraction of the cost.
Do I need to insulate the floor of my workshop shed?
It depends on the floor type. A concrete slab benefits greatly from rigid foam underneath (ideally installed during construction) or a foam-underlayment subfloor on top. A wood-framed floor with a crawl space should have batts between the joists with a vapor barrier facing down.
Will insulation alone keep my workshop warm in winter?
Insulation slows heat loss but doesn’t generate heat. You’ll still need a heat source, such as an electric space heater, propane heater, or mini-split system. Insulation makes that heat source far more efficient and the space far more comfortable.
What’s the best way to insulate a shed door?
Replace hollow-core shed doors with solid-core doors, add weatherstripping around the frame, and consider a door sweep at the bottom. For extra performance, glue a thin layer of rigid foam to the interior face of the door.
Can I use house insulation in my shed?
Yes. Standard residential fiberglass batts, rigid foam boards, and mineral wool products are exactly what you’d use in a shed. There’s no separate “shed insulation” category. The same products work for both.
How do I know if my shed is already insulated?
Remove an outlet cover or look inside a wall cavity through any existing gap. If you see pink, yellow, or gray material between the studs, it’s insulated. If you see bare wood or metal, it isn’t.
Does insulating my shed require a building permit?
In most jurisdictions, adding insulation to an existing shed doesn’t require a permit. However, if you’re adding electrical (for a heater or exhaust fan), a permit may be required. Check with your local building department before starting.
Conclusion
The best insulation for a year-round workshop shed comes down to three factors: your shed’s construction type, your climate, and your budget. For wood-framed sheds, fiberglass or mineral wool batts in the walls paired with rigid foam on the ceiling is a proven, affordable combination. For metal sheds, rigid foam board or closed-cell spray foam is the right call. In either case, vapor control and ventilation aren’t optional extras. They’re what make the insulation work long-term.
Start with air sealing. Then add insulation. Then address ventilation. That sequence matters more than the brand of insulation you choose.
If you’re building a new shed or planning a significant upgrade, it’s worth thinking through the full project together. The DIY shed building cost comparison can help you weigh hiring help versus going solo, and for those considering a dual-purpose space, comparing she-shed, studio shed, and office shed designs may open up ideas for how to configure your workshop for year-round use.
Products and Tools Worth Considering
Based on what works well in real workshop shed builds:
- Owens Corning EcoTouch R-13 Fiberglass Batts are the standard for wood-framed shed walls. Widely available, easy to cut, and consistent in quality.
- Dow Thermax Polyiso Rigid Foam Boards offer the highest R-value per inch among rigid foam options and hold up well in ceiling applications.
- Rockwool Safe’n’Sound Mineral Wool Batts are worth the extra cost if you want fire resistance and noise reduction in a shared or attached workshop space.
- Great Stuff Pro Gaps and Cracks Sealant is a reliable expanding foam sealant for sealing penetrations and gaps before insulating.
- Raven Vapor Barrier (6-mil poly sheeting) is a straightforward, durable choice for the vapor barrier layer in most climates.
- A good utility knife with snap-off blades is the most-used tool in any insulation project. Keep extra blades on hand.
None of these are exotic or hard to find. Most are available at Home Depot, Lowe’s, or online. The goal is a comfortable, dry workshop you can use in January and July without fighting the temperature the whole time.