Best Shed Plans for Beginners: Simple, Step-by-Step Builds

A first-time shed builder who follows a well-matched plan can frame walls, set a roof, and hang a door in a single weekend. The same person working from a poorly chosen plan might spend three weekends confused, frustrated, and short on lumber. The difference almost always comes down to the plan itself, not the builder’s skill level.
The best shed plans for beginners (simple builds) share a handful of clear traits: pre-calculated cut lists, straightforward framing, basic roof designs, and enough visual detail that you never have to guess what comes next. This guide covers everything a first-time builder needs to choose the right plan, avoid the most common mistakes, and walk away with a structure they’re genuinely proud of.
Key Takeaways
- Beginner-friendly shed plans include complete material lists, simple roof styles (lean-to or gable), and step-by-step diagrams.
- An 8×10 shed is widely considered the best starting size: large enough to be useful, small enough to manage alone or with one helper.
- A gravel pad or concrete block foundation is simpler than a poured slab and perfectly adequate for most small sheds.
- Building a basic 8×10 shed from plans typically costs between $800 and $2,500 in materials, depending on lumber prices and finish choices.
- Most beginners can complete a simple shed in one to three weekends with standard tools they may already own.
- Free shed plans can work well, but paid plans from reputable sources tend to offer better detail, clearer diagrams, and customer support.
- Pre-cut shed kits reduce complexity but cost more and limit customization compared to building from plans.
- You can modify shed plans, but structural elements like rafter spacing and floor joist sizing should not be changed without understanding load calculations.
What Makes a Shed Plan Beginner-Friendly
A beginner-friendly shed plan removes guesswork at every step. It provides a complete cut list, a clear materials list with quantities, numbered assembly steps, and diagrams that show each stage from multiple angles.
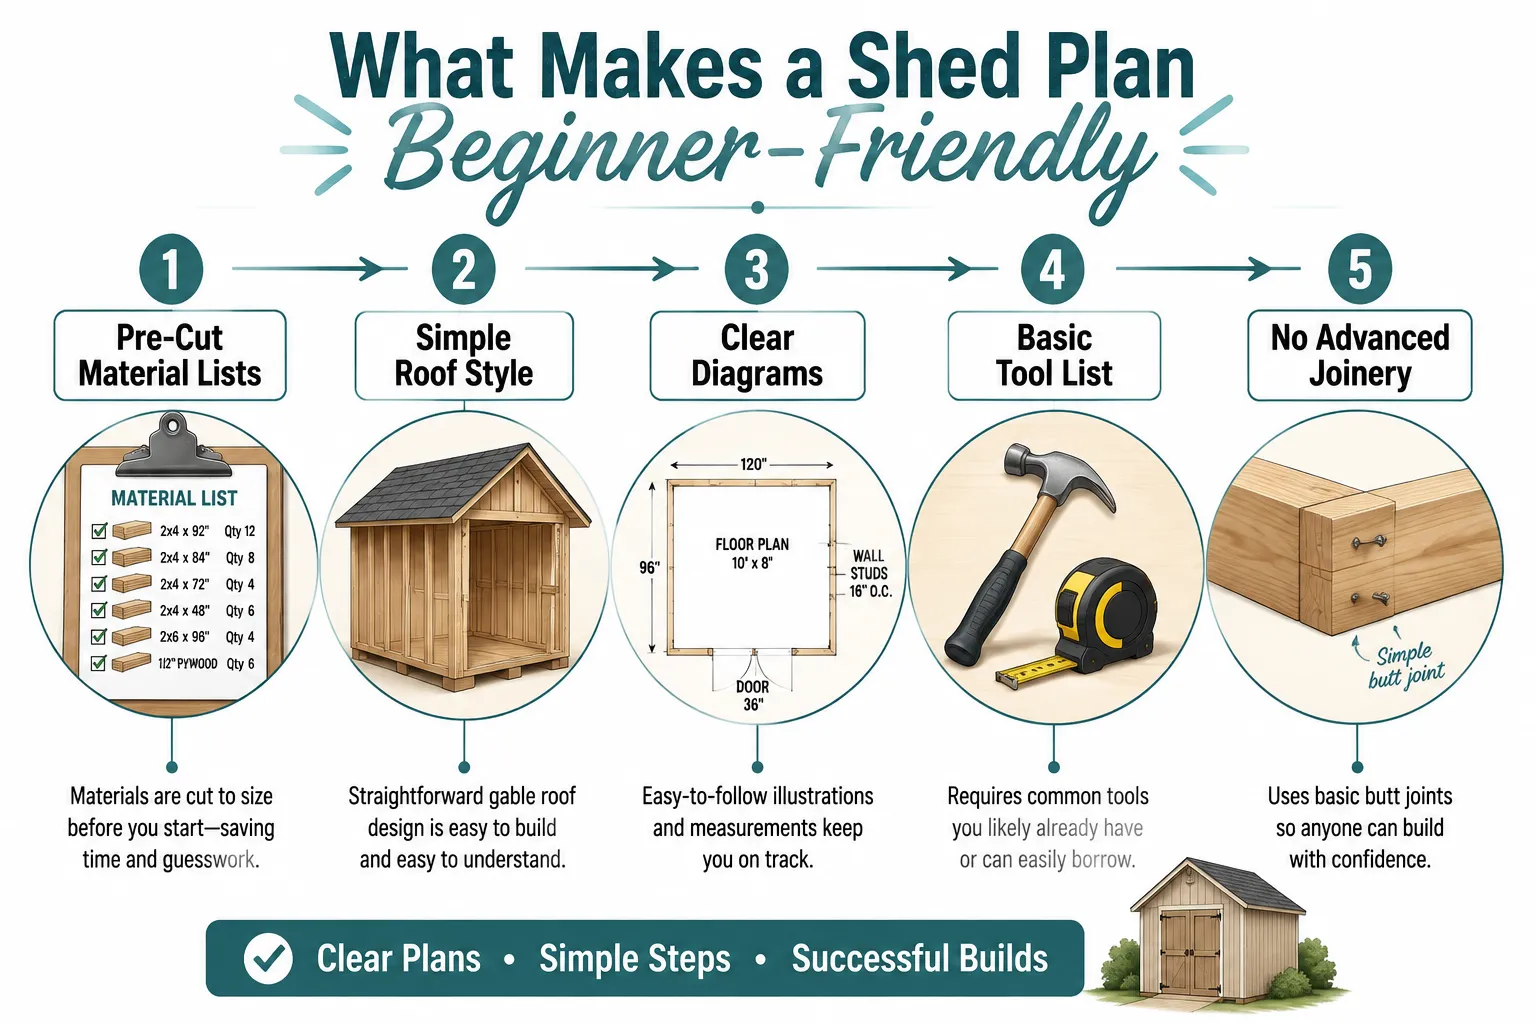
Specifically, look for these qualities when evaluating any plan:
- Complete cut list: Every board dimension is pre-calculated so you can order lumber without estimating.
- Simple roof style: A lean-to (single slope) or basic gable roof is far easier to frame than a barn or gambrel style. See our guide on choosing the best shed roof style for a full comparison.
- Standard framing spacing: Plans that use 16-inch or 24-inch on-center stud spacing follow conventional framing rules, which means tutorials and help are easy to find.
- No complex joinery: Beginner plans rely on butt joints, structural screws, and metal connectors rather than mortise-and-tenon or lap joints.
- Permit-friendly dimensions: Plans sized at or under 10×12 feet often fall below the threshold requiring a building permit in many municipalities, though local rules vary.
Common mistake: Choosing a plan based on how the finished shed looks in photos rather than how clearly the building steps are explained. A beautiful shed plan with vague instructions will cost more time and money than a plain plan with excellent detail.
Can I Build a Shed With No Woodworking Experience
Yes. A simple shed is one of the best first builds for someone with no prior woodworking experience. Shed framing uses repetitive cuts, basic fasteners, and forgiving tolerances compared to furniture or cabinetry work.
That said, a few baseline skills make the process much smoother:
- Measuring accurately with a tape measure
- Making straight cuts with a circular saw
- Reading a basic construction diagram
If those feel unfamiliar, spend an afternoon reviewing our step-by-step guide to woodworking projects for beginners before starting. The learning curve on a shed is real but manageable, and most first-timers report that framing the walls is far less intimidating than they expected once they’re actually doing it.
Choose this path if: You’re comfortable following instructions carefully and willing to take your time. A weekend shed build for a beginner might realistically take two or three weekends, and that’s fine.
What Size Shed Should I Start With as a Beginner
An 8×10 shed is the best starting size for most beginners. It’s large enough to store a lawn mower, garden tools, and bikes, but small enough that one person can lift wall frames solo (with a prop) and manage the roof without scaffolding.
For a full breakdown of how size affects cost and usability on a typical suburban lot, see our complete shed size comparison guide.
Here’s a quick reference for common beginner shed sizes:
| Size | Best For | Relative Difficulty | Typical Material Cost (2026 estimate) |
|---|---|---|---|
| 6×8 | Basic tool storage | Easiest | $600,$1,200 |
| 8×10 | General storage, starter workshop | Easy | $900,$1,800 |
| 10×12 | Workshop, larger storage | Moderate | $1,400,$2,800 |
| 12×16 | Full workshop, multiple uses | Intermediate | $2,500,$5,000+ |
Cost estimates are based on standard pressure-treated lumber and OSB sheathing. Prices vary by region and lumber market conditions.
Simple Shed Plans: 8×10 vs 10×12, Which Is Easier
An 8×10 shed is easier to build than a 10×12 for three practical reasons: the wall frames are lighter and easier to raise alone, the roof span is shorter (which simplifies rafter cutting), and the total lumber count is lower, meaning fewer opportunities for measurement errors.
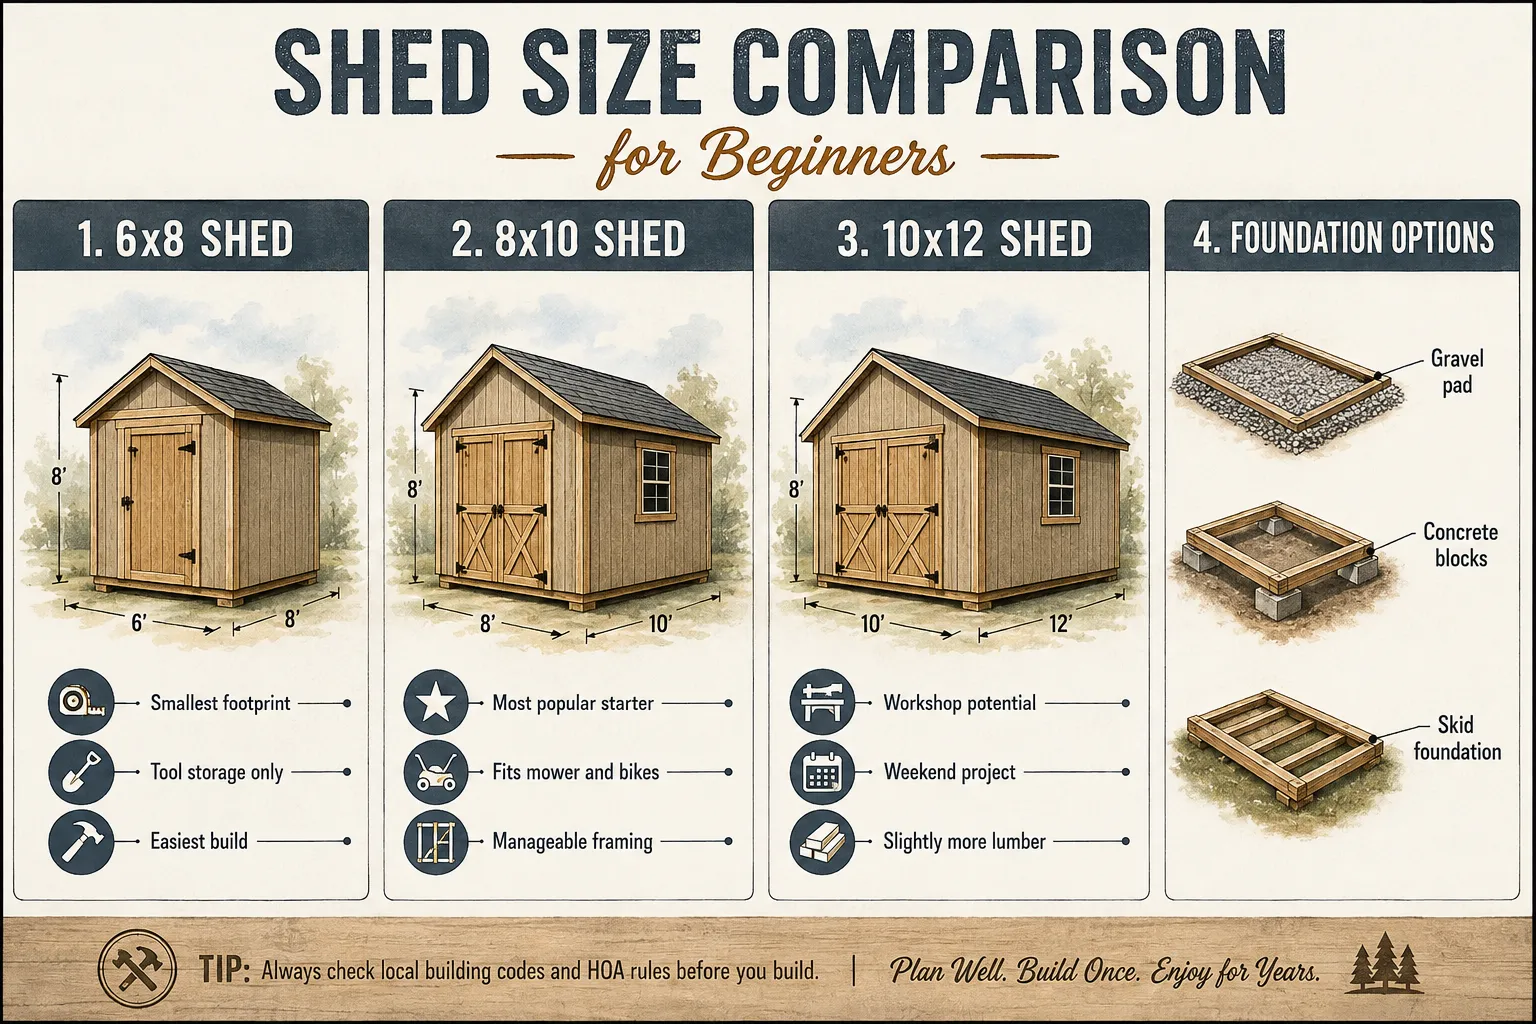
A 10×12 shed is still a reasonable beginner project, especially with a helper. The extra floor space pays off quickly if you plan to use the shed as a small workshop. The framing logic is identical; there’s just more of it.
Decision rule: Choose 8×10 if this is your first build and you’re working mostly alone. Choose 10×12 if you have a helper and already know you’ll need the space.
How Much Does It Cost to Build a Simple Shed From Plans
Building a basic 8×10 shed from plans typically costs between $900 and $1,800 in materials in 2026, assuming standard pressure-treated floor framing, OSB wall sheathing, and asphalt shingle roofing. A 10×12 shed runs closer to $1,400 to $2,800.
For a detailed cost breakdown, our guide on how much it costs to build a small shed covers materials, labor, and permit fees in depth.
Key cost variables include:
- Lumber prices: Softwood framing lumber prices fluctuate significantly. Always get a current quote from your local supplier before budgeting.
- Foundation type: A gravel pad costs less than $100 in materials. A poured concrete slab can add $500 to $1,500 depending on size and whether you hire it out.
- Roofing material: Asphalt shingles are the most affordable option. Metal roofing costs more upfront but lasts longer.
- Siding choice: T1-11 plywood siding is the most common beginner choice because it installs fast and costs less than cedar or vinyl.
- Door and window: Pre-hung doors and windows add $150 to $400 to the budget but save significant framing time.
If you’re weighing whether to hire help for any portion of the build, our DIY shed building cost comparison breaks down exactly where hiring out saves money versus where it doesn’t.
Free Shed Plans vs. Paid Plans: Which Is Better
Free shed plans are a reasonable starting point, but paid plans from reputable sources are generally worth the investment for beginners. The difference isn’t always the design itself, it’s the level of detail, the accuracy of the cut list, and whether customer support is available when something doesn’t make sense.
Free plans found on home improvement blogs or manufacturer websites often lack:
- Dimensioned drawings for every framing member
- Rafter templates or rafter tables
- Foundation layout details
- Notes on local code compliance
Paid plans from established woodworking plan publishers typically include all of the above, plus 3D renderings that help you visualize assembly before you cut anything. Expect to pay $15 to $50 for a quality beginner shed plan package.
Bottom line: If a free plan includes a complete cut list, multiple-view diagrams, and a foundation detail, it can absolutely work. If it’s just a sketch with rough dimensions, pay for a better plan. The $30 you spend on a quality plan could save you $200 in lumber mistakes.
Shed Plans With or Without a Foundation: Which Is Simpler
A gravel pad or concrete block foundation is simpler than a poured concrete slab for a beginner. It requires fewer specialized skills, costs less, and can be completed the same day you start building.
The three most common beginner-friendly foundation options:
- Gravel pad: Excavate 4-6 inches, fill with compacted gravel, and set pressure-treated skids directly on top. Works well for sheds under 10×12 feet on level ground.
- Concrete deck blocks: Pre-formed blocks set on compacted gravel. Fast, no mixing required, and adjustable for minor slope.
- Skid foundation: Two or more pressure-treated 4×6 or 6×6 beams laid directly on the ground or gravel. Common in many beginner plan sets and acceptable in many jurisdictions for small sheds.
A poured concrete slab is more permanent and better for workshop use, but it adds cost, time, and skill requirements that most beginners don’t need for a first build.
What Tools Do I Need to Build a Shed for Beginners
Most beginner shed builds require only a handful of tools that many homeowners already own. You do not need a full workshop setup.
Essential tools:
- Circular saw (for framing cuts)
- Drill/driver (for screws and hardware)
- Tape measure (25-foot minimum)
- Speed square (for checking 90-degree angles)
- Chalk line (for layout)
- Level (4-foot recommended)
- Hammer (for framing nails and blocking)
- Utility knife (for sheathing and roofing)
Helpful but not required:
- Miter saw (speeds up repetitive cuts)
- Framing nailer (dramatically faster than hand-nailing)
- Sawhorses (two minimum for safe cutting)
For a full breakdown of what each tool does and which brands offer the best value for beginners, see our guide to various tools used for woodworking.
How Long Does It Take to Build a Shed From Plans
A motivated beginner building an 8×10 shed can realistically complete the project in two to three weekends. The first weekend typically covers foundation prep and floor framing. The second covers wall framing and sheathing. The third handles the roof and finishing details like doors, trim, and paint.
Timeline factors that slow beginners down:
- Waiting for lumber delivery (order early, allow 3-5 business days)
- Permit approval (if required, can add 1-4 weeks before you break ground)
- Weather delays (roofing and painting require dry conditions)
- Working alone (wall-raising is significantly faster with a second person)
An experienced builder with a helper can complete the same 8×10 shed in a single long weekend. Don’t use that as your benchmark for a first build.
Best Shed Plans for Small Backyards
For small backyards, the best shed plans prioritize a compact footprint, vertical storage, and a roof style that minimizes visual bulk. A lean-to shed built against an existing fence or garage wall is often the best choice because it uses existing structure for one wall and keeps the roofline low.
Key considerations for small-yard builds:
- Check setback requirements: Most municipalities require sheds to sit at least 3-5 feet from property lines. Measure before you plan.
- Use vertical space: Plans with loft shelving or wall-mounted tool storage maximize a small footprint.
- Choose a low-profile roof: A lean-to or low-pitch gable keeps the shed from dominating a small yard visually.
- Consider a narrow design: A 6×10 or 6×12 shed fits along a fence line where an 8×10 wouldn’t.
For more guidance on fitting a shed into a smaller suburban lot, our small backyard shed planning guide covers zoning, placement, and design options in detail.
Common Mistakes Beginners Make When Building Sheds
The most common and costly beginner mistakes happen before a single board is cut. Skipping the permit check, failing to establish a level foundation, and buying lumber before confirming the cut list are the top three.
Full list of mistakes worth knowing before you start:
- Not checking local permits: Many jurisdictions require permits for sheds over a certain size. Skipping this can result in fines or forced removal.
- Unlevel foundation: Even a half-inch of unlevel on the foundation translates to crooked walls and doors that won’t close.
- Buying all lumber at once without checking the plan: Cut lists sometimes have errors. Buy framing lumber first, then purchase sheathing and roofing after confirming dimensions.
- Skipping the square check: Always check that floor frames are square (equal diagonal measurements) before fastening. A racked floor frame makes everything above it harder.
- Undersizing the door opening: A 4-foot-wide door opening is the minimum for getting a riding mower in and out. Many beginner plans default to 3-foot doors.
- Using untreated lumber for floor framing: Ground-contact floor framing must be pressure-treated lumber rated for ground contact (UC4B or higher).
Can I Modify Shed Plans, or Do I Have to Follow Exactly
You can modify shed plans, but the type of modification matters. Cosmetic changes like siding style, paint color, window placement, and door hardware are completely fine to adjust. Structural changes require more caution.
Safe to modify:
- Siding material and color
- Roofing material (within the same weight class)
- Window and door placement (as long as you maintain header sizing)
- Interior shelving and storage layout
- Trim and exterior finish details
Modify with caution:
- Rafter spacing and rafter size (affects snow and wind load capacity)
- Floor joist spacing and sizing (affects load capacity)
- Wall stud spacing (affects sheathing performance and insulation options)
- Foundation type (affects drainage and frost movement)
If you want to understand how to read and adapt a plan confidently, our guide on how to read and use woodworking plans covers the fundamentals in plain language.
Are Pre-Cut Shed Kits Easier Than Building From Plans
Pre-cut shed kits are easier to start but come with trade-offs. A kit provides pre-cut and sometimes pre-drilled lumber, hardware, and instructions designed for a specific design. This eliminates the measuring and cutting stage, which is where most beginner errors occur.
Advantages of kits:
- Fewer cuts mean fewer mistakes
- All materials arrive together, reducing supply-run trips
- Instructions are matched to the exact materials provided
Disadvantages of kits:
- Cost 20-50% more than buying lumber and a plan separately (estimate based on typical retail comparisons, actual savings vary by supplier)
- Limited size and style options
- Harder to customize or modify
- Lower-quality lumber in some budget kits
Decision rule: Choose a kit if your priority is speed and simplicity and you’re not concerned about cost. Choose plans and separate lumber if you want more control over materials, size, and cost.
FAQ
Do I need a building permit to build a shed?
In many municipalities, sheds under a certain size (often 100-200 square feet) don’t require a permit, but rules vary widely. Always check with your local planning or zoning office before you start. Skipping this step is one of the most common and expensive beginner mistakes.
What’s the easiest shed roof to build as a beginner?
A lean-to (single-slope) roof is the easiest because it uses identical rafters with no ridge board and no complex cuts. A basic gable roof is the next easiest and is more common in plan sets.
Can one person build a shed alone?
Yes, with the right approach. Most experienced solo builders use temporary props to hold wall frames upright while fastening. That said, having a second person for wall-raising day makes the process significantly safer and faster.
What wood should I use for shed framing?
Standard SPF (spruce-pine-fir) or Douglas fir dimensional lumber works well for wall framing and roof framing. Floor framing and any wood in contact with the ground must be pressure-treated lumber rated for ground contact.
How do I keep my shed floor from rotting?
Use pressure-treated lumber for all floor framing, ensure the foundation provides drainage so water doesn’t pool under the shed, and maintain at least 6 inches of clearance between the bottom of the floor frame and bare soil.
Is an 8×10 shed big enough for a lawn mower?
Yes, for most walk-behind and push mowers. A standard riding mower typically needs a 4-foot-wide door opening and a shed at least 8 feet deep. Confirm your mower’s dimensions against the plan’s door and interior measurements before building.
What’s the best free source for beginner shed plans?
Home improvement retailers like The Home Depot and manufacturers like Ana White publish free shed plans with reasonable detail. Always verify that the plan includes a complete cut list and foundation detail before committing.
How do I know if my shed plan is structurally sound?
Plans from established publishers or home improvement retailers are generally engineered for standard residential loads. If you’re in a high-snow or high-wind area, look for plans that specify regional load ratings, or consult a local building official.
Can I build a shed on a slope?
Yes, but you’ll need to account for the grade when setting your foundation. Concrete deck blocks or a skid foundation on a gravel pad can be shimmed to compensate for moderate slopes. Steep slopes may require a more involved foundation solution.
What’s the difference between a shed kit and shed plans?
A shed kit includes pre-cut lumber and hardware matched to a specific design. Shed plans are drawings and instructions you use to purchase and cut your own lumber. Kits cost more but reduce the skill required. Plans cost less and offer more flexibility.
Conclusion
Building a shed from plans is one of the most satisfying first projects a beginner woodworker can take on. The skills it builds, layout, framing, roofing, and finishing, carry over to nearly every other construction project. The key is choosing the right plan from the start: one that matches your skill level, your available tools, and the size your yard and budget can support.
Actionable next steps:
- Measure your available yard space and check local setback requirements before choosing a plan size.
- Decide on your foundation type based on your soil, slope, and local frost depth.
- Review a plan’s cut list and diagrams carefully before purchasing, if the instructions aren’t clear to you on paper, they won’t be clearer on the job site.
- Gather your tools and price out lumber locally before committing to a budget.
- Start with an 8×10 gable or lean-to design if you’re genuinely unsure where to begin. It’s the most well-documented beginner shed size, and finding help online is easy.
The best shed plans for beginners (simple builds) aren’t the fanciest or the most detailed, they’re the ones you can actually follow through to completion. Pick one that matches where you are right now, build it well, and the next one will come even easier.
Products, Tools, and Resources
Recommended tools for a first shed build:
- Circular saw: A 7-1/4″ corded circular saw from DeWalt or Makita handles all the framing cuts a beginner needs. Cordless models work well too if you already own batteries in that platform.
- Drill/driver combo kit: A two-piece drill and impact driver kit speeds up fastening significantly. Milwaukee, DeWalt, and Ryobi all offer solid entry-level combo kits.
- 4-foot level: A basic aluminum level from Empire or Stanley is accurate enough for shed work and costs under $30.
- Speed square: A 7-inch Swanson speed square is the standard choice for framing layout. It’s inexpensive and nearly indestructible.
- Framing nailer (optional but recommended): A pneumatic framing nailer cuts wall-assembly time dramatically. Renting one for a weekend from a local tool rental shop is a cost-effective option if you don’t want to buy.
Resources worth bookmarking:
- Our beginner woodworking guide covers foundational skills that apply directly to shed building.
- The complete guide to building your own backyard shed walks through the full process from site selection to final trim.
- For understanding how to read any plan before you build from it, our guide on how to read and use woodworking plans is the clearest starting point available.