Shed Framing 101: A Beginner’s Walkthrough
Most backyard sheds fail not because of bad siding or a leaky roof, but because the frame underneath was never square, level, or strong enough to carry the load. That single mistake shows up years later as a sagging door or a wall that bows outward. This Shed Framing 101: A Beginner’s Walkthrough breaks down exactly how to avoid that fate, covering the materials, steps, costs, and mistakes that matter most for a first-time builder.
Shed framing is the skeleton work that happens between the foundation and the finished walls: floor joists, wall studs, top and bottom plates, and roof rafters. Get this stage right, and everything else, siding, doors, windows, shelving, goes on easily. Get it wrong, and no amount of trim work will fix a crooked structure.
Find this useful? Add us as a preferred source on Google and more of what we publish will show up in your results.
Key Takeaways
- Shed framing means building the floor, wall, and roof skeleton using dimensional lumber, typically 2x4s or 2x6s spaced 16 or 24 inches on center.
- A beginner with basic tools and a weekend or two of free time can frame a small shed, generally 8×10 to 10×12 feet, without prior carpentry experience.
- Framing costs scale with lumber size and local prices; a small shed’s framing lumber package typically runs into the low hundreds of dollars, separate from foundation, roofing, and siding costs.
- Most jurisdictions require a permit once a shed exceeds a certain square footage, often 100 to 200 square feet, so check local rules before buying lumber.
- Uneven ground needs correcting at the foundation stage (skids, blocks, or a leveled pad) before any framing begins, not after.
- A speed square, framing hammer or nailer, circular saw, tape measure, and a 4-foot level cover nearly everything a beginner needs to start.
- Cold weather slows curing times for concrete footings and makes lumber more brittle, so plan weather-sensitive steps around forecasts.
- Hire a professional if the shed exceeds roughly 200 square feet, sits on a steep slope, or needs to meet strict local snow-load or wind-load codes.
What Is Shed Framing and Why Does It Matter?
Shed framing is the process of building the structural wood skeleton that supports a shed’s floor, walls, and roof before any siding, roofing, or trim goes on. It matters because a frame that is out of square or improperly spaced will cause every later step, doors, windows, roofing, to fit poorly or fail early.
Think of framing as the bones of the building. Everything else, from plywood sheathing to paint, depends on those bones being straight and properly fastened. A shed with solid framing can handle snow loads, wind gusts, and the weight of stored tools or a workbench for decades. A shed with weak framing might look fine on day one and start leaning within a single season.
Framing typically includes four parts:
- Floor frame: joists and rim boards that sit on the foundation
- Wall frames: studs, top plates, and bottom (sole) plates
- Roof frame: rafters or trusses that support the roofing material
- Bracing: temporary or permanent supports that keep walls plumb during and after assembly
Anyone planning a workshop shed, storage building, or a backyard studio should treat framing as the step that determines the building’s lifespan, not just its shape. For a broader look at how framing fits into the full build, see this complete guide to building your own backyard shed.
How Do I Frame a Shed Step by Step?
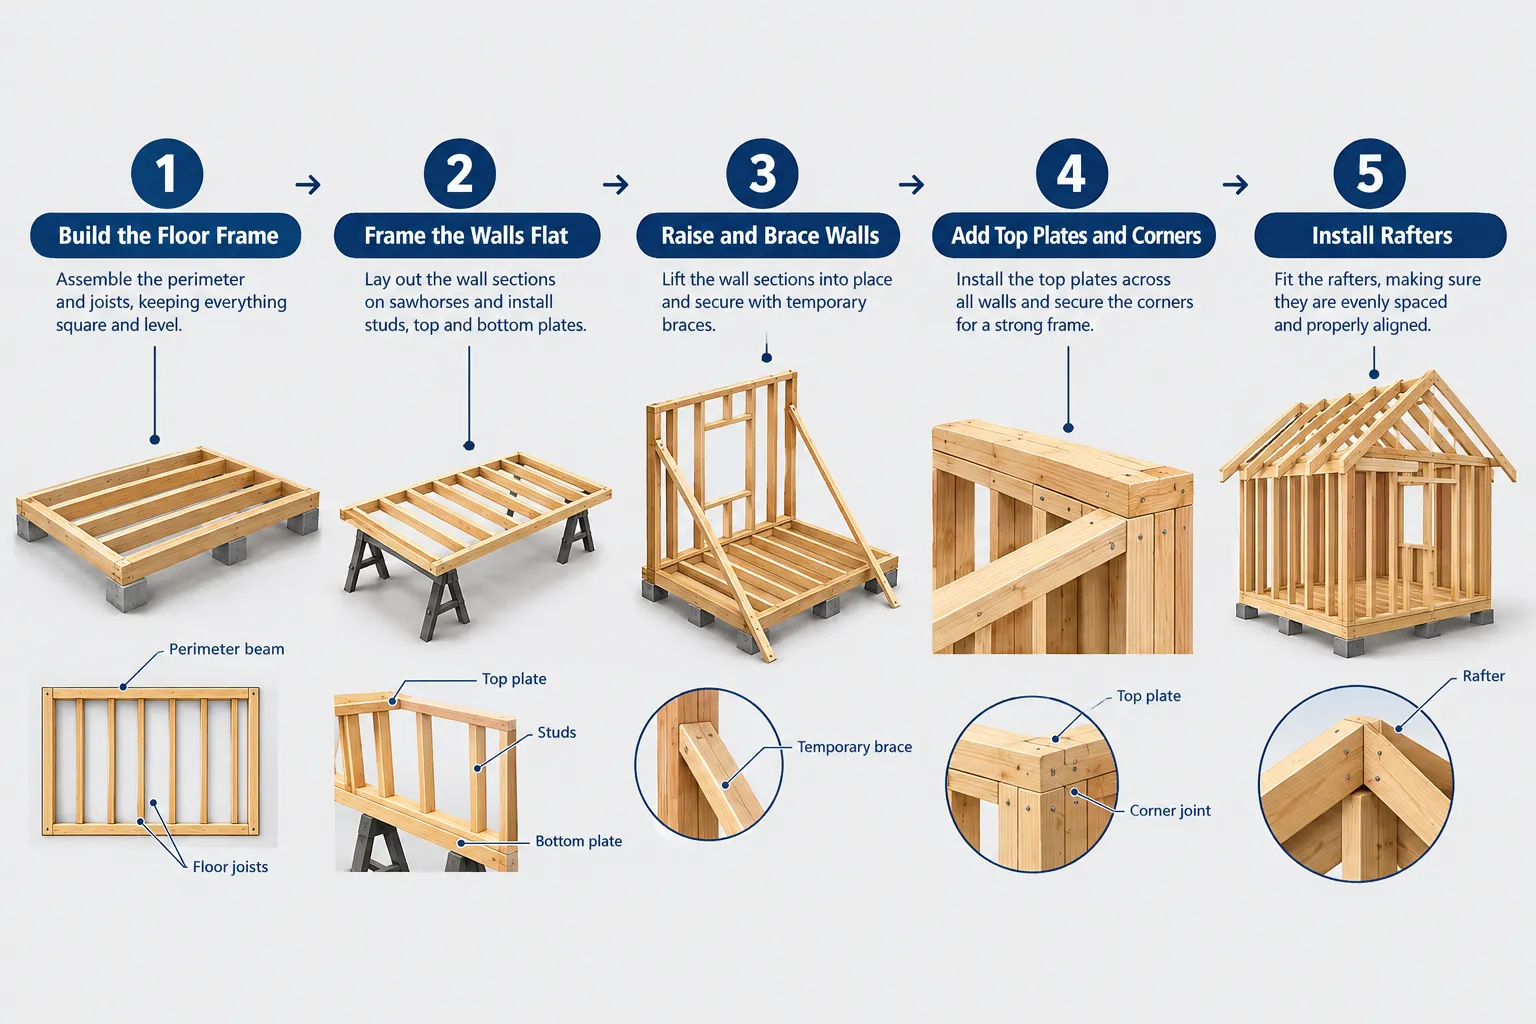
Shed framing follows a predictable order: build the floor first, then the walls, then the roof. Skipping ahead or working out of sequence is the fastest way to end up with a frame that doesn’t square up correctly.
Here is the standard sequence most beginners follow:
- Lay out and build the floor frame. Set rim joists around the perimeter, then add internal joists (commonly 16 inches on center) and check that the frame is square using the 3-4-5 triangle method or a long diagonal measurement comparison.
- Sheath the floor. Attach plywood or OSB decking to the joists so you have a solid working surface.
- Frame the walls flat on the ground. Lay out studs between top and bottom plates, nail them together while the wall is lying flat, then stand it up.
- Raise and brace each wall. Lift the wall into place, check it with a level, and nail temporary diagonal braces to hold it plumb while the next wall goes up.
- Connect the corners and add double top plates. This ties adjacent walls together and gives the roof frame a continuous surface to rest on.
- Frame the roof. Install rafters or prebuilt trusses, spacing them to match your sheathing and local snow-load requirements.
- Sheath the roof and walls. Once the skeleton is solid, add exterior plywood or OSB before moving on to roofing and siding.
A common edge case: if your shed design includes a loft or extra storage shelf, add blocking between joists or studs at that stage, since retrofitting support later is far harder. For design inspiration before you start cutting, browse these simple, step-by-step beginner shed plans.
What Materials Do I Need to Frame a Shed?
Shed framing relies on dimensional lumber, fasteners, and a handful of connector hardware. Most small sheds use 2×4 lumber for walls and 2×6 or 2×8 for floor joists, though larger sheds may need 2×6 studs for added strength.
A typical materials list includes:
- Studs and plates: pressure-treated 2×4 or 2×6 lumber for the bottom plate (since it contacts the foundation), standard lumber for studs and top plates
- Floor joists: 2×6, 2×8, or 2×10 depending on span and load
- Sheathing: 1/2-inch or 5/8-inch plywood or OSB for floors, roofs, and walls
- Roof framing: rafters cut on site or prefabricated trusses
- Fasteners: 16d common nails or framing screws, plus construction adhesive for added hold
- Connectors: joist hangers, hurricane ties, and metal corner brackets for wind resistance
Choose pressure-treated lumber for anything touching concrete or soil, since untreated wood will rot within a few seasons in that position. For everything above the sill plate, standard framing lumber is fine and considerably cheaper. If you’re still deciding on shed dimensions before buying material, this guide to choosing the best shed size for suburban lots can help you avoid over-buying lumber.
How Much Does It Cost to Frame a Shed?
Framing costs depend on shed size, lumber grade, and regional pricing, but the lumber package for a small shed’s frame (floor, walls, and roof skeleton) is usually a modest fraction of the total build cost. Foundation materials, roofing, siding, and hardware typically add far more than the raw framing lumber itself.
Rough cost drivers to expect:
- Lumber size: larger dimension lumber (2×6 vs 2×4) and treated lumber both cost more per board foot
- Shed footprint: an 8×10 shed needs noticeably less lumber than a 12×16 shed
- Local pricing: lumber prices vary by region and by season, so check a local supplier before budgeting
- Waste factor: experienced builders typically add 10 to 15 percent extra lumber to cover cutting mistakes and defects
Choose a smaller footprint if budget is the main constraint, since framing cost scales almost directly with square footage. For a full cost breakdown that includes foundation, roofing, and siding alongside framing, see this detailed cost to build a small shed guide.
Shed Framing vs. Full Construction: What’s the Difference?
Shed framing and full home construction share the same basic techniques, but sheds operate under far fewer structural demands, which is why beginners can realistically take on shed framing without a contractor.
| Factor | Shed Framing | Full Construction |
|---|---|---|
| Load requirements | Light: tools, storage, occasional occupancy | Heavy: full-time living loads, multiple stories |
| Permitting | Often exempt below a size threshold | Always requires permits and inspections |
| Foundation complexity | Skids, blocks, or a simple slab | Engineered footings and poured foundations |
| Timeline | Days to a couple of weekends | Weeks to months |
Choose shed framing as a learning project if you want to practice carpentry fundamentals without the liability and complexity of a habitable structure.
Can I Frame a Shed Without Experience, and What Size Should I Start With?
Yes. A beginner with no prior framing experience can successfully frame a shed, provided the project stays small and the builder follows a tested plan rather than improvising measurements.
An 8×10 or 10×12 footprint is the sweet spot for a first attempt. These sizes are large enough to be useful as storage or a small workshop, but small enough that mistakes are cheap to fix and the lumber count stays manageable.
Decision rule: choose a size at or under 120 square feet if this is your first framing project. Anything larger, particularly sheds approaching 200 square feet, introduces longer spans, heavier roof loads, and often a permit requirement, all of which raise the stakes for a first-timer.
A common mistake beginners make here is choosing an ambitious design (two stories, a loft, a wraparound porch) for a first build. Start simple, finish it, and apply lessons learned to the next project. For scaled, beginner-tested layouts, these 10×12 shed plans for backyard storage are a practical starting point.
How Long Does It Take to Frame a Shed?
Framing a small shed (8×10 to 10×12) typically takes a beginner one to two full weekends, assuming materials are pre-cut or measured ahead of time and weather cooperates.
Time breakdown generally looks like this:
- Floor frame and sheathing: half a day
- Wall framing and raising: one full day
- Roof framing: half a day to a full day, depending on rafter complexity
- Sheathing and bracing cleanup: a few extra hours
Working solo roughly doubles wall-raising time, since lifting and holding a wall plumb is much easier with a second set of hands. Choose to recruit a helper for at least the wall-raising day if possible; it’s the single biggest time-saver in the entire process.
Common Mistakes People Make When Framing Sheds
The most common shed framing mistakes involve skipping square-and-level checks, using the wrong fastener for the job, and failing to brace walls before moving to the next step.
Watch for these specific errors:
- Not checking square early. A floor frame that’s slightly out of square compounds into crooked walls and a roof that doesn’t sit flush.
- Skipping temporary braces. Walls that aren’t braced can shift or fall before the roof ties them together.
- Using interior nails outdoors. Standard nails rust and weaken in exterior conditions; use galvanized or coated fasteners.
- Wrong stud spacing for the sheathing. Plywood and OSB panels are sized for 16- or 24-inch spacing; mismatched spacing wastes material and weakens seams.
- Ignoring the bottom plate’s exposure. A non-treated bottom plate sitting on a foundation will rot faster than any other framing member.
A quick example: a builder who frames all four walls before checking plumb on each one often discovers the final corner doesn’t close up square, forcing a rebuild of at least one wall. Checking each wall individually before moving to the next prevents this entirely.
Do I Need Permits to Frame a Shed?
Permit requirements for shed framing depend on local building codes and usually hinge on square footage, not on the framing method itself. Many jurisdictions exempt sheds under roughly 100 to 200 square feet, but this threshold varies significantly by city and county.
Before buying lumber, check with your local building department for:
- Minimum size that triggers a permit requirement
- Setback rules (how close the shed can sit to property lines)
- Height restrictions, especially for sheds with a loft or tall roof pitch
- Any requirement for a permanent foundation versus a movable skid foundation
Choose to confirm permit rules before framing if your planned shed is near the local size threshold; a shed that’s six inches over the exempt limit can trigger the full permitting process. The custom vs. standard shed design comparison covers how design choices intersect with local code requirements in more detail.
Shed Framing on Uneven Ground: How to Handle It
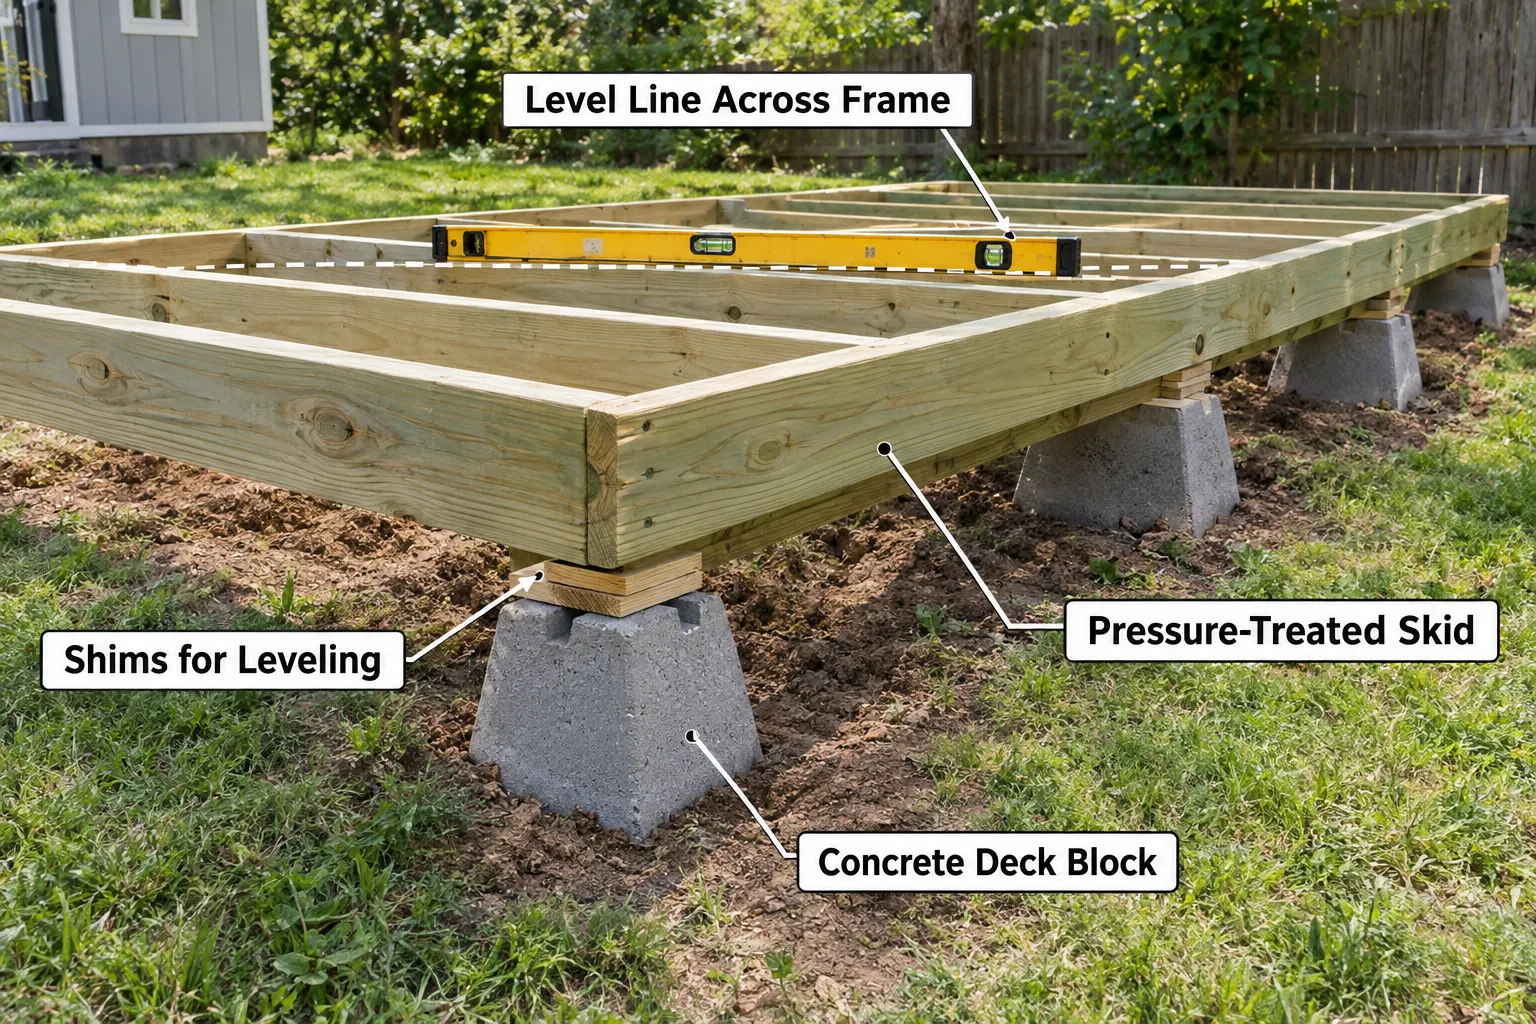
Uneven ground should be corrected at the foundation stage, before framing starts, using leveled skids, concrete deck blocks, or a graded pad. Framing directly on sloped or uneven ground without correcting it first leads to a frame that’s twisted out of square no matter how carefully the lumber is cut.
Common approaches for uneven sites:
- Concrete deck blocks at varying heights: works well for moderate slopes and allows airflow under the floor
- Pressure-treated skids on a graded gravel bed: a budget-friendly option for mild slopes
- A full concrete pad or slab: best for steep or very uneven ground, though it adds cost and time
Edge case: if the slope exceeds a few inches across the shed’s footprint, consult a local contractor or engineer before proceeding, since excessive grading or retaining wall work falls outside typical DIY scope. Always confirm the foundation is level in both directions with a long level or laser level before a single stud goes up.
Best Tools for Shed Framing: A Beginner’s Walkthrough of Must-Haves
A beginner can frame a shed with a modest tool kit: a circular saw, a framing hammer or nail gun, a tape measure, a speed square, and a 4-foot level cover nearly every task in this Shed Framing 101: A Beginner’s Walkthrough.
Core tool list:
- Circular saw: for cutting dimensional lumber to length
- Speed square: for marking square cut lines and checking corners
- 4-foot level and a torpedo level: for plumb walls and level plates
- Framing hammer or pneumatic nailer: speeds up repetitive nailing significantly
- Tape measure (25-foot): for layout and spacing checks
- Chalk line: for marking long, straight layout lines on the floor deck
Choose a pneumatic or battery-powered framing nailer if you’re building more than one shed or plan to continue with other carpentry projects; the time savings compound quickly. For a broader rundown of what belongs in a starter kit, see this guide to various tools used for woodworking and a full beginner tools and equipment overview.
Shed Framing in Winter or Bad Weather: Tips for Staying on Schedule
Framing in winter or wet weather is possible but requires adjusting for cold, brittle lumber, slower concrete cure times, and shorter daylight windows. Extreme cold can make wood more prone to splitting when nailed, and wet lumber swells, which affects fastener grip once it dries.
Practical adjustments for bad weather:
- Let pressure-treated lumber dry before framing if it arrived wet from the supplier, since swollen wood shrinks after assembly and can loosen joints.
- Pre-drill in very cold temperatures to reduce splitting, especially near the ends of boards.
- Cover the lumber stack and any poured concrete with tarps to protect from rain or frost.
- Plan foundation work for a weather window with several dry, mild days, since concrete curing slows significantly in cold temperatures.
Choose to delay wall raising specifically on windy days; an unbraced wall caught by a gust is a genuine safety hazard, not just an inconvenience.
When Should I Hire a Professional Instead of DIY Framing?
Hire a professional when the shed exceeds roughly 200 square feet, sits on a steep or complicated site, needs to meet strict snow-load or seismic code requirements, or when the project requires a permit that mandates licensed work.
Signs it’s time to bring in a contractor:
- The design includes a loft, second story, or heavy rooftop equipment
- Local code requires engineered plans or stamped drawings
- The site has significant slope, poor drainage, or requires excavation
- You’re building multiple structures and value is the main driver
Choose the DIY route if the shed is small, the site is reasonably flat, and the local permit threshold allows an exempt build. For a direct breakdown of cost differences between hiring help and going solo, this DIY shed building cost comparison lays out the numbers clearly.
Frequently Asked Questions
Do I really need pressure-treated lumber for the whole frame, or just part of it?
Just the parts touching the foundation or ground, typically the bottom (sill) plate and any skids. Everything above that can be standard framing lumber, which saves money without sacrificing durability.
What if my walls don’t come out perfectly square?
A small gap is normal and gets corrected during sheathing, but anything more than about a quarter inch out of square across a wall should be re-checked and re-braced before moving forward. Small errors compound fast once the roof goes on.
Can I use screws instead of nails for framing?
Yes, framing screws work and some builders prefer them for easier disassembly, but they’re generally slower to drive than a nail gun and cost more per fastener. Many codes still default to nailing schedules, so check local requirements if the shed needs a permit.
Is it cheaper to buy a prefab shed kit instead of framing from scratch?
It depends on size and finish level. Kits often save time but cost more per square foot; framing from scratch costs less in materials but takes more hours. This prefab shed kit cost comparison breaks down the trade-offs in detail.
Do I need a building inspector to check my framing?
Only if your shed requires a permit. Exempt sheds under the local size threshold usually don’t need inspection, but anything permitted will likely need a framing inspection before you close the walls with sheathing.
What roof style is easiest to frame as a beginner?
A simple gable roof is the most beginner-friendly option, since the rafter cuts are straightforward and materials are widely available. This guide to choosing between lean-to, gable, and barn shed roof styles compares the framing difficulty of each.
Conclusion
Shed framing comes down to sequence and precision: build the floor square, raise plumb walls, brace them before moving on, and top it off with a roof frame that matches your sheathing spacing. None of these steps require advanced carpentry skills, just patience and a willingness to double-check measurements before cutting.
Start with a small footprint, confirm your local permit rules, and correct any ground slope before the first board goes down. Those three decisions prevent the majority of problems beginners run into. Once the frame is standing square and braced, the rest of the build, siding, roofing, and doors, becomes dramatically easier.
Products, Tools, and Resources Worth Having on Hand
A few extras make shed framing noticeably smoother for a first-timer. A quality 4-foot level and a speed square are worth buying new rather than borrowing, since accuracy here affects everything downstream. A corded or battery circular saw with a sharp framing blade handles nearly every cut a small shed requires, and a basic framing nailer (pneumatic or battery) saves hours compared to hand-nailing an entire frame. If you’re building your carpentry skills alongside this project, a broader beginner woodworking tool kit will serve you well beyond just this one shed.