How to Build Floating Shelves That Hold Weight

A poorly mounted floating shelf can hold up just fine for weeks, right up until the moment it drops everything on the floor. The difference between a shelf that fails and one that lasts for years comes down to a handful of decisions made before a single screw goes into the wall. This guide walks through how to build floating shelves that hold weight, covering everything from choosing the right materials to finding studs, hiding hardware, and avoiding the mistakes that cause most shelves to sag or pull away from the wall.
Key Takeaways
- Floating shelves get their strength from wall anchors, not surface fasteners. Hitting studs is the single most important factor in load capacity.
- A shelf anchored into two wall studs with proper hardware can realistically support 50 to 80 pounds, depending on shelf depth and bracket type.

- Solid wood and plywood outperform MDF for heavy loads. MDF sags under sustained weight.
- Shelf depth should match the load: 8 to 10 inches for books, 6 to 8 inches for decor, 12 inches for kitchen or utility use.
- Plaster walls require a different approach than drywall, toggle bolts or masonry anchors are often necessary.
- Hidden rod brackets are the cleanest way to build a floating shelf with no visible hardware.
- Leveling is non-negotiable. Even a 1-degree tilt becomes obvious once items are placed on the shelf.
- Sagging shelves can usually be fixed by adding a center bracket or switching to a thicker shelf board.
What Is a Floating Shelf and How Does It Work?
A floating shelf is a wall-mounted shelf with no visible support underneath, no brackets sticking out, no legs, no frame. It appears to “float” against the wall. The support comes from hidden hardware mounted inside the wall and inside the shelf itself.
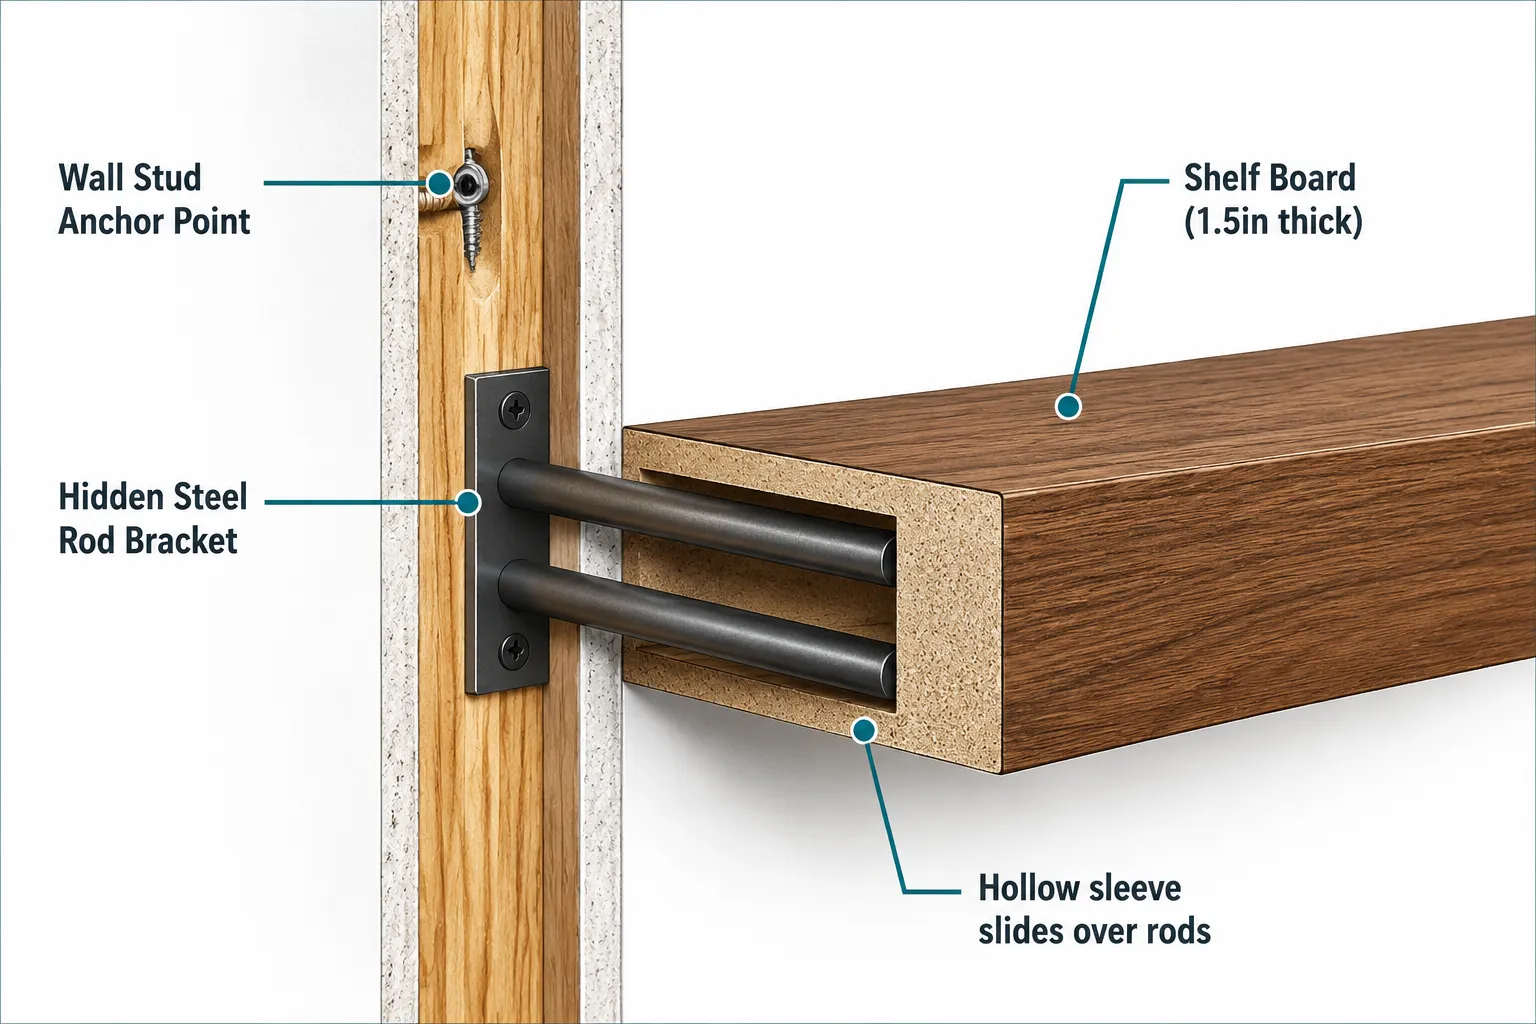
Most floating shelves use one of two systems. The first uses a metal wall cleat or a flat bracket that screws into the wall, with the shelf sliding over it or sitting on top. The second, and more structurally sound option for heavy loads, uses steel rods or dowels that extend horizontally from the wall into a hollow channel drilled through the shelf board. The shelf slides over the rods and sits flush against the wall, hiding all the hardware.
The key engineering principle: the rods or bracket act as a lever arm. The wall anchor takes the downward force. The deeper the shelf, the more leverage is applied at the wall, which is why deep shelves need stronger anchors.
How Much Weight Can Floating Shelves Actually Hold?
The weight a floating shelf can hold depends almost entirely on what it’s anchored into, not the shelf material itself. A shelf screwed into two wall studs with proper hardware can hold 50 to 80 pounds under normal conditions. A shelf anchored only into drywall with standard plastic anchors may hold as little as 10 to 20 pounds before the anchors pull out.
Here’s a practical breakdown:
| Anchor Type | Wall Material | Estimated Load Capacity |
|---|---|---|
| Screws into studs (2 studs) | Drywall | 50 to 80 lbs |
| Toggle bolts | Drywall (no stud) | 20 to 40 lbs |
| Plastic expansion anchors | Drywall | 10 to 20 lbs |
| Masonry anchors | Brick or concrete | 60 to 100+ lbs |
| Screws into studs (2 studs) | Plaster | 40 to 70 lbs |
These are general estimates based on typical residential construction. Actual capacity varies with stud spacing, screw length, bracket design, and shelf depth. For shelves holding books or heavy objects, always anchor into studs.
Floating Shelves vs. Regular Shelves: Which Is Better?
Floating shelves win on aesthetics and space efficiency. Traditional bracket shelves win on raw load capacity and ease of adjustment. The right choice depends on what the shelf needs to do.
Choose floating shelves if:
- The goal is a clean, modern look with no visible hardware
- The load is moderate (books, plants, decor, small appliances)
- The wall has accessible studs at the right spacing
Choose traditional bracket shelves if:
- The load is heavy and frequently changed (garage storage, workshop supplies)
- The wall is difficult to anchor into (old plaster, tile, or thin partition walls)
- Budget is tight, bracket shelves are faster and cheaper to install
For most living spaces, floating shelves are the better-looking and perfectly functional choice when built correctly. For a broader look at furniture-building projects, the Furniture Building Plans: DIY Woodworking Projects For Every Room resource covers a wide range of builds at every skill level.
Best Materials for Building Floating Shelves
The best material for a floating shelf that holds weight is solid hardwood or high-quality plywood. MDF is popular because it’s cheap and smooth, but it sags under sustained loads and doesn’t hold screws well near edges.
Solid hardwood (oak, maple, walnut): Best for heavy loads and a premium finish. Resists sagging. More expensive, but worth it for shelves holding books or kitchen items.
Plywood (3/4-inch, void-free): A strong, stable option that costs less than solid hardwood. Edges need to be banded or routed for a clean look. Holds screws well.
Pine or fir: Budget-friendly and easy to work with. Fine for light to medium loads. Prone to denting and warping in humid environments.
MDF: Acceptable only for very light decorative shelves. Do not use MDF for shelves holding books, appliances, or anything over 15 to 20 pounds.
For shelf thickness, 3/4 inch is the minimum for most applications. For shelves deeper than 10 inches or loads over 30 pounds, use 1-inch or 1.5-inch material, or add a front-edge reinforcement strip.
How Deep Should Floating Shelves Be?
Shelf depth should be matched to its purpose. Going too deep on a lightly anchored shelf increases the lever-arm effect and puts more stress on the wall anchors.
- 6 to 8 inches: Ideal for small decor, picture frames, and plants
- 8 to 10 inches: Best for books, small electronics, and kitchen spices
- 10 to 12 inches: Suitable for kitchen shelves, heavier objects, and storage bins
- 12 inches or more: Requires anchoring into studs at every bracket point, no exceptions
A common mistake is building a 12-inch-deep shelf and anchoring it with drywall anchors only. The extra depth multiplies the pull-out force on every anchor. Deeper always means stronger anchors.
What Hardware Do You Need to Build Floating Shelves?
The right hardware is what separates a shelf that lasts from one that fails. For a standard floating shelf build, gather the following:
For the wall:
- Stud finder
- Level (a 4-foot level is more accurate than a torpedo level for long shelves)
- Drill and drill bits (including a long 3/8-inch bit for rod-style brackets)
- 3-inch wood screws for stud mounting
- Toggle bolts or heavy-duty drywall anchors if studs aren’t accessible
For the shelf:
- Hidden rod bracket kit (steel rods, wall plate, and mounting hardware) or a French cleat system
- Sandpaper (80 to 220 grit progression)
- Wood finish of choice (oil, stain, polyurethane, or paint)
- Tape measure and pencil
For a deeper look at the tools that make woodworking projects like this easier, the Various Tools Used For Woodworking guide covers everything from hand tools to power tools with practical recommendations.
How to Install Floating Shelves in Drywall: Step-by-Step
Installing floating shelves that hold weight in drywall comes down to one rule: find the studs and use them. Here’s a reliable process that works for most standard builds.
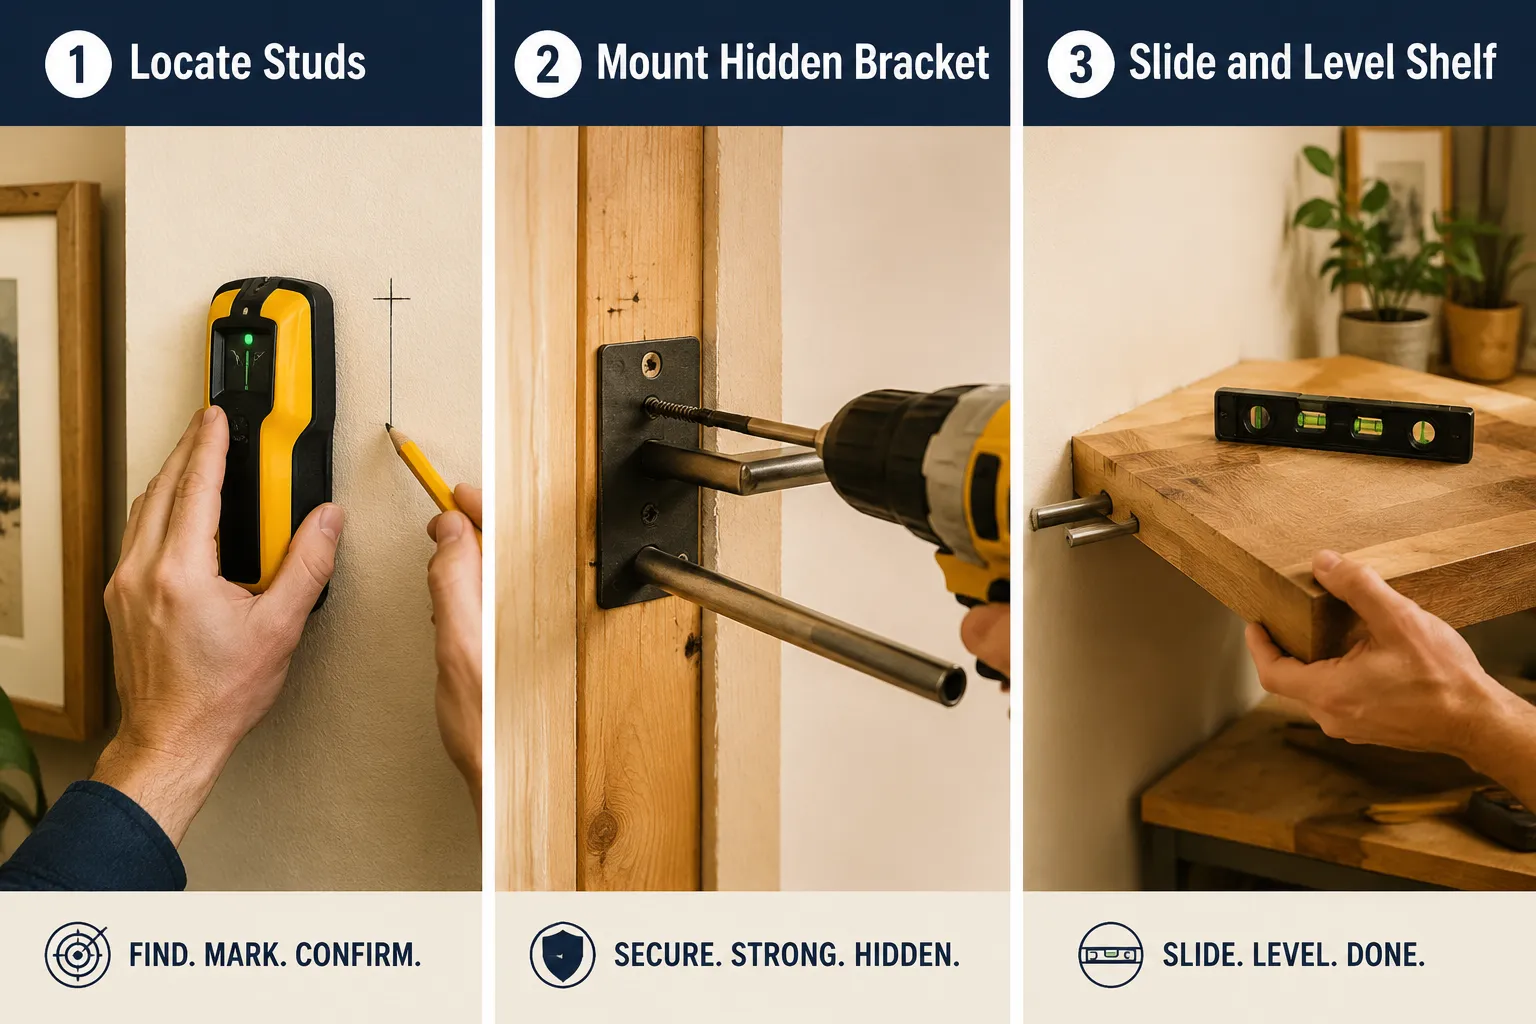
Step 1: Locate the studs. Use a stud finder and mark the center of each stud with a light pencil mark. Studs in most homes are spaced 16 inches apart. Verify with a small nail or a rare-earth magnet before drilling.
Step 2: Mark your shelf position. Use a level to draw a faint horizontal line at the desired shelf height. Double-check the line at both ends before drilling anything.
Step 3: Mount the bracket or wall plate. Position the bracket so at least two screws land in studs. Use 3-inch screws for maximum grip. If one mounting point falls between studs, use a toggle bolt rated for the load.
Step 4: Drill the shelf board. For rod-style brackets, drill horizontal holes through the shelf board at the correct spacing. Use a drill press or a drilling guide to keep holes perfectly level. Misaligned holes are the most common reason shelves won’t slide on cleanly.
Step 5: Slide the shelf onto the rods. Apply a small amount of construction adhesive inside the holes for a permanent, rattle-free fit. Slide the shelf flush against the wall.
Step 6: Final level check. Place a level on top of the shelf before the adhesive sets. Adjust if needed.
For beginners who want to build confidence with projects like this, the Step-by-Step Guide To Woodworking Projects For Beginners is a solid starting point.
Floating Shelves Into Studs vs. Anchors: Which Should You Use?
Always use studs when possible. Studs provide a mechanical connection to the structural framing of the wall, while drywall anchors rely only on the drywall itself, a material that is not designed for sustained tension loads.
The only time anchors are the right choice is when studs are not accessible at the needed location and the load is light (under 20 pounds). In that case, use toggle bolts (also called butterfly anchors), which spread the load across a larger area of drywall. Avoid standard plastic expansion anchors for anything heavier than a picture frame.
Decision rule: If the shelf will hold books, kitchen items, or anything a person might lean on, anchor into studs. No exceptions.
Can You Put Floating Shelves on Plaster Walls?
Yes, floating shelves can go on plaster walls, but the installation requires more care than drywall. Plaster is harder and more brittle, and it can crack if drilled without the right technique.
Use a masonry or multi-material drill bit and start at a slow speed to prevent cracking. Locate studs with a magnetic stud finder (plaster often has metal lath that confuses electronic finders). When studs are accessible, screw directly into them through the plaster using 3.5-inch screws to reach the wood framing behind.
When studs aren’t accessible, use toggle bolts rated for plaster. Avoid standard plastic anchors, they don’t grip plaster reliably. Pre-drill carefully and keep the drill perpendicular to the wall to prevent cracking around the hole.
How to Hide Brackets on Floating Shelves
The cleanest method is a rod-style hidden bracket system. The wall plate mounts flush to the wall, steel rods extend outward, and the shelf slides over the rods with no visible hardware. From the front, the shelf looks like it’s glued to the wall.
A French cleat is another option: a beveled strip of wood mounts to the wall, and a matching bevel on the back of the shelf locks over it. This method is strong and easy to adjust, but the cleat is visible from the side.
For a fully seamless look, the rod system is the best choice. The shelf board needs to be thick enough to accommodate the rod holes, at least 1.5 inches for most standard rod kits.
Understanding the right joinery and connection techniques makes hidden bracket builds much easier. The Woodworking Joinery And Techniques: Build Skills That Last guide covers the core skills that apply directly to shelf-building projects.
Are Floating Shelves Safe for Heavy Items Like Books?
Floating shelves are safe for books when built correctly. A shelf anchored into two studs with a rod-style bracket and made from 3/4-inch plywood or solid hardwood can hold a full row of hardcover books without issue.
The risk comes from under-built shelves: thin MDF boards, anchors in drywall only, or brackets spaced too far apart. A standard row of hardcover books (about 12 books per linear foot) weighs roughly 20 to 25 pounds per foot. A 3-foot shelf of books can approach 60 to 75 pounds, well within the capacity of a properly stud-mounted shelf, but far beyond what drywall anchors alone can handle.
For heavier book collections, add a center bracket, use 1-inch-thick shelf material, and keep the shelf depth at 10 inches or less.
Common Mistakes When Installing Floating Shelves
Most floating shelf failures trace back to a short list of avoidable errors.
Missing the studs. Using only drywall anchors for a shelf that will hold real weight is the most common and most costly mistake. Always verify stud location before drilling.
Using MDF for heavy loads. MDF looks great in the store but sags noticeably under books or kitchen items within months. Use plywood or solid wood.
Drilling shelf holes off-level. If the holes drilled into the shelf board aren’t perfectly horizontal, the shelf will sit at an angle or won’t slide onto the rods at all. Use a drill press or a drilling guide.
Skipping the level check. A shelf that looks level to the eye is often not. Use a 4-foot level and check it twice before the adhesive sets.
Choosing the wrong depth for the anchor type. A 12-inch-deep shelf on toggle bolts is asking for failure. Match shelf depth to anchor strength.
Floating Shelf Sagging: How to Fix It
A sagging floating shelf is usually caused by one of three things: the shelf material is too thin, the bracket spacing is too wide, or the shelf is overloaded. Each has a straightforward fix.
Thin shelf board: Remove the shelf and replace it with a thicker board (3/4 inch minimum, 1 inch for spans over 30 inches).
Wide bracket spacing: Add a center bracket. Most sagging happens in the middle of long spans with only two end-mounted brackets.
Overloading: Redistribute the weight or move heavier items to a lower, more robustly mounted shelf.
If the shelf has pulled away from the wall rather than sagging in the middle, the anchors have failed. Remove the shelf, fill the old holes, locate the studs, and remount with proper stud-anchored hardware.
How to Level Floating Shelves Perfectly
Leveling is the step most beginners rush, and it’s the one that’s most visible once the shelf is loaded. A 1-degree tilt on a 36-inch shelf means one end sits nearly 3/8 of an inch lower than the other, noticeable to anyone who walks into the room.
The reliable method: draw a level line on the wall before mounting anything. Use a 4-foot level (or longer) rather than a short torpedo level. Mark both ends of the line, then check the middle. Mount the wall bracket or cleat to this line exactly.
After the shelf is installed, place the level on top of the shelf itself, not on the bracket, for a final confirmation. Small adjustments can be made by shimming behind the bracket before the screws are fully tightened.
For readers who want to take on more complex furniture builds after mastering shelf installation, How To Read & Use Woodworking Plans: Beginner’s Complete Guide is a natural next step.
FAQ
Do floating shelves need to go into studs?
For any shelf holding more than 20 pounds, yes. Studs provide a structural connection that drywall alone cannot match. Use toggle bolts only for light decorative shelves with no real load.
How far apart should floating shelf brackets be?
For most shelves, brackets should be no more than 16 to 24 inches apart. For spans over 36 inches, add a center bracket to prevent sagging.
What is the maximum weight for a floating shelf?
A properly stud-mounted floating shelf with a rod bracket can hold 50 to 80 pounds. That’s enough for a full row of books or a small appliance. Exceeding this range requires additional brackets or a different shelf system.
Can floating shelves hold a TV?
Not safely in most cases. TVs require a dedicated wall mount rated for the TV’s weight, anchored into studs. A floating shelf is not designed for the dynamic load and vibration of a television.
How thick should a floating shelf be?
At minimum, 3/4 inch for spans under 24 inches with light loads. For longer spans or heavier loads, use 1-inch or 1.5-inch material. Thicker shelves also look more substantial and are less prone to visible sagging.
What’s the best wood for floating shelves?
Oak, maple, and walnut are top choices for strength and appearance. For a budget option, 3/4-inch birch plywood is strong, stable, and takes paint or stain well.
How do I stop my floating shelf from wobbling?
Wobbling usually means the shelf isn’t fully seated on the bracket, the rods are loose in their holes, or the wall anchors have loosened. Tighten all screws, add construction adhesive inside the rod holes, and check that every anchor is still secure.
Can floating shelves go on any wall?
Most walls work, but some require extra steps. Tile walls need masonry bits and anchors. Concrete or brick walls need masonry anchors. Very thin partition walls (less than 3 inches deep) may not have enough depth for standard hardware.
How long does it take to build and install floating shelves?
For a beginner, plan on two to three hours per shelf, including measuring, cutting, finishing, and installation. With practice, the process gets closer to one hour per shelf.
Is it cheaper to build floating shelves or buy them?
Building from scratch is generally cheaper for quality results. A solid hardwood floating shelf can cost $15 to $40 in materials versus $60 to $150 or more for a comparable retail product. The Best Popular Woodworking Products For Home Improvement page has product recommendations that can help with sourcing hardware and materials.
Conclusion
Building floating shelves that hold weight is a genuinely achievable project for any beginner willing to do the prep work correctly. The shelf itself is straightforward woodworking. The part that matters most, the part that determines whether the shelf stays on the wall for a decade or comes down in a year, is the wall connection.
Find the studs. Use the right hardware for the wall type. Match shelf depth and material to the actual load. Level carefully before anything sets. Those four steps cover the vast majority of what separates a successful floating shelf from a failed one.
Start with a single shelf in a low-stakes location to get comfortable with the process. Once the technique is solid, the same skills apply to full wall-to-wall shelf systems, built-in bookcases, and kitchen open shelving. The Popular Woodworking section at Woodworking Guru has project ideas and plans to keep building from there.
Products and Tools Worth Having
A quality stud finder (the magnetic type works on both drywall and plaster), a 4-foot level, and a hidden rod bracket kit are the three purchases that make the biggest difference in this project. For the shelf board itself, a local hardwood dealer or a well-stocked home center with a plywood cutoff bin can save significant money over pre-made retail shelves. A random-orbit sander and a simple wipe-on oil finish round out the toolkit for a shelf that looks as good as it holds.