
Ultimate Woodworking Joints Guide: Every Joint Type Compared
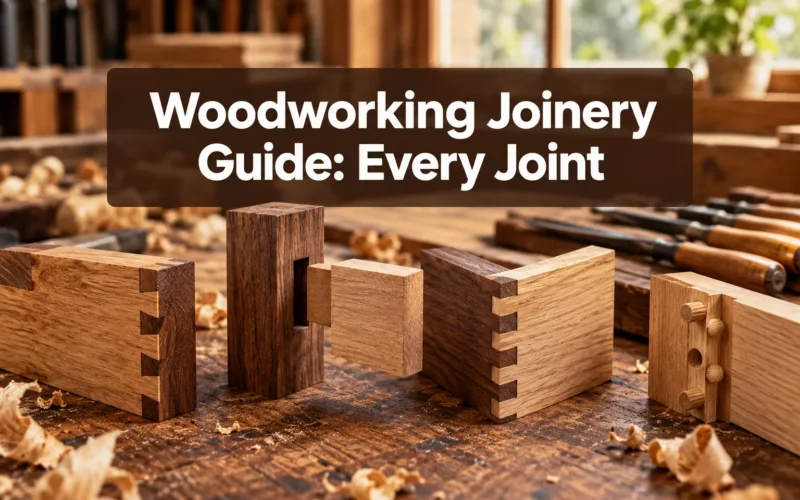
The joint holding a chair together matters more than the wood it’s made from. That’s not an exaggeration. A beautiful piece of red oak furniture built with the wrong joint will fail in months. The right joint, cut cleanly, can last generations. This woodworking joints guide covers every major joint type, compares their strengths honestly, and helps beginners choose the right one for each project.
Key Takeaways
- The mortise and tenon joint is widely considered the strongest option for furniture frames, doors, and load-bearing connections.

- Dovetail joints offer exceptional resistance to pulling apart and are the traditional choice for drawer construction.
- Pocket hole joinery is a legitimate, beginner-friendly method that works well for face frames, cabinets, and light furniture.
- Butt joints are the weakest joint type and should always be reinforced with fasteners, dowels, or pocket screws.
- Dowel joints are strong enough for most furniture applications and easier to cut than mortise and tenon joints.
- Beginners should start with pocket holes and dowel joints before progressing to hand-cut dovetails or mortises.
- Softwoods like pine require more careful joint selection because they compress and dent more easily than hardwoods.
- Most beginner joinery setups cost between $50 and $300, depending on the method chosen.
- Joint failure almost always comes down to poor fit, inadequate glue surface, or the wrong joint for the load direction.
Find this useful? Add us as a preferred source on Google and more of what we publish will show up in your results.
What Are the Main Types of Woodworking Joints and How Do They Work
Every woodworking joint connects two pieces of wood by creating a mechanical interlock, a glue surface, or both. The joint type determines how forces are distributed across the connection, which is why matching the joint to the load is so important.
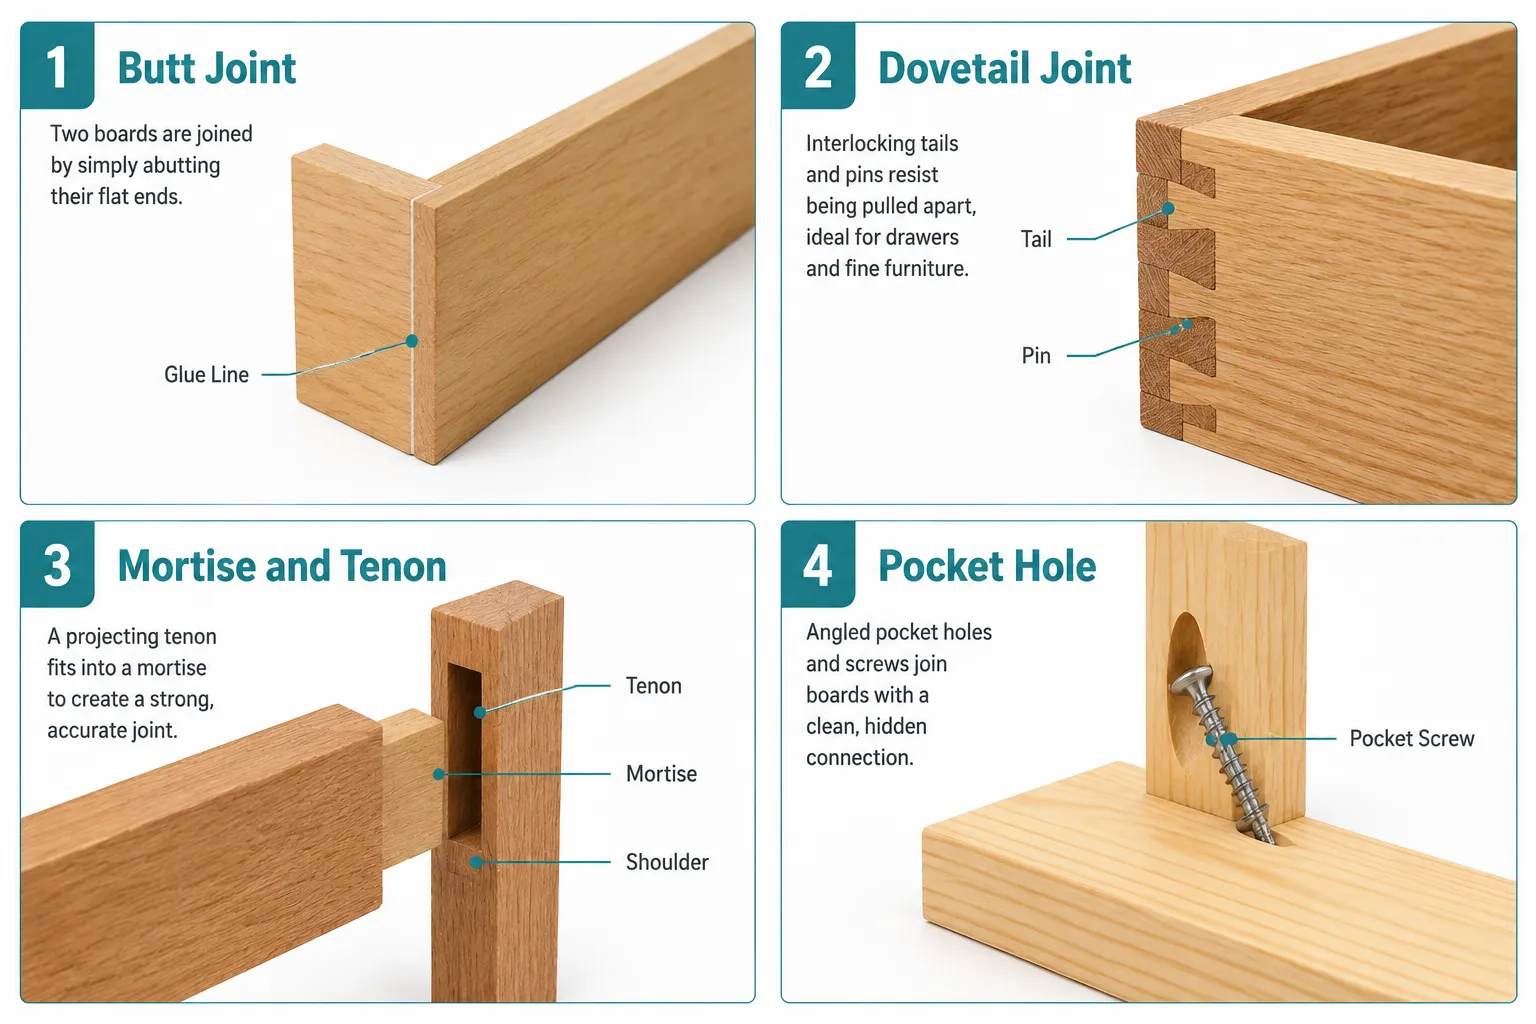
Here are the joints every woodworker should know:
Butt Joint, the simplest joint. Two boards meet end-to-face or end-to-end with no shaping. Weak on its own because end grain glues poorly. Always needs mechanical reinforcement (nails, screws, or pocket holes).
Lap Joint: One board overlaps another, with material removed from each so they sit flush. Good glue surface area. Common in frame construction and shelving.
Dado Joint: A channel cut across the grain of one board to accept another board’s edge. Standard for shelf construction in cabinets and bookcases.
Rabbet Joint: An L-shaped notch cut along the edge or end of a board. Often used for cabinet backs and drawer bottoms.
Mortise and Tenon: A projecting tenon cut on one piece fits into a matching cavity (mortise) on another. The gold standard for furniture frames and doors.
Dovetail Joint: Interlocking fan-shaped tails and pins that resist pulling apart. Traditional for drawer boxes and case construction.
Box Joint (Finger Joint), interlocking square fingers. Strong glue surface, easier to cut than dovetails, common for boxes and drawers.
Dowel Joint, Cylindrical wooden pegs align and reinforce a glued butt joint. Stronger than a plain butt joint and accessible to beginners.
Pocket Hole Joint: An angled hole drilled into one board accepts a self-tapping screw that pulls the joint tight. Fast, strong enough for most furniture, and beginner-friendly.
For a deeper look at how these techniques fit into a broader skill set, the Woodworking Joinery and Techniques: Build Skills That Last guide is a solid next read.
Which Woodworking Joint Is Strongest for Different Applications
The mortise and tenon joint is the strongest for furniture frames and structural connections. For resisting pull-apart forces specifically, the dovetail joint leads. No single joint wins every category; strength depends on the direction of the load.
| Joint Type | Best Application | Strength Rating | Skill Level |
|---|---|---|---|
| Mortise and Tenon | Chair legs, door frames, tables | Excellent | Intermediate |
| Dovetail | Drawer boxes, case sides | Excellent (tension) | Advanced |
| Box Joint | Boxes, drawers, small carcasses | Very Good | Intermediate |
| Dado | Shelves, cabinet interiors | Good (vertical load) | Beginner |
| Dowel | Face frames, panel alignment | Good | Beginner |
| Pocket Hole | Cabinets, face frames, furniture | Good | Beginner |
| Butt Joint | Rough construction only | Poor (without reinforcement) | Beginner |
Decision rule: Choose mortise and tenon for anything that carries weight or experiences racking forces (like chair legs). Use dovetails where the joint needs to resist being pulled apart. Use pocket holes or dowels when speed and simplicity matter more than traditional craftsmanship.
Mortise and Tenon vs. Dovetail Joint: Which Should You Use
These are two different tools for two different jobs. The mortise and tenon excels at right-angle connections under compression and racking stress. The dovetail excels at corner connections that must resist tension, being pulled apart along the length of the boards.
Use a mortise and tenon when:
- Joining a rail to a leg (tables, chairs, bed frames)
- Building a door or window frame
- Any connection where one piece enters another at 90 degrees and needs to hold under load
Use a dovetail when:
- Building a drawer box
- Joining the corners of a cabinet carcass
- You want a joint that’s both strong and visually impressive
A common beginner mistake is treating these as interchangeable. They’re not. Cutting a dovetail on a chair leg-to-rail connection makes no structural sense, and a mortise and tenon on a drawer corner is more work than necessary.
What’s the Difference Between Through and Blind Mortise and Tenon Joints
A through mortise and tenon passes completely through the receiving piece so the tenon end is visible on the far side. A blind (or stopped) mortise and tenon stops short, hiding the joint entirely. Both are equally strong when cut correctly.
- Through mortise and tenon: Visible from both sides. Often used in workbench construction, timber framing, and rustic furniture where the exposed joint is a design feature.
- Blind mortise and tenon: Hidden inside the joint. The standard choice for furniture where clean, unbroken surfaces matter.
- Wedged mortise and tenon: A through joint with small wedges driven into saw kerfs in the tenon after assembly, locking it permanently. Extremely strong and used in high-stress applications.
For beginners, the blind mortise and tenon is the most practical starting point because any slight gap at the tenon end stays hidden.
How Do I Cut a Dovetail Joint by Hand for Beginners
Hand-cutting a dovetail is achievable for beginners with the right approach. The key is marking carefully, sawing to the line, and paring the waste with a sharp chisel rather than rushing.
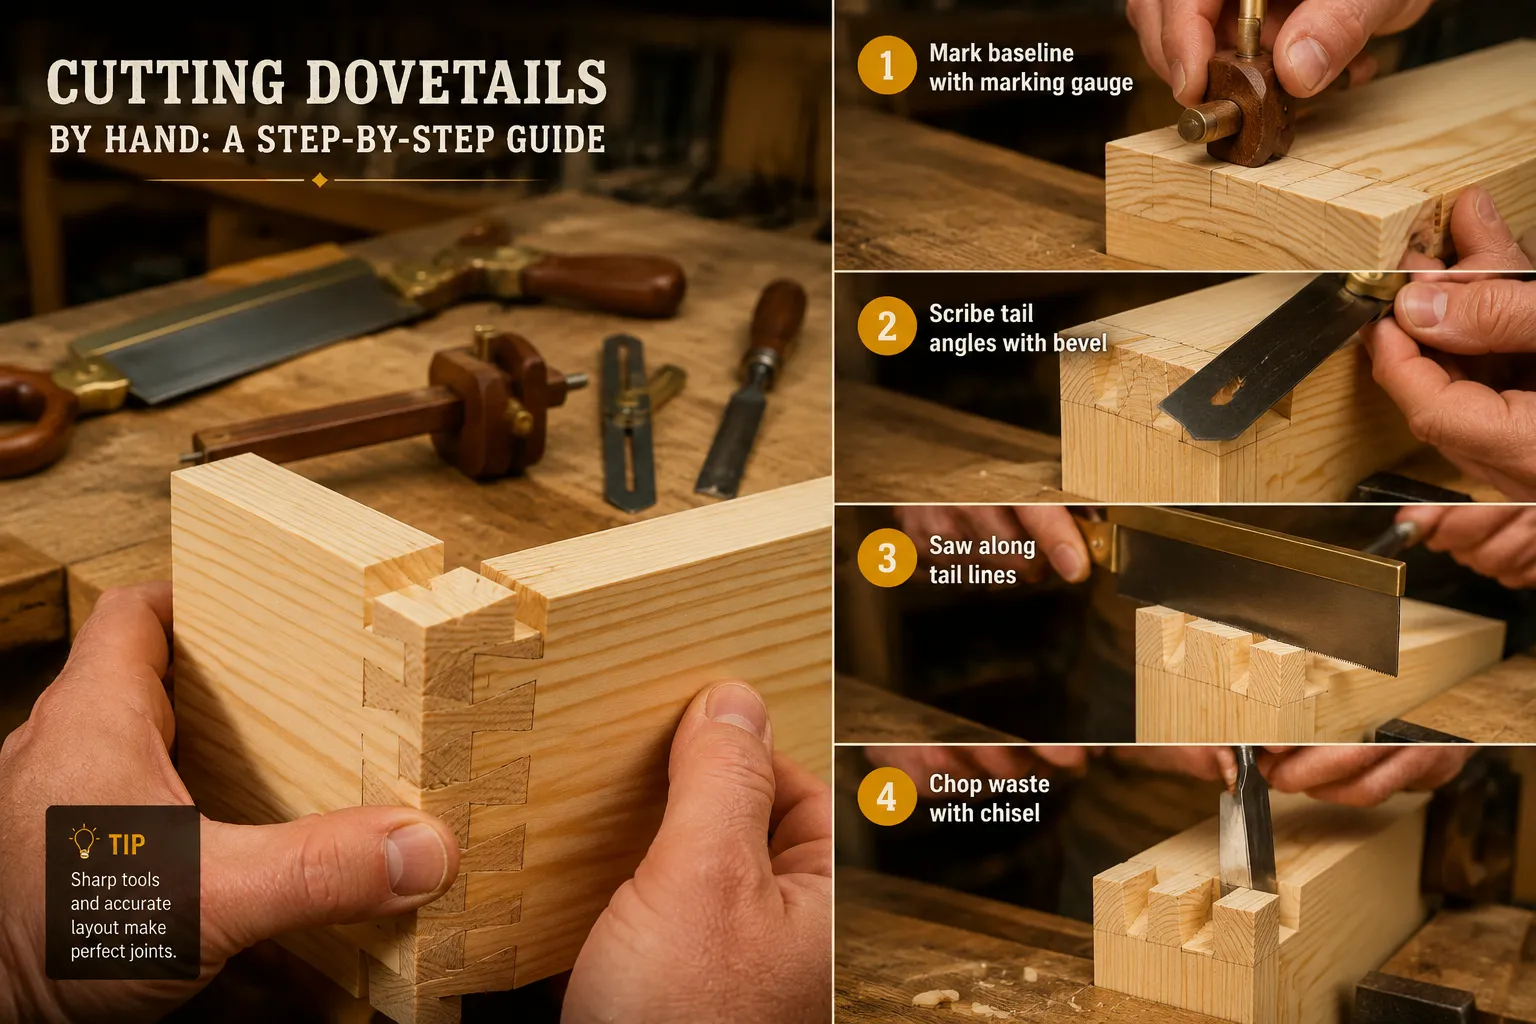
Basic hand-cut dovetail process:
- Mark the baseline on both pieces using a marking gauge set to just over the board thickness.
- Lay out the tails using a sliding bevel set to a 1:8 ratio for hardwood or 1:6 for softwood. Mark with a sharp pencil or marking knife.
- Saw the tails with a fine-toothed dovetail saw, staying just outside the line on the waste side.
- Chop out the waste between the tails using a sharp bench chisel and mallet. Work halfway through, flip the board, and finish from the other side.
- Transfer the tail layout to the pin board by holding the tails against the pin board and scribing directly with a marking knife.
- Saw and chop the pins using the same technique.
- Test fit and adjust by paring thin shavings from tight spots until the joint slides together with hand pressure.
A sharp chisel is non-negotiable here. Dull tools cause tear-out and sloppy fits. For a structured approach to building these skills, the Step-by-Step Guide to Woodworking Projects for Beginners is a good companion resource.
Which Joints Are Best for Furniture That Needs to Hold Weight
For furniture that carries significant weight, dining tables, chairs, bookshelves, bed frames, the joint must resist both compression and racking (side-to-side movement). Mortise and tenon joints are the top choice, followed by well-fitted dado joints for shelving.
- Chairs: Mortise and tenon at every leg-to-rail connection. Chairs take complex, multi-directional forces and need the strongest possible joint.
- Tables: Mortise and tenon for apron-to-leg joints. Dowels can work for lighter side tables.
- Bookshelves: Dado joints for shelves (they resist vertical load well). Rabbet joints for the back panel.
- Bed frames: Mortise and tenon or heavy-duty pocket screws with corner blocks for the rail-to-post connections.
Common mistake: Using pocket holes alone on chair leg connections. Pocket screws handle shear loads reasonably well but are not designed for the racking and twisting forces a chair experiences daily.
Can I Use Pocket Holes Instead of Traditional Joinery
Yes, pocket holes are a legitimate joinery method for most furniture and cabinet projects. They’re not a shortcut or a compromise; they’re a different tool that suits certain applications very well.
Pocket holes work best for:
- Face frames on cabinets
- Tabletops (attaching the top to the apron)
- Light-duty furniture like side tables, benches, and storage units
- Situations where assembly speed matters
Pocket holes are a poor choice for:
- Chair leg-to-rail connections (racking forces are too high)
- Any joint where the screws would be visible and unsightly
- Joints in very thin stock (under 3/4 inch can be tricky)
A quality pocket hole jig like the Kreg R3 or K4 costs $30 to $100 and is one of the most practical investments for a beginner’s shop. Explore more options in the Top Types of Woodworking Jigs Every Woodworker Needs guide.
Are Dowel Joints as Strong as Mortise and Tenon
Dowel joints are close in strength to mortise and tenon joints for many furniture applications, but not quite equal under heavy racking stress. Several independent tests by woodworking publications have shown dowel joints reaching 70-90% of the strength of a comparable mortise and tenon, depending on dowel diameter, number of dowels, and wood species.
For most hobbyist furniture projects, side tables, shelving, bed frames, dowel joints are more than adequate. The gap in strength only becomes meaningful in high-stress applications like chair construction.
Dowel joint tips for beginners:
- Use at least two dowels per joint to prevent rotation.
- Choose dowels that are half the thickness of the narrower board.
- Use spiral-grooved dowels rather than smooth ones, they allow glue to distribute more evenly.
- A self-centering dowel jig (such as the Milescraft Dowel Jig) makes accurate alignment much easier.
Which Joints Are Easiest for a Beginner Woodworker to Learn First
The three best starting joints for beginners are the pocket hole joint, the dowel joint, and the dado joint. All three are achievable with basic tools, produce reliable results quickly, and build the foundational understanding needed for more advanced joinery later.
Recommended learning order:
- Pocket hole joint: requires only a pocket hole jig and a drill. Results are immediate and strong enough for real projects.
- Dado joint: cut with a router and a straight bit or a table saw with a dado stack. Teaches the importance of precise fit.
- Dowel joint: introduces alignment skills and the concept of reinforcing a glue joint mechanically.
- Lap joint, Simple to cut, great for frames, and teaches accurate shoulder cuts.
- Mortise and tenon: The natural progression once basic tool control is established.
The Beginner Woodworking Guide: Tools, Projects and Tips to Start Today has a broader overview of how joinery fits into the overall learning path.
How Much Does Woodworking Joinery Equipment Cost to Get Started
A beginner can get started with functional joinery equipment for $50 to $300, depending on the methods chosen. More advanced setups (router table, mortising machine) can reach $500 to $1,500, but those aren’t necessary at the start.
Approximate starting costs (2026 estimates):
- Pocket hole jig (Kreg R3 or similar): $30,$60
- Dowel jig (self-centering): $20,$50
- Router with straight bit for dadoes: $80,$200
- Dovetail saw and chisels for hand-cut joints: $60,$150
- Mortise chisel set for mortise and tenon: $40,$100
Most beginners should start with a pocket hole jig and a basic chisel set. That combination covers the majority of beginner projects without a large upfront investment. For a full breakdown of what tools matter most early on, see Beginner Woodworking Tools and Equipment: What You Need and Why.
What Joints Should I Avoid When Working With Softwood
Softwoods like pine, cedar, and spruce compress and dent more easily than hardwoods, which affects how certain joints perform. Avoid joints that rely on tight mechanical compression in thin walls, and be cautious with joints that require precise, crisp edges.
- Avoid fine dovetails in soft pine, The thin tails and pins crush and dent during assembly, ruining the fit.
- Avoid very thin tenon cheeks. Softwood tenons need more material thickness to resist compression.
- Butt joints in softwood are especially weak. End grain in softwood absorbs glue poorly and provides almost no long-grain glue surface.
Better choices for softwood:
- Dado and rabbet joints (they distribute load over a wide surface)
- Pocket hole joints (the screw does most of the work)
- Box joints with wider fingers (more glue surface, less fragile edges)
For guidance on choosing the right wood species for your project, the Wood Types and Material Selection: Choose the Right Lumber for Any Project guide covers this in depth.
Why Does My Wood Joint Keep Failing or Coming Apart
Joint failure almost always traces back to one of four causes: poor fit, inadequate glue surface, wrong glue for the application, or the wrong joint for the load direction.
Diagnose the failure:
- Gap in the joint. The fit was too loose. Glue fills gaps up to about 0.005 inches well; beyond that, strength drops sharply. Recut for a snug fit.
- Glue failure at the surface. End grain glues poorly. If the joint is mostly end grain (like a plain butt joint), the glue bond is never going to hold under stress. Switch to a joint with a longer grain surface.
- Joint pulled apart under tension. The joint type doesn’t resist tension. A butt joint or dado joint will pull apart if loaded in the wrong direction. Switch to a dovetail or mortise and tenon.
- Seasonal wood movement: Wood expands and contracts with humidity changes. If the joint was glued across the grain without allowing for movement, the wood itself can split. This is especially common in wide panel construction.
What are the most common mistakes when cutting them:
- Cutting dovetails too quickly without scribing the pins from the tails directly (always scribe, never measure)
- Cutting mortises without checking for square as you go
- Assembling pocket hole joints without clamping the pieces flush before driving the screw
How Do I Know Which Joint to Use for a Specific Woodworking Project
Match the joint to the load direction, the visibility of the connection, and your current skill level. Those three factors narrow the choice quickly.
A practical decision framework:
- Is the joint hidden or visible? If visible, a dovetail or box joint adds beauty. If hidden, pocket holes or dowels are fine.
- What direction is the force? Compression and racking = mortise and tenon. Tension (pulling apart) = dovetail. Vertical shelf load = dado.
- What’s your skill level? Beginners should default to pocket holes, dowels, and dadoes until hand tool skills develop.
- What wood species are you using? Softwood limits some options (see above).
Reading project plans carefully also helps; good plans specify joint types for a reason. The How to Read and Use Woodworking Plans: Beginner’s Complete Guide walks through how to interpret those specifications correctly.
Frequently Asked Questions
What is the strongest wood joint for beginners to cut?
The strongest joint a beginner can cut reliably is the mortise and tenon, but it requires practice. For beginners who want strong results immediately, a well-fitted dowel joint or pocket hole joint is more practical and still very strong for most furniture applications.
Do I need a router to cut a dado joint?
No. A dado can be cut with a table saw and dado stack, a hand saw and chisel, or a router with a straight bit. A router with a straight-edge guide is the most accessible option for beginners without a table saw.
Can I use wood glue alone without any joint?
Long-grain to long-grain glue joints (like edge-gluing boards for a tabletop) are actually very strong and can exceed the strength of the wood itself. But end-grain glue joints are weak and should always be reinforced with a mechanical joint or fastener.
How tight should a mortise and tenon joint be before gluing?
The tenon should slide into the mortise with firm hand pressure, not loose, but not so tight that it requires a mallet. A joint that needs to be forced in will stress the wood during assembly and may split it.
Is it worth learning hand-cut dovetails as a beginner?
Yes, eventually. Hand-cut dovetails build precision, tool control, and an understanding of how wood behaves. But they’re not a first-week project. Build basic skills with pocket holes and dados first, then progress to dovetails when hand saw and chisel work feel comfortable.
What glue should I use for woodworking joints?
PVA wood glue (like Titebond II or III) is the standard choice for most interior furniture. It’s strong, sands well, and has a reasonable open time for assembly. For outdoor projects, use a waterproof PVA (Titebond III) or epoxy.
Can pocket holes be used for outdoor furniture?
Yes, with waterproof screws (stainless steel or coated) and exterior-rated wood glue. The pocket holes themselves don’t weaken in moisture, but standard zinc screws will rust and fail over time outdoors.
How many dowels should I use per joint?
At minimum, two dowels per joint to prevent rotation. For longer joints (like a full-length edge joint on a panel), space dowels every 8 to 12 inches.
What’s a good first joinery project for a complete beginner?
A simple box using dado joints for the corners and a rabbet for the bottom panel. It teaches accurate measuring, dado cutting, and dry-fitting, all foundational skills that transfer directly to more complex projects.
Do I need expensive tools to cut good joints?
No. Sharp, well-maintained basic tools outperform expensive dull ones every time. A $15 bench chisel that’s properly sharpened will cut cleaner joints than a $100 chisel that’s never been honed.
Conclusion
The best joint is always the one that fits the load, suits the wood, and matches the builder’s current skill level. This woodworking joinery guide has covered every major joint type from the humble butt joint to the classic dovetail, compared their strengths honestly, and laid out clear criteria for choosing between them.
Actionable next steps:
- If you’re just starting out, buy a pocket hole jig and cut your first ten joints in scrap wood before committing to a project.
- Once pocket holes feel natural, move to dowel joints and then dado joints to build a complete beginner toolkit.
- When hand tool skills develop, tackle a mortise and tenon on a small stool or side table, it’s the joint that teaches the most.
- Always dry-fit every joint before applying glue. A joint that doesn’t fit dry won’t fit better wet.
Joinery is where woodworking becomes craftsmanship. Each joint cut well is a skill that stays with you for every project that follows.
Products, Tools, and Resources
Pocket Hole Jig (Kreg R3 or K4), The Kreg R3 is compact and affordable, ideal for beginners. The K4 adds a built-in clamp for faster production. Either one is a worthwhile first investment.
Self-Centering Dowel Jig (Milescraft or Wolfcraft), These jigs eliminate the guesswork from dowel alignment and cost $20,$50. They’re one of the best value tools in a beginner’s shop.
Dovetail Saw and Bench Chisels: A quality dovetail saw (Gyokucho or Veritas) paired with a set of bench chisels (Two Cherries, Narex, or Stanley Sweetheart) gives everything needed for hand-cut joinery. Keep them sharp, and they’ll last decades.
Router with Straight Bit: A mid-range plunge router (Bosch, DeWalt, or Makita) with a 3/4-inch straight bit handles dadoes, rabbets, and mortises. It’s one of the most versatile tools in any shop.
PVA Wood Glue (Titebond II or III), Titebond II for interior projects, Titebond III for anything that may see moisture. Both are widely available and trusted by professional woodworkers.
For structured learning on how to use these tools effectively, the Woodworking Online Training: The Complete Beginner’s Guide is a practical resource worth bookmarking.