Essential Tools You Need to Build a Shed from Scratch
A table saw alone costs more than most people spend on their entire shed-building tool kit. That single fact surprises many first-time builders who assume they need a fully equipped workshop before they can frame a single wall. The truth is simpler: the tools you need to build a shed from scratch fit into three categories: measuring and layout, cutting, and fastening, and a beginner can cover all three with a modest, focused toolkit.
This guide walks through exactly what belongs in that kit, what’s optional, what beginners forget, and how to tell when you’ve got enough gear to start framing with confidence.
Find this useful? Add us as a preferred source on Google and more of what we publish will show up in your results.
Key Takeaways
- The core tools you need to build a shed from scratch are a tape measure, framing square, circular saw, cordless drill/driver, level, hammer, and a basic safety kit.
- A cordless drill handles nearly every shed-building task better than a hand drill; reserve hand drilling for pilot holes in tight spots.

- A circular saw is the go-to cutting tool for framing; a miter saw adds precision for trim and angled cuts, while a table saw is better suited to ripping long boards in a shop setting.
- A basic shed-building tool kit for a beginner typically runs in the low hundreds of dollars if tools are bought individually, less if you already own a drill or saw.
- Renting is usually smarter than buying for one-time-use equipment like a post hole digger or a large compressor.
- Safety gear, glasses, hearing protection, gloves, and a first aid kit, is non-negotiable and often skipped by beginners.
- You can build a basic shed with hand tools alone, but expect the project to take noticeably longer and require more physical effort.
What Are the Essential Tools for Building a Shed from Scratch
The essential tools for building a shed from scratch cover three jobs: measuring and marking, cutting lumber, and driving fasteners. Miss a tool in any one category and the build stalls.
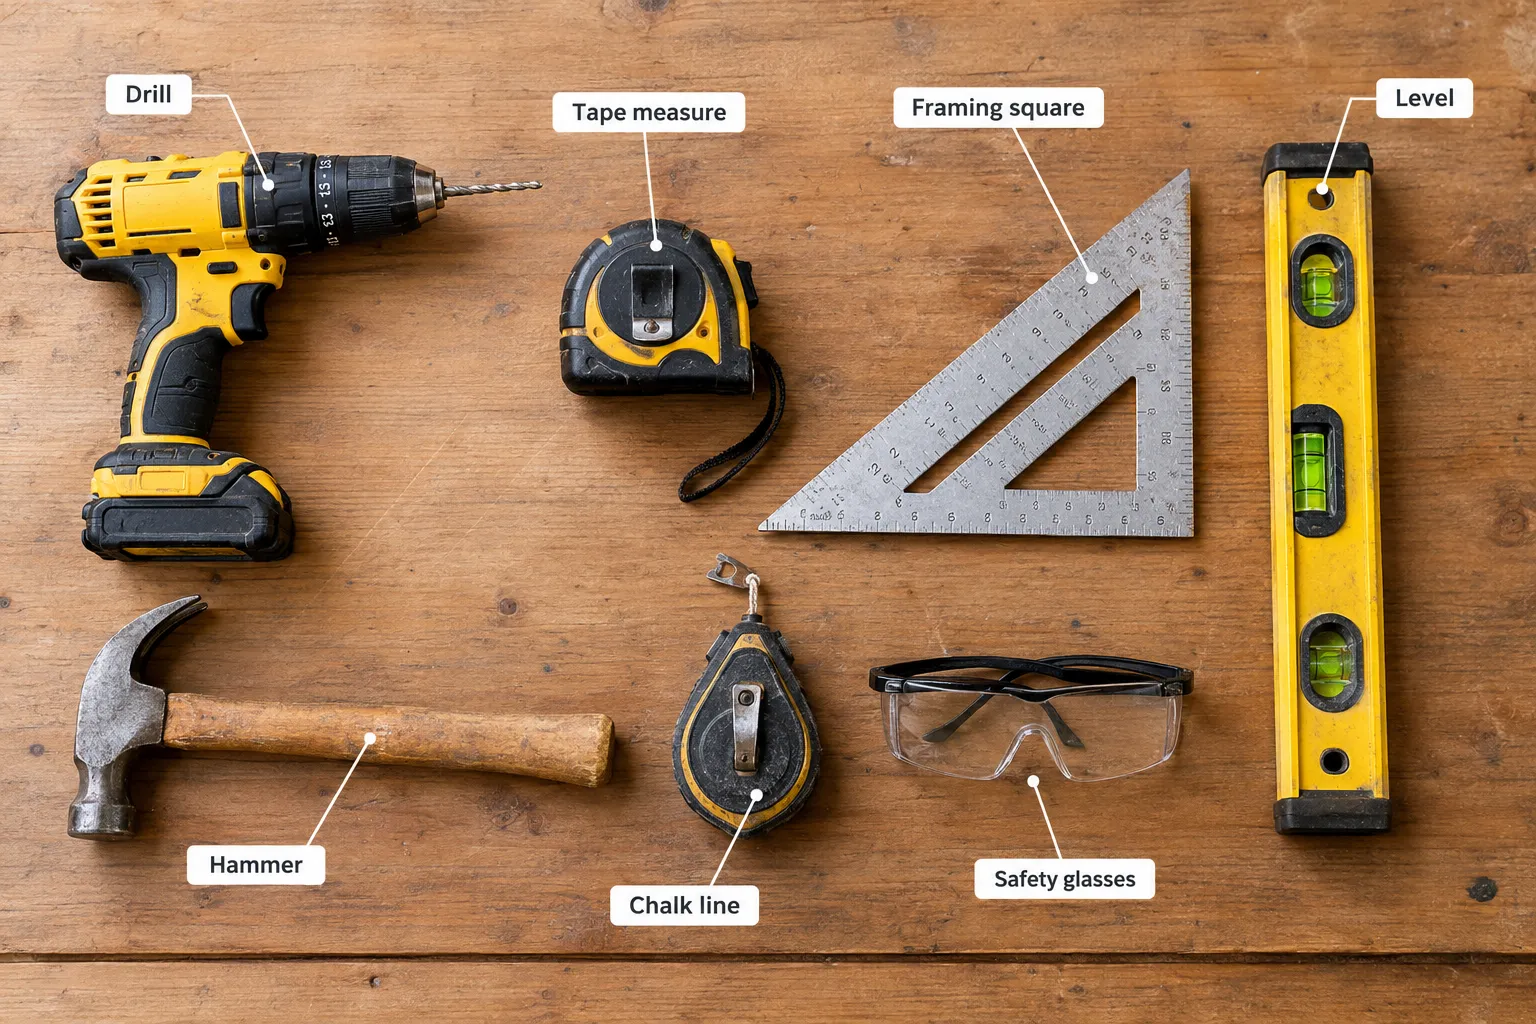
Here’s the practical breakdown:
- Measuring and layout: tape measure (25 ft minimum), framing square, speed square, chalk line, and a 4-foot level (a laser level helps but isn’t required).
- Cutting: a circular saw for framing lumber and sheet goods, plus a handsaw for small trim cuts.
- Fastening: a cordless drill/driver, a hammer (or framing hammer), and a stud finder if you’re attaching to an existing structure.
- Support gear: a sturdy ladder, sawhorses, clamps, and a wheelbarrow or hand truck for moving materials.
Choose this kit if you’re building a simple gable or lean-to shed under roughly 120 square feet. For a deeper rundown of general-purpose gear that overlaps with shed projects, the guide on beginner woodworking tools and equipment is worth a look before you shop.
Common mistake: buying a long list of specialty tools before the first stud is cut. Most beginners only need the list above to complete a basic 8×10 or 10×12 shed.
Power Drill or Hand Drill, Cordless or Corded: What Do You Actually Need
A cordless power drill is the right choice for nearly every shed-building task; a hand drill is too slow for framing and deck screws. Cordless tools also beat corded ones for shed work because you won’t always have power at the build site.
Here’s how the decision plays out in practice:
- Choose cordless if you’re building anywhere without a nearby outlet, which covers most backyard shed sites.
- Choose corded only for tools that demand sustained high power, like a table saw or large compressor, where battery life becomes a real limitation.
- Skip the hand drill except for delicate pilot holes in thin trim where a power drill might split the wood.
A decent 18V or 20V cordless drill/driver combo kit with two batteries covers drilling, driving screws, and even light mixing (for concrete footings) without ever needing a cord. Corded tools still have a place in a permanent home workshop, see the home woodshop setup planning guide if you’re also building out a shop space alongside your shed.
Edge case: if your shed site is far from the house and you don’t have a generator, go cordless across the board and budget for a second battery pack so you’re never stuck mid-cut.
Circular Saw, Miter Saw, or Table Saw: Choosing the Right Cutting Tool for Shed Framing
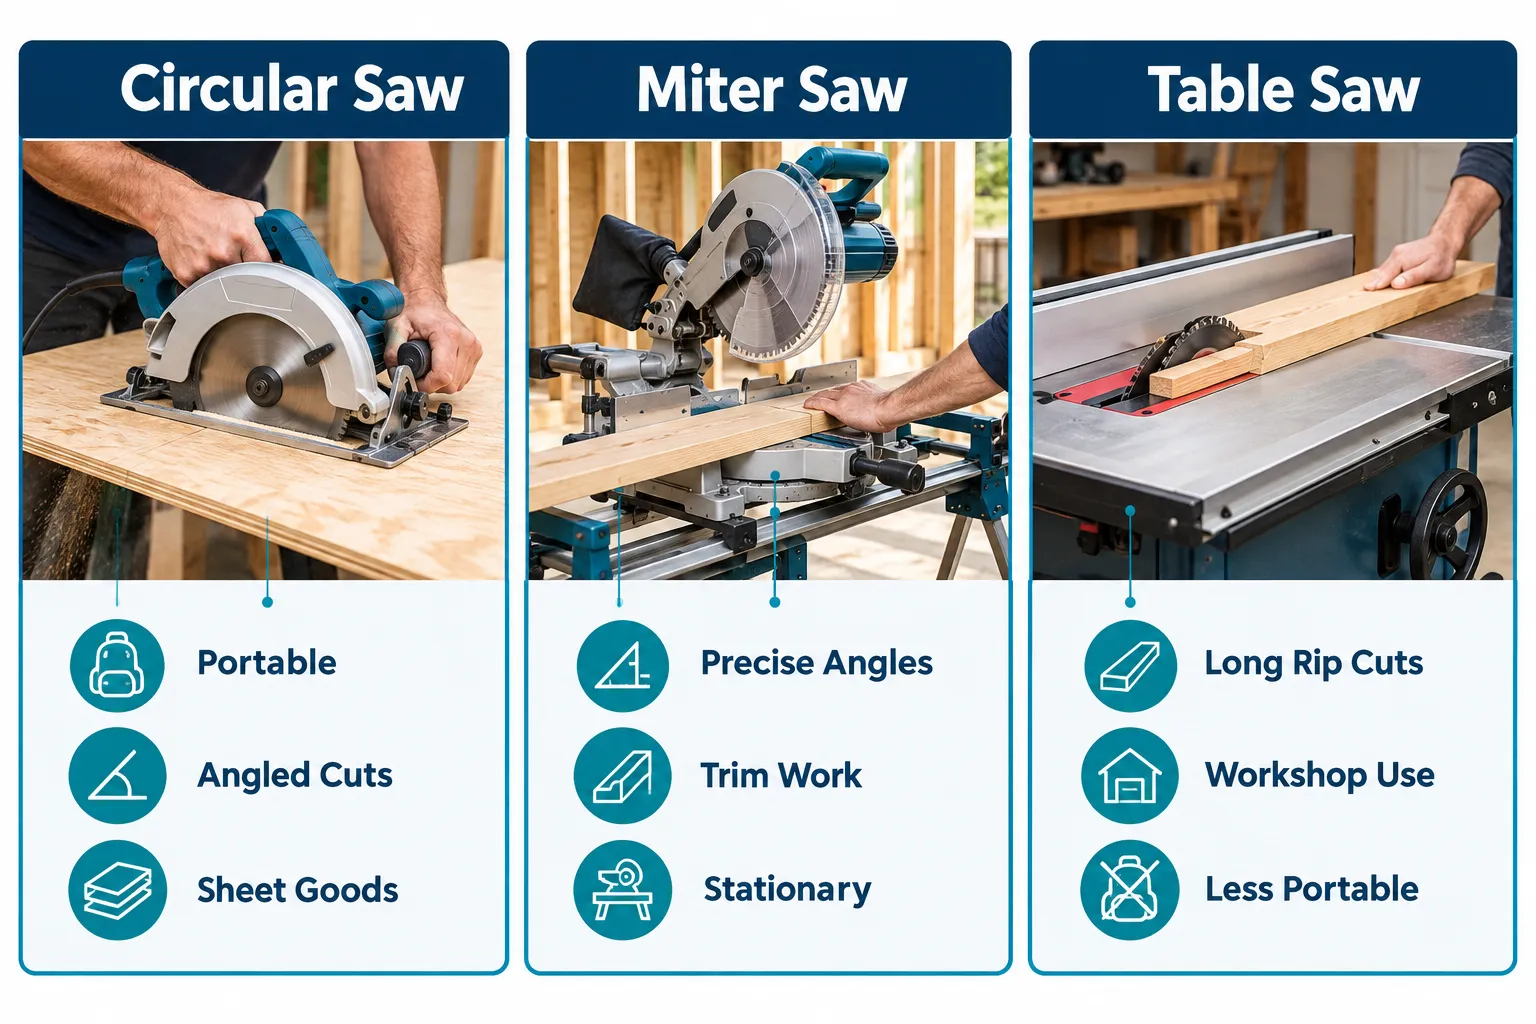
A circular saw is the single most important cutting tool for shed framing because it’s portable, handles sheet goods, and makes both straight and angled cuts on site. A miter saw adds accuracy for repetitive angle cuts like rafters and trim, while a table saw is best for ripping long boards to width in a stationary shop setting.
Here’s the practical difference between the three:
| Tool | Best for | Portability | Skip it if |
|---|---|---|---|
| Circular saw | Framing lumber, plywood sheathing, general cuts | High, carries to the build site | You only have angled trim to cut |
| Miter saw | Repeated angle cuts, rafters, trim, fascia | Medium, needs a stand or bench | You’re only cutting straight framing lumber |
| Table saw | Ripping long boards to width | Low, stays in the shop | Your cut list has no long rip cuts |
Decision rule: choose a circular saw if it’s your only saw purchase. Add a miter saw once your project includes a roof with angled rafter cuts. Reserve the table saw for builders who already have shop space and plan to rip a lot of siding or trim to custom widths.
A common mistake is buying a table saw before a circular saw. A table saw can’t easily cut down a full sheet of plywood on its own, which makes it a poor first purchase for shed framing.
Can You Build a Shed with Just Basic Hand Tools
Yes, you can build a basic shed with hand tools alone, but expect the project to take considerably longer and demand more physical stamina than a power-tool build. This approach works for small sheds and builders who value quiet, traditional methods over speed.
A hand-tool shed kit typically includes:
- A quality handsaw or crosscut saw
- A hand drill or brace and bit set
- A claw hammer and nail set
- A combination square and chalk line
- Hand planes for smoothing rough-cut lumber
Choose hand tools if you’re building something small, like a 4×6 storage shed, and you enjoy the slower, skill-building pace. Avoid hand tools only if you’re working on a tight weekend timeline or building anything larger than about 100 square feet, where the extra labor adds up fast. For a broader look at hand-tool-only setups, the beginner hand tool woodworking kit guide breaks down what to buy and roughly what it costs.
What Tools Are Needed for Shed Roof Installation
Shed roof installation calls for its own short list: a roofing nailer or hammer, a utility knife for shingles, chalk line, and a circular saw for cutting rafters and sheathing to length. A miter saw helps if your roof style includes angled fascia or trim.
Specific needs depend on roof style:
- Gable or barn roofs need accurate angle cuts, so a miter saw or a speed square paired with a circular saw earns its keep.
- Lean-to roofs are simpler and often doable with just a circular saw and level.
- Asphalt shingle roofs need a utility knife, roofing nails, and a chalk line for straight courses; metal roofing needs tin snips and self-tapping screws instead.
Before buying roofing tools, confirm your roof style, since the shape changes both the tool list and the cut angles involved. The comparison in best shed roof style: lean-to, gable, or barn is a useful next step if you haven’t locked in a design yet.
Common mistake: forgetting a stable ladder or roof jacks. Working on a pitched roof without secure footing is one of the most frequent safety lapses on first-time shed builds.
What Safety Tools Do You Need When Building a Shed
Safety gear for shed building includes eye protection, hearing protection, work gloves, a dust mask, and a basic first aid kit, and none of it is optional once power tools come out. These items protect against the two most common shed-building injuries: eye debris from cutting and hand injuries from fasteners.
A minimal safety kit covers:
- Safety glasses or goggles (worn every time a saw runs)
- Hearing protection for extended circular saw or compressor use
- Work gloves rated for handling rough lumber
- A dust mask or respirator for cutting pressure-treated wood
- A basic first aid kit kept on site, not in the garage
Edge case: if you’re cutting pressure-treated lumber, upgrade from a basic dust mask to an N95-rated respirator, since the treated wood dust is more irritating than standard sawdust.
How Much Does a Basic Shed Building Tool Kit Cost
A basic shed-building tool kit for a beginner typically costs a few hundred dollars if purchased piece by piece, and noticeably less if you already own a drill, hammer, or ladder. Buying a combo kit (drill plus driver with batteries) usually saves money over buying each tool separately.
Typical cost ranges by category (general retail estimates, 2026):
- Measuring and layout tools (tape measure, squares, level, chalk line): budget-friendly, usually the cheapest category
- Cutting tools (circular saw): mid-range, the single biggest line item for most beginners
- Cordless drill/driver combo kit: mid-range, often the second biggest expense
- Safety gear (glasses, gloves, ear protection, mask): low cost but easy to underbudget for
- Support gear (ladder, sawhorses, clamps): variable, often the item people already own
Decision rule: if you already own a drill and a saw from past projects, your new spending drops to mostly safety gear and a few measuring tools. If you’re starting from zero, budget for the drill and saw first since everything else is cheaper. For a full breakdown of total project costs beyond tools, see how much it costs to build a small shed.
Do You Need to Rent Specialized Equipment to Build a Shed
Renting makes sense for equipment you’ll only use once, like a post hole auger, a large concrete mixer, or a pneumatic nail gun with compressor. Buying makes sense for tools you’ll reuse on future projects, like a drill, circular saw, or hand tools.
Use this simple rule:
- Rent it if the tool costs more than your shed’s total material budget, or if you’ll likely never use it again (heavy auger, scaffolding, large compressor).
- Buy it if the tool is under roughly $150 and useful for other home or shop projects (drill, circular saw, level, clamps).
- Borrow it if a neighbor or family member has a specialty item you need for a single afternoon, like a plate compactor for a gravel base.
If you’re weighing whether to DIY the whole project or bring in help for parts of it, the comparison in DIY shed building cost: hire help vs. go solo lays out where professional labor tends to pay off versus where renting a tool for a day is the smarter move.
Tools Beginners Forget (and the Best Tools for Your First Shed Build)
Beginners most often forget clamps, a chalk line, extra drill bits, and a dedicated extension cord rated for outdoor use. These small items don’t show up on most basic tool lists, yet their absence causes real delays mid-build.
The most commonly forgotten items:
- Clamps, needed for holding boards steady while screwing or nailing, especially when working alone.
- Chalk line, essential for marking long, straight cuts across sheathing or siding.
- Spare drill bits and driver tips, these wear out or strip faster than people expect.
- Heavy-duty outdoor extension cords, a thin indoor cord will trip breakers or underpower a saw.
- A broom or shop vacuum, sawdust buildup becomes a tripping hazard fast.
For a first-time build, the best starting tool kit pairs a circular saw, cordless drill, framing square, level, and safety gear with a short list of fasteners matched to your plan. The best beginner woodworking tool kits guide is a solid reference for assembling that list without overbuying. Pairing your tools with a proven, simplified plan also reduces the number of specialty cuts you’ll need, see best shed plans for beginners for layouts designed around basic tool kits.
How Do You Know If You Have Enough Tools, or If You’re Missing Something
You have enough tools when you can complete every step on your shed’s cut list and fastening schedule without needing to pause and buy something new. The fastest way to check is to walk through your plan’s material and task list against your tool inventory before cutting a single board.
A quick self-check checklist:
- Does your plan include angled cuts (roof rafters, fascia)? If yes, confirm you have a miter saw or a reliable speed square and circular saw combo.
- Will you be attaching siding or trim? Confirm you have a finish hammer or nail gun and enough clamps.
- Are you pouring or setting footings? Confirm you have a shovel, level, and mixing tool, or a rental lined up.
- Do you have backup batteries or a backup charging plan for cordless tools?
- Is your safety gear actually on site, not just owned?
Common mistake: assuming “enough tools” means every tool on a generic list. The real test is whether your specific plan’s steps are covered; a shed with a simple lean-to roof needs far less than one with a full gable roof and dormer vents.
FAQ
What are the absolute essential tools needed to start building a shed from scratch?
– Tape measure (25 ft minimum)
– Framing square and speed square
– Circular saw for cuts
– Cordless drill/driver for fastening
– Hammer or framing hammer
– 4-foot level
– Basic safety gear (glasses, gloves, hearing protection)
Can I build a shed using only hand tools?
– Yes, but it takes significantly longer and requires more physical effort.
– Suitable for small sheds (under 100 sq ft) and builders who prefer traditional methods.
– Hand tools needed include a quality handsaw, hand drill or brace/bit, claw hammer, combination square, chalk line, and hand planes.
Should I buy or rent specialized equipment like a post hole digger or compressor?
– Rent tools that you will only use once or that cost more than your shed’s material budget (e.g., post hole auger, large concrete mixer).
– Buy essential, reusable tools like drills and saws.
– Borrow specialty tools from neighbors if possible for occasional use.
What safety equipment is mandatory during shed construction?
– Always wear ANSI-rated safety glasses or goggles.
– Use hearing protection when operating power tools for extended periods.
– Wear work gloves rated for rough lumber handling.
– Use a dust mask or N95 respirator, especially when cutting pressure-treated wood.
– Keep a basic first aid kit on site at all times.
How do I know if I have enough tools to complete my shed build?
– Cross-check your shed plan’s cut list and fastening steps with your current tool set.
– Verify you have tools for all required tasks (measuring, cutting, fastening).
– Confirm backup batteries and safety gear are ready on site.
– Ensure you have the right tools for any angled cuts, siding, or footing work.
– Avoid buying all tools upfront; prioritize only those necessary for your specific design.
Conclusion
Building a shed from scratch doesn’t require a professional workshop. It requires the right small set of tools, used correctly, in the right order: measure and mark first, cut second, fasten third, and protect yourself the entire time. Start with a cordless drill, a circular saw, basic measuring tools, and safety gear, then add a miter saw or rental equipment only when your specific plan calls for it.
Before buying anything else, pull out your shed plan and match each listed tool to a step in the build. That five-minute check prevents both overspending and the frustrating mid-project trip to the hardware store.
Products, Tools, and Resources
A few picks worth considering once you’re ready to shop:
- An 18V or 20V cordless drill/driver combo kit with two batteries, this single purchase covers more shed-building tasks than any other tool on the list.
- A 7-1/4 inch circular saw with a fresh framing blade, the workhorse for cutting studs, rafters, and sheathing.
- A quality 4-foot level and speed square are cheap insurance against crooked walls and roof lines.
- ANSI-rated safety glasses and ear muffs are inexpensive, easy to forget, and worth keeping in the truck or shed, not on the garage shelf.
- A heavy-duty 12-gauge outdoor extension cord,. Undersized cords are a quiet cause of underpowered cuts and tripped breakers.
If your shed build is the first step toward a bigger backyard project, the complete guide to building your own backyard shed is a natural next read once your tool kit is sorted.