How to Read & Use Woodworking Plans: Beginner’s Complete Guide

Woodworking plans are detailed, step-by-step documents that include measurements, cut lists, materials, and assembly instructions for building furniture or wooden objects. They are the single most reliable starting point for beginners because they remove guesswork and reduce costly mistakes. Whether you find them free online, purchase them from a specialist site, or commission a custom design, the right plan makes the difference between a finished piece you’re proud of and a pile of wasted timber.
Key Takeaways
- Woodworking plans include diagrams, measurements, a cut list, and finishing instructions. Missing any one of these elements makes a plan unreliable.
- Free plans from reputable woodworking sites are genuinely good for beginners. Paid plans tend to offer more precision, better illustrations, and customer support.
- Always verify that a plan’s required tools match what you actually own before you start buying lumber.

- Complexity ratings matter. A plan labeled “beginner” should require only basic hand tools and involve no complex joinery.
- Measurements are the most critical element of any plan. A single incorrect dimension can cause an entire assembly to fail.
- Plans from different websites are not always compatible. Units, scale conventions, and joinery methods can vary significantly between sources.
- Finishing is not an afterthought. The right stain, paint, or oil can completely transform a piece, and most plans include finishing guidance for a reason.
- Children and teenagers can safely follow simple woodworking plans with adult supervision, and doing so builds real practical skills.
- Custom plans are worth the cost for complex, space-specific, or heirloom-quality projects. Pre-made plans are better for learning and general use.
- The most common reason beginner projects fail is skipping the plan review step before picking up a single tool.
What Are Woodworking Plans and How Do You Use Them?
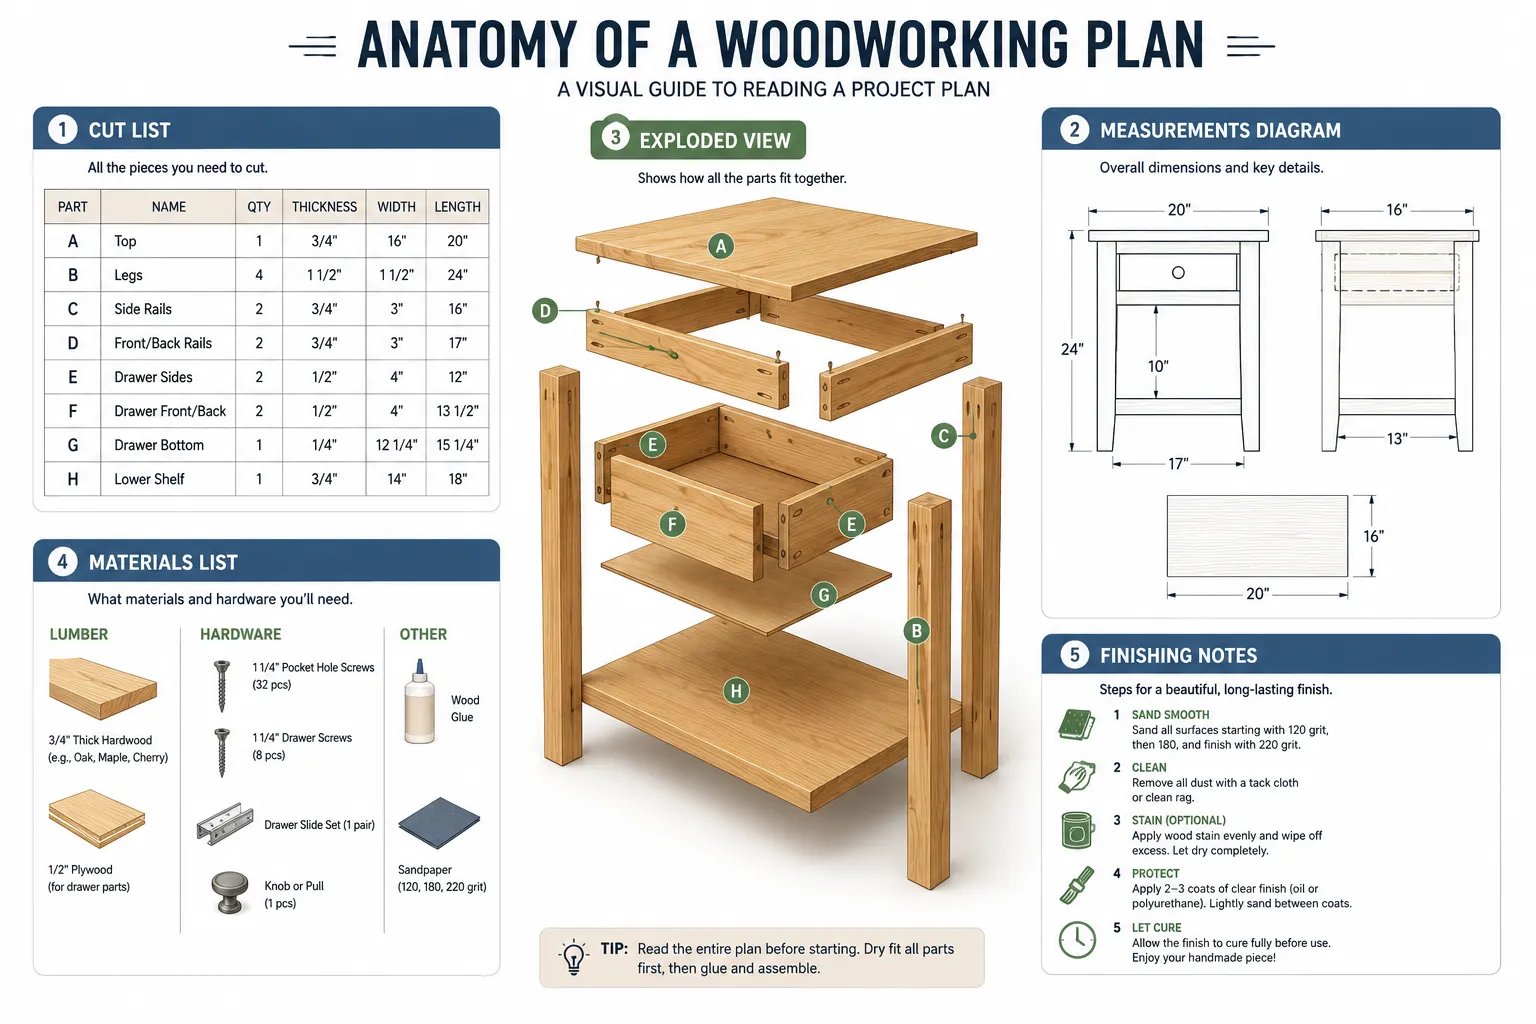
Woodworking plans are structured documents that guide a builder through every stage of creating a wooden object, from the first cut to the final coat of finish. They exist because even experienced woodworkers benefit from having a clear reference point before committing expensive materials to a design.
A complete woodworking plan typically contains:
- A cut list: Every piece of wood you need, with exact dimensions and the quantity of each.
- A materials list: Wood species, hardware (screws, hinges, dowels), adhesives, and finishing products.
- Scaled diagrams or blueprints: Top, side, and front views, plus an exploded assembly diagram showing how parts fit together.
- Step-by-step instructions: Numbered stages that walk you through assembly in the correct sequence.
- Finishing notes: Recommendations for sanding grits, stain colors, sealers, or paint.
To use a plan effectively, read it completely before touching any wood. This sounds obvious, but most beginner mistakes happen because a builder skips to step one without understanding where step twelve leads. Lay out all your materials, confirm your tools match the plan’s requirements, and then follow the sequence as written. Deviating from the plan mid-build, especially on joinery or structural connections, is the fastest route to a failed project.
You can explore a wide range of project types through popular woodworking resources to get a feel for what styles and complexity levels suit your current skill set.
Best Free Woodworking Plans for Beginners
Free woodworking plans are genuinely useful for beginners, provided you know where to look and what quality markers to check. The internet has thousands of free plans, but quality varies enormously. A good free plan is indistinguishable from a paid one in terms of its core components: clear dimensions, a cut list, and at least one assembly diagram.
Reliable sources for free beginner plans include:
- Ana White (anawhite.com): One of the most cited free plan libraries online, with hundreds of furniture projects organized by skill level and tool requirement.
- Instructables (instructables.com): Community-submitted plans with photos at each step. Quality varies, so check the comment section for errors other builders have caught.
- The Family Handyman: Offers a selection of free downloadable plans with professional-grade diagrams.
- Woodworking Guild of America: Provides some free introductory plans alongside its paid content.
When evaluating any free plan, check for these four things before you download: a complete cut list, at least one dimensioned diagram, a stated skill level, and a tool list. If any of these are missing, the plan will likely cause frustration partway through the build.
Good beginner projects to look for in free plan libraries include: small shelving units, step stools, simple benches, picture frames, and basic storage boxes. These projects use straightforward joinery (butt joints, pocket screws) and require minimal tooling.
Where Can You Buy Detailed Woodworking Plans Online?
Paid woodworking plans are worth the investment when you want higher precision, professional illustrations, and plans that have been tested and verified by experienced builders. Prices typically range from $5 to $50 per individual plan, with subscription-based libraries offering better value for anyone building multiple projects per year.
Well-regarded paid plan sources include:
- Woodsmith Plans (woodsmithplans.com): Produced by the editorial team behind Woodsmith Magazine, these plans are known for exceptional clarity and tested accuracy.
- Fine Woodworking Plans (finewoodworking.com): Skews toward intermediate and advanced projects, but the quality of diagrams and instruction is among the best available.
- WOOD Magazine Plans (woodmagazine.com): A large library covering beginner to advanced, with a mix of free and paid options.
- Etsy: Independent designers sell custom and niche plans here. Always check reviews and confirm the plan includes a cut list and full dimensions before purchasing.
For anyone considering turning a hobby into something more structured, understanding how woodworking businesses source and use plans can also inform how much to invest in plan quality from the start.
Woodworking Plans vs. Just Building from Scratch
Building from scratch without a plan is viable for experienced woodworkers who can visualize joinery, calculate dimensions on the fly, and troubleshoot structural issues as they arise. For beginners, it almost always results in wasted material and a project that doesn’t come together correctly.
Here is a practical comparison:
| Factor | Using a Plan | Building from Scratch |
|---|---|---|
| Skill required | Low to moderate | High |
| Material waste risk | Low | High |
| Time to complete | Predictable | Unpredictable |
| Cost control | Easier (cut list provided) | Harder |
| Creative freedom | Limited to design | Complete |
| Best for | Beginners, reproducible builds | Experienced builders, one-off designs |
The honest case for plans: they encode the problem-solving that an experienced builder has already done. When a plan tells you to cut a dado joint at a specific depth before assembling a cabinet, that instruction exists because someone learned (possibly the hard way) that doing it after assembly is nearly impossible.
Choose a plan if you are building something for the first time, if the piece needs to be structurally reliable (a chair, a bed frame, a staircase), or if you are working with expensive hardwoods where mistakes are costly. Build from scratch only when you have enough experience to know what can go wrong and how to fix it.
How Much Do Professional Woodworking Plans Cost?
Individual professional woodworking plans typically cost between $5 and $50, depending on complexity, source, and whether they include 3D renderings or video walkthroughs. Subscription libraries, which give access to hundreds of plans, generally run between $30 and $100 per year.
Cost breakdown by category:
- Free plans: Available widely. Best for simple beginner projects. Verify quality before starting.
- Single plan purchase ($5 to $15): Standard for basic furniture like shelves, tables, and benches. Suitable for most hobbyist needs.
- Premium single plans ($20 to $50): Typically for complex pieces: built-in cabinetry, rocking chairs, workbenches with multiple features. Often include 3D models and detailed joinery callouts.
- Annual subscriptions ($30 to $100/year): Best value for active hobbyists building multiple projects. Woodsmith, WOOD Magazine, and Fine Woodworking all offer this model.
- Custom plans (commissioned): Prices vary widely, from $50 for a simple sketch to several hundred dollars for a fully engineered furniture plan from a professional designer or furniture maker.
Custom plans are worth commissioning when you need furniture to fit a specific space, when you are working with unusual materials, or when the piece has heirloom significance and you want it done precisely right.
Easy Woodworking Projects for Someone with No Experience
No-experience woodworkers should start with projects that use basic butt joints or pocket screws, require only a saw, drill, and sandpaper, and can be completed in a single weekend. Success on a first project builds the confidence and muscle memory that makes the next project easier.
The five most beginner-friendly project types, in order of difficulty:
- Floating wall shelf: Requires only a few cuts, two brackets, and basic finishing. Teaches measuring, leveling, and wall mounting.
- Simple storage box or crate: Introduces butt joints and basic assembly. Great for learning how to keep corners square.
- Step stool: Slightly more structural, but still straightforward. Teaches how to cut angles and think about load-bearing joints.
- Raised garden bed: Outdoor project using rough lumber. Very forgiving of minor measurement errors.
- Small side table or end table: Introduces legs, aprons, and tabletop attachment. A natural progression from the box and shelf projects.
For each of these, look for plans that specifically state “no power tools required” or “hand tools only” if you are not yet equipped with a workshop setup. Many excellent beginner woodworking projects can be completed with a hand saw, a pocket hole jig, a drill, and clamps.
Why Your Woodworking Project Failed Following the Plans
Most plan-following failures come down to one of four causes: incorrect measurements during cutting, skipping the dry-fit step, using the wrong wood species or thickness, or misreading a diagram. None of these are reasons to abandon plans altogether. They are reasons to slow down and review.
The most common failure points:
- Measurement errors: Even experienced builders measure twice and cut once. If a piece is 1/8 inch too long or too short, it can throw off an entire assembly. Always mark your cut lines clearly and confirm dimensions against the cut list before sawing.
- Skipping the dry fit: Assembling a project without glue or fasteners first (a “dry fit”) reveals problems before they become permanent. Most beginners skip this step. Don’t.
- Wrong lumber dimensions: Lumber sold as “2×4” in most markets is actually 1.5 inches by 3.5 inches after milling. Plans from reputable sources account for this, but some free plans do not. Always check whether a plan uses nominal or actual dimensions.
- Misreading the diagram: Exploded diagrams can be confusing. If you are unsure which part connects where, look for a parts-labeling key and cross-reference it with the written instructions.
- Ignoring grain direction: For drawer bottoms, tabletops, and panel doors, wood movement with seasonal humidity changes is real. Plans that specify grain direction do so for structural reasons.
If a project is not coming together, stop before forcing joints. Forced assembly usually damages the wood and makes correction harder. Go back to the plan, identify where the deviation happened, and work backward from there.
Woodworking Plans for Small Spaces and Apartments
Woodworking plans designed for small spaces prioritize multi-function, wall-mounted, or fold-away designs that maximize utility without consuming floor area. These are among the most practical plans available and are increasingly popular as apartment living becomes more common.
Excellent small-space woodworking plan categories:
- Murphy beds and wall beds: Plans exist for DIY Murphy bed frames that use standard hardware kits. These are intermediate-level projects but are well within reach for a motivated beginner on a second or third build.
- Floating desks and fold-down workbenches: Wall-mounted desks that fold flat when not in use. Require only basic tools and a few hours of work.
- Built-in shelving and window seats with storage: These plans require careful measurement of your specific space but dramatically increase storage without adding furniture footprint.
- Slim console tables and narrow entryway benches: Designed for tight hallways and entryways. Simple construction, high visual impact.
- Pegboard tool walls and vertical storage systems: Particularly useful for apartment woodworkers who need to store tools without a dedicated workshop.
When adapting any standard plan for a small space, the key adjustment is scale. Reduce dimensions proportionally rather than arbitrarily, and always recalculate the cut list after making changes. A plan scaled down by 20% does not simply use 20% less wood; the joinery and hardware requirements may change as well.
Are Woodworking Plans from Different Sites Compatible?
Plans from different websites are not automatically compatible, and mixing elements from multiple sources in a single project is a common source of confusion and structural errors. The main variables that differ between sources are unit systems (imperial vs. metric), lumber size conventions (nominal vs. actual), joinery methods, and assumed tool availability.
Before combining elements from two different plans:
- Confirm both use the same unit system. Converting between inches and millimeters mid-project introduces rounding errors.
- Check that lumber dimensions are stated the same way. A plan from a North American site using nominal dimensions and a plan from a European site using actual (finished) dimensions will produce parts that do not fit together.
- Verify that joinery methods are compatible. A plan that uses pocket screws throughout will not pair cleanly with a plan that relies on mortise-and-tenon joints without significant adaptation.
The safest approach for beginners is to use a single plan from a single source for each project. Once you understand how plans are structured and can read a blueprint confidently, adapting and combining plans becomes a manageable skill.
Woodworking Plans for Kids and Teenagers
Simple woodworking plans are genuinely appropriate for children and teenagers, with adult supervision, and working with wood from a young age builds spatial reasoning, patience, and practical problem-solving skills. Plans designed for young builders typically use hand tools only, avoid complex joinery, and produce something useful or fun within a short time frame.
Good beginner projects for young woodworkers:
- Birdhouses: Classic for a reason. Simple box construction, a single drilled hole, and a roof. Teaches measuring, cutting, and assembly in one project.
- Wooden toolbox: Practical and satisfying. Introduces the concept of a handle and basic structural reinforcement.
- Simple bookshelf: A slightly more ambitious project for teenagers. Teaches squareness, shelf pin drilling, and finishing.
- Toy cars or wooden animals: Scroll saw or jigsaw projects that develop cutting control and finishing skills.
- Picture frames: Introduces miter cuts and teaches the importance of precision in angles.
For children under 12, hand tools (chisels, hand saws, mallets) with proper instruction are safer than power tools and teach better foundational technique. Teenagers can progress to a drill press, jigsaw, and orbital sander with appropriate safety training. Look for plans that explicitly state the age range and tool requirements, and always prioritize eye protection, hearing protection, and secure workholding (clamps, not hands).
How to Read and Understand Woodworking Blueprints
A woodworking blueprint uses standardized views and symbols to communicate a three-dimensional object on a two-dimensional page. Understanding these conventions is a learnable skill that takes most beginners one or two projects to become comfortable with.
The key elements of a woodworking blueprint:
- Orthographic views: Most plans show a front view, side view, and top view of the completed piece. These are drawn to scale and include dimension lines with measurements.
- Exploded view: Shows all parts separated from each other in the correct spatial relationship. This is the most useful diagram for understanding assembly sequence.
- Section view: A “cut-through” view that shows interior construction, such as the depth of a dado groove or the thickness of a panel inside a frame.
- Parts callouts: Letters or numbers on the diagram that correspond to a parts list, telling you which piece is which.
- Dimension lines: Thin lines with arrows at each end and a measurement in the middle. Always read these carefully. A misread dimension is the most common single cause of a failed cut.
If a plan’s diagrams are unclear, look for a 3D rendering or a photo of the completed project. Working backward from a finished photo can clarify ambiguous assembly steps. Many woodworking pattern resources also provide annotated visual guides that make blueprint reading easier for new builders.
Woodworking Plans That Don’t Require Expensive Tools
Many excellent woodworking plans require nothing more than a tape measure, a hand saw, a drill, sandpaper, and clamps. The idea that woodworking demands a shop full of expensive machinery is one of the most persistent barriers for beginners, and it is largely untrue for the majority of furniture and home project builds.
A practical starter tool kit for plan-based woodworking (estimated cost in 2026: $150 to $300 for quality entry-level tools):
- Tape measure (25-foot)
- Combination square
- Hand saw or circular saw
- Cordless drill and driver bits
- Pocket hole jig (a Kreg jig costs approximately $20 to $40 and replaces the need for complex joinery on most beginner plans)
- Clamps (4 to 6 medium bar or F-clamps)
- Random orbital sander
- Safety glasses and hearing protection
Plans that specifically work within this tool set include most shelf, bench, table, and storage box designs. When a plan lists a router, table saw, or band saw as required tools, that is a signal the project is intermediate or advanced level. Beginners should filter for plans that list only the tools above until they are ready to invest in and learn additional woodworking equipment.
A pocket hole jig in particular is worth calling out. It allows beginners to create strong, hidden joints without any advanced joinery skills, and most beginner-friendly plans now incorporate it as a primary fastening method.
Custom vs. Pre-Made Woodworking Plans: Which Is Better?
Pre-made plans are better for beginners and for standard furniture builds. Custom plans are better when you need furniture to fit a specific space, match a specific aesthetic, or use non-standard materials. Neither is universally superior. The right choice depends on what you are building and why.
Choose a pre-made plan when:
- You are learning and want a tested, proven design.
- The furniture is a standard size (a dining table, a bookshelf, a bed frame).
- You want to complete the project quickly without a design phase.
- Budget is a consideration.
Choose a custom plan when:
- The piece must fit a specific architectural feature (a built-in under a staircase, a window seat in a bay window).
- You have a specific design in mind that no existing plan matches.
- You are using reclaimed or non-standard lumber that requires adjusted dimensions.
- The piece is an heirloom or commission where precision and uniqueness matter.
Custom plans from a professional furniture designer or experienced woodworker typically cost $50 to $300 depending on complexity. For a built-in unit or a complex piece of furniture, that cost is usually justified by the material savings alone. You can also find independent plan designers on platforms like Etsy or through local woodworking clubs and guilds.
Common Mistakes People Make with Woodworking Plans
The most common mistake beginners make with woodworking plans is not reading the entire plan before starting. This single habit, or the lack of it, accounts for a large proportion of failed beginner projects.
Other frequent mistakes:
- Buying lumber before reading the cut list: You may buy the wrong thickness, the wrong species, or the wrong quantity. Always generate a shopping list from the cut list before going to the lumber yard.
- Ignoring the skill level rating: A plan rated “intermediate” is intermediate for a reason. Starting with a project beyond your current skill level wastes materials and discourages further building.
- Assuming all measurements are correct: Even published plans contain occasional errors. If a measurement looks wrong (a part that seems too large or too small relative to the others), double-check it against the diagram before cutting.
- Skipping finishing steps: Sanding between coats, applying a sealer before stain, and allowing adequate drying time are all specified in finishing notes for functional reasons. Skipping them produces a noticeably inferior result.
- Not accounting for wood movement: Solid wood expands and contracts with humidity changes. Plans that include breadboard ends, floating tabletop clips, or slotted screw holes are engineering for this movement. Ignoring these details can cause a tabletop to crack or a drawer to stick permanently.
- Using the wrong fasteners: A plan that specifies 1.25-inch pocket screws is not interchangeable with 2-inch screws. The longer screw may blow through the face of the wood. Follow hardware specifications as written.
Avoiding these mistakes is largely a matter of patience. Woodworking rewards people who slow down before they cut, and it punishes people who rush. The plan is your map. Respect it, and the build becomes significantly more predictable.
FAQ: Woodworking Plans for Beginners
Do I need woodworking experience to use a plan?
No. Plans designed for beginners are written with the assumption that you have no prior experience. They include every measurement, every cut, and every assembly step. The key is choosing a plan rated for your level and reading it fully before you start.
What is a cut list in a woodworking plan?
A cut list is a table that itemizes every piece of wood needed for the project, including its dimensions (length, width, and thickness) and the quantity required. It is the first thing you use when buying lumber and the reference you return to throughout the build.
Can I scale a woodworking plan up or down?
Yes, but it requires recalculating every dimension, not just applying a percentage. Joinery dimensions, hardware specifications, and structural proportions may all need adjustment. Scaling is an intermediate skill. Beginners are better served by finding a plan already sized for their needs.
Are free woodworking plans as good as paid ones?
Some are, some are not. The best free plans (from sources like Ana White or Woodsmith’s free section) are fully tested and professionally illustrated. The worst free plans are incomplete sketches with no cut list. Always evaluate the plan’s components before starting, regardless of whether you paid for it.
How long does it take to complete a beginner woodworking project?
A simple shelf or storage box typically takes 4 to 8 hours across one or two sessions, including finishing time. A small table or bench might take a full weekend. Plans usually include a time estimate. If they don’t, the cut list length is a reasonable proxy: more parts generally means more time.
What wood should a beginner use?
Pine and poplar are the most forgiving and affordable options for beginners. They are soft enough to cut and shape easily, widely available at home improvement stores, and take paint and stain well. Hardwoods like oak, maple, and walnut are beautiful but less forgiving of cutting errors and require sharper tools.
Do I need a workshop to follow woodworking plans?
No. Many beginner plans can be executed in a garage, a backyard, or even a large apartment with a drop cloth. A portable workbench (a folding Workmate-style bench costs roughly $60 to $100) and a set of clamps are sufficient for most small to medium projects.
What does “nominal vs. actual” lumber size mean?
Nominal size is the name the lumber is sold under (for example, a “2×4”). Actual size is the real, measured dimension after milling (1.5 inches by 3.5 inches for a standard 2×4 in North American markets). Good plans specify which convention they use. If a plan does not clarify this, measure your lumber before cutting.
Can I use a woodworking plan to build furniture for sale?
It depends on the plan’s license. Most plans sold for personal use do not include commercial rights. If you intend to sell pieces built from a plan, check the terms of use or contact the plan’s creator. Some publishers offer commercial licenses for an additional fee.
What is the difference between a woodworking plan and a woodworking pattern?
A plan covers the full construction of a three-dimensional object, including structure, joinery, and finishing. A pattern typically refers to a two-dimensional shape template used for cutting decorative profiles, scroll saw work, or repeated shapes. Both are useful tools, and many projects use both.
How do I know if a plan is accurate before I start cutting?
Check the cut list against the diagrams. Add up the dimensions of parts that should equal a known total (for example, shelf heights plus shelf thicknesses should equal the total cabinet height). If the numbers don’t reconcile, the plan has an error. This check takes five minutes and can save hours of rework.
Where can I find woodworking plans for furniture that fits specific room dimensions?
Start with adjustable or modular plan categories on sites like Ana White or Woodsmith. If nothing fits your space, a custom plan from an independent designer (via Etsy or a local woodworking guild) is the most reliable solution. Provide your exact dimensions and any structural constraints (wall angles, ceiling height, floor unevenness) to the designer upfront.
Conclusion
Woodworking plans are not a crutch for beginners. They are a professional tool used at every level of the craft, from a hobbyist building a first shelf to a furniture maker producing a commission piece. What they offer is clarity: a tested sequence of decisions that removes the guesswork from an inherently complex process.
For anyone starting out, the path is straightforward. Choose a plan rated for your skill level, confirm you have the tools it requires, read it completely before you cut anything, and follow it as written. The first project will teach you more about woodworking than any amount of reading. The second project will be faster and better. The third will start to feel natural.
The craft rewards patience, precision, and the willingness to slow down before making irreversible cuts. A good plan gives you the structure to do exactly that.
Products, Tools, and Resources
These are practical recommendations based on what genuinely helps beginners get started with woodworking plans:
Pocket Hole Jig (Kreg Jig K4 or K5): The single most useful tool for beginner plan-based woodworking. Allows strong, hidden joints without complex joinery skills. Available at most home improvement stores for $40 to $80.
Random Orbital Sander (DeWalt or Ridgid entry-level models): Produces a consistently smooth finish far more efficiently than hand sanding. Essential for any project that will be stained or painted. Budget approximately $50 to $80.
Combination Square: A $15 to $25 tool that ensures your cuts are square and your measurements are accurate. More important than many power tools for beginner accuracy.
TedsWoodworking: TedsWoodworking is the largest woodworking plan library we’ve reviewed — over 16,000 project blueprints covering furniture, outdoor structures, toys, storage, and more, organized so you’re never stuck searching for what to build next. Every plan includes a materials list, cut list, and step-by-step instructions, with supplementary video walkthroughs for trickier builds.
Ana White (anawhite.com): The best free plan library for beginners. Hundreds of tested designs with photos at every stage.
Woodworking online training resources: If you want to build faster and make fewer mistakes, structured video instruction accelerates the learning curve significantly, especially for reading blueprints and understanding joinery.
Woodworking jigs and fixtures guide: Jigs are reusable guides that help you make repeatable, accurate cuts. Understanding which jigs correspond to which plan types saves time and improves consistency.
Equipment used in woodworking: A practical overview of what tools you actually need at each stage of skill development, useful for matching your tool kit to the plans you want to tackle.
Furniture building plans library: A curated collection of furniture-specific plans worth exploring once you have completed your first beginner project and are ready to move up in complexity.