Top Types of Woodworking Jigs Every Woodworker Needs
Hey there! Some links on this page may be affiliate links, which means that if you choose to make a purchase, I may earn a commission at no extra cost to you. I greatly appreciate your support!
Woodworking jigs are guides or templates that hold your workpiece, position your tools, or control cutting angles so you get the same accurate result every time. They are especially valuable for beginners because they eliminate guesswork on repetitive cuts and joints. You can buy premade jigs for $10 to $300 or build many of the most useful ones yourself from scrap wood in an afternoon.
Key Takeaways
- A woodworking jig is any device that guides a tool or holds a workpiece in a fixed, repeatable position during cutting, drilling, or shaping.
- The most useful jigs for beginners are the pocket hole jig, dowel jig, dovetail jig, and a basic crosscut sled for the table saw.

- Most entry-level jigs cost between $15 and $60. Professional-grade versions range from $80 to $300 or more.
- Many of the best shop jigs can be built from scrap plywood or offcuts, costing little to nothing beyond your time.
- Jigs reduce setup time, improve cut consistency, and make complex joinery accessible to woodworkers who are still building their skills.
- The pocket hole jig is widely considered the single most time-saving jig for furniture building and cabinet work.
- Common beginner mistakes include not clamping the jig securely, using the wrong jig for the material thickness, and skipping test cuts on scrap wood.
- Jigs are not always the right choice: for one-off cuts or highly custom shapes, they add setup time without a real payoff.
- Small workshop spaces benefit most from multi-purpose jigs and wall-mounted storage systems.
- Woodworking jigs pair best with a solid understanding of basic tool safety and project planning.
What Is a Woodworking Jig and Why Do You Need One?
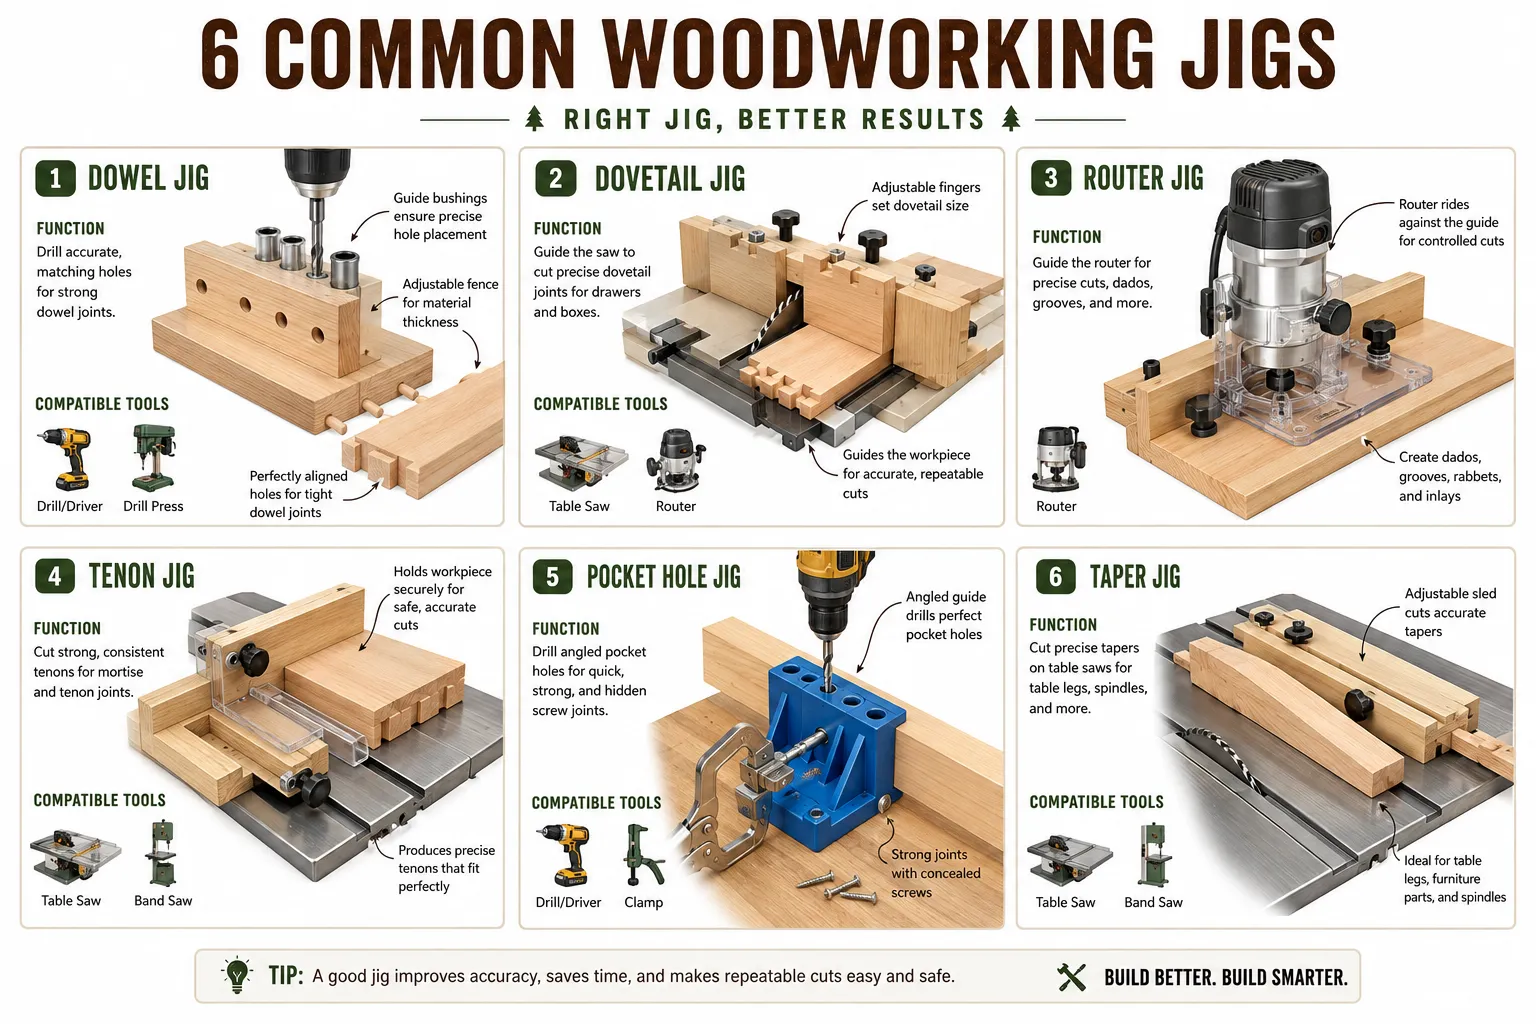
A woodworking jig is a shop-made or manufactured device that guides, positions, or constrains a cutting tool or workpiece so you get a precise, repeatable result. The word “jig” comes from manufacturing, where fixtures and guides have been used for centuries to standardize production. In a home workshop, the concept is exactly the same: you set up the jig once, and it does the precision work for you on every subsequent cut.
Why does that matter? Because woodworking demands consistency. A drawer front that is 1/16 of an inch off will not sit flush. A set of dowel holes that are even slightly misaligned will cause a joint to rack. For a beginner, achieving that consistency freehand is genuinely difficult. A jig removes most of the variables, letting you focus on technique rather than measurement.
According to Home Depot’s woodworking jig guide, jigs are defined as “tools that hold the workpiece and guide the cutting tool,” and they distinguish jigs from fixtures, which hold the workpiece but do not guide the tool. In practice, most woodworkers use the terms interchangeably.
You need a jig any time you are:
- Making the same cut, hole, or joint more than twice.
- Working on a joint type where a fraction of a millimeter matters (dovetails, mortise and tenon, dowels).
- Using a handheld tool (router, drill) and need to control its path precisely.
- Teaching yourself a new technique and want a safety net while your eye and hand develop.
If you are exploring woodworking projects for the first time, jigs are one of the fastest ways to close the gap between beginner results and professional-looking work.
What Woodworking Jigs Do You Actually Need?
For most beginners, four or five jigs will cover the vast majority of projects. You do not need a full rack of specialty jigs before you start building. Start with what your current projects actually require, then add from there.
The short list for beginners:
- Pocket hole jig: Essential for cabinet face frames, furniture assembly, and any project where you want strong, hidden joints fast. The Kreg Jig is the industry standard and costs around $30 to $50 for the entry model.
- Dowel jig: Useful for aligning edge-to-edge glue-ups and for adding reinforcement to butt joints. A basic self-centering dowel jig runs $20 to $40.
- Crosscut sled (table saw): The most accurate way to make square crosscuts on a table saw. Most woodworkers build this one themselves from plywood.
- Dovetail jig: Needed if you want to cut dovetail joints for drawers or boxes. Porter-Cable and Leigh make reliable options starting around $80.
- Router edge guide: A simple jig that keeps your router a fixed distance from the edge of a board. Often included with routers or available for under $20.
If your budget is tight, build the crosscut sled first. It costs almost nothing and immediately improves the accuracy of nearly every cut you make.
Best Woodworking Jigs for Beginners
The best jigs for beginners are ones that are easy to set up, forgiving of minor errors, and immediately useful across multiple project types. Based on guidance from Woodcraft’s jig collection and resources like The Woodwork Starter’s 2025 jig guide, these are the top picks:
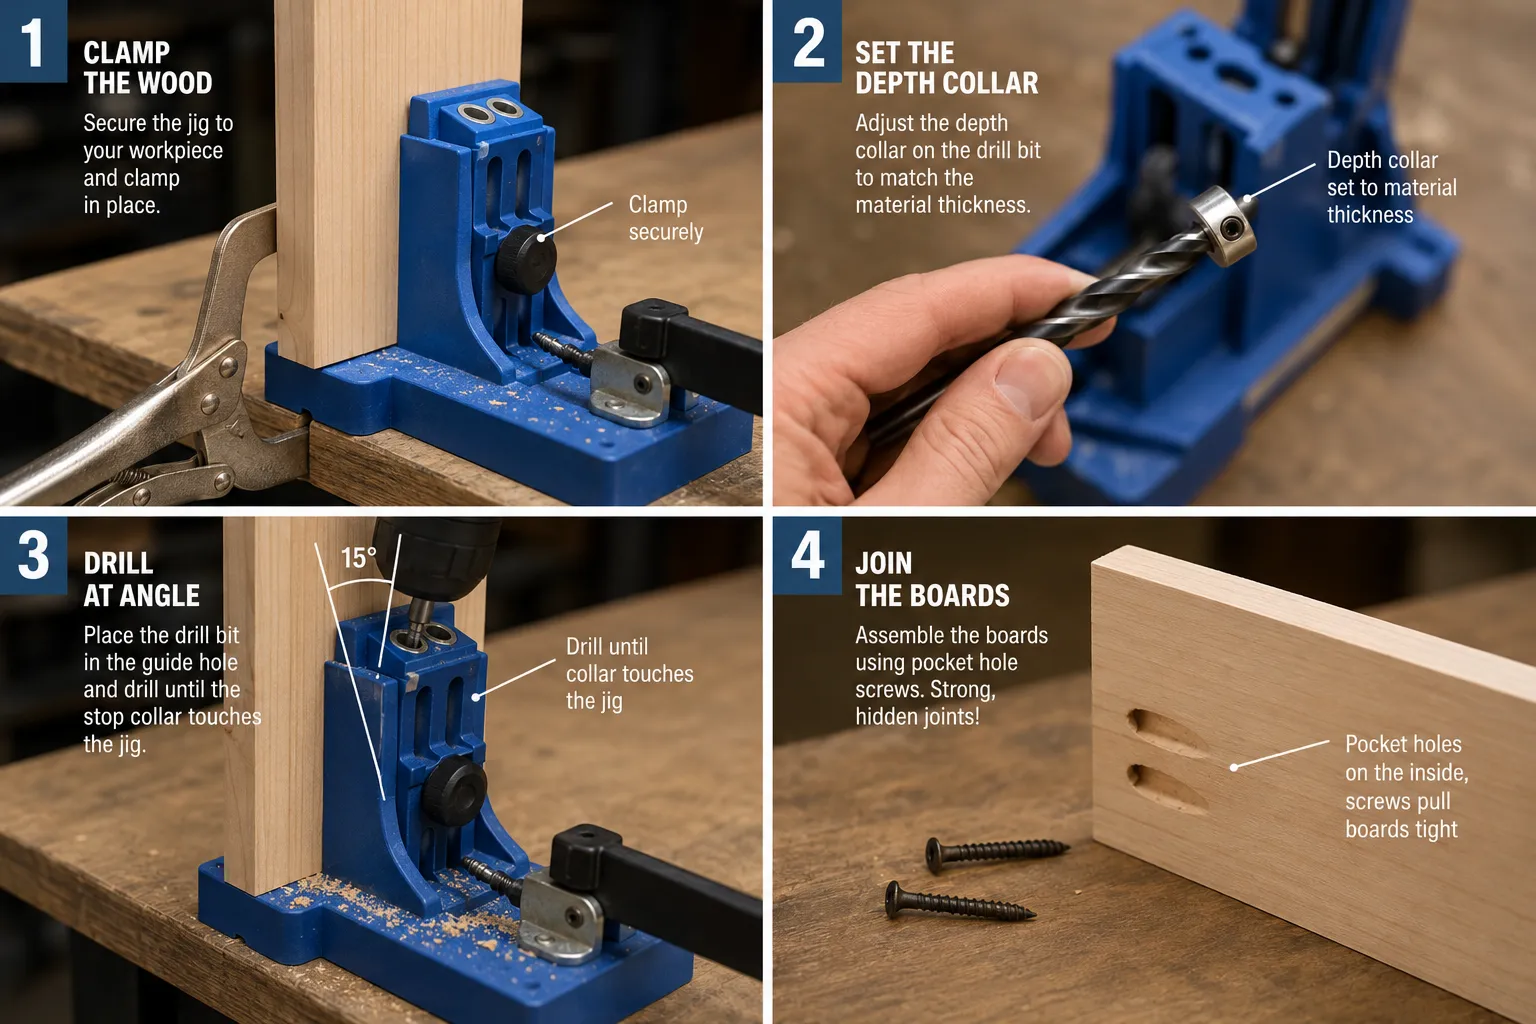
Kreg Jig (Pocket Hole Jig): The most beginner-friendly jig available. You clamp it to the board, set the depth collar to match your material thickness, drill the angled pocket hole, and drive a screw. The joint is strong, fast, and invisible from the front. It is the go-to tool for building face frames, attaching tabletops, and assembling cabinet carcasses.
Self-Centering Dowel Jig: These jigs automatically center on the edge of a board regardless of thickness, which removes one of the most common sources of error. They are ideal for edge-joining boards for tabletops and for reinforcing butt joints in furniture.
Combination Square Jig: Not always labeled as a “jig,” but a quality combination square used as a marking guide functions as one. It helps you mark consistent lines for hand-saw cuts and chisel work.
Tapering Jig: If you are building furniture with tapered legs, a tapering jig for the table saw is worth having early. You can buy one for around $25 or build one from scrap in an hour.
Featherboard: A safety and accuracy jig that holds your workpiece firmly against the fence or table during a cut. It prevents kickback and keeps cuts consistent. Most woodworkers build their own from plywood.
For anyone following structured woodworking plans, these five jigs will handle the joinery and cutting requirements of the majority of beginner and intermediate projects.
How Much Do Quality Woodworking Jigs Cost?
Woodworking jig costs range from nothing (for shop-built jigs made from scrap) to several hundred dollars for precision machined fixtures. Here is a realistic breakdown by category:
| Jig Type | Budget Option | Mid-Range | Professional Grade |
|---|---|---|---|
| Pocket hole jig | $30 (Kreg Jig Mini) | $50 (Kreg Jig K4) | $170+ (Kreg Foreman) |
| Dowel jig | $20 (basic) | $40 (self-centering) | $80+ (Veritas) |
| Dovetail jig | $80 (Porter-Cable 4210) | $150 (Leigh D4R) | $300+ (Leigh Super Jig) |
| Router table fence | $25 (basic) | $80 (Kreg router fence) | $200+ (Incra) |
| Tenon jig | $30 (shop-built) | $60 (Delta) | $150+ (Incra) |
| Crosscut sled | $0 to $15 (shop-built) | $60 (premade) | $150+ (precision sled) |
For a beginner setting up a first shop, a realistic starting budget for jigs is $100 to $150. That will get you a solid pocket hole jig, a dowel jig, and materials to build a crosscut sled. You can add specialty jigs as your projects demand them.
One thing worth knowing: the most expensive jig is not always the best choice for a beginner. A $30 Kreg Jig Mini will outperform a $200 jig you do not know how to use yet.
DIY Woodworking Jigs vs. Buying Premade
For many common jigs, building your own is the better choice. For precision joinery jigs, buying premade often makes more sense. The decision comes down to three factors: the precision required, the time you have, and whether the jig needs to be adjustable.
Build your own when:
- The jig is simple (a crosscut sled, a tapering jig, a featherboard, a shooting board).
- You have scrap plywood or MDF available.
- The jig is for a one-time or infrequent use.
- You want to customize the jig for a specific project dimension.
Buy premade when:
- The jig requires machined metal parts for accuracy (dovetail jigs, router table fences).
- You need adjustability across a wide range of settings (Incra-style fences).
- Your time is limited and the project is time-sensitive.
- Safety is a concern and a poorly built jig could cause injury or kickback.
Real Woodwork Plans’ complete jig guide makes a useful point: many of the most effective shop jigs are hybrid builds, where you buy the hardware (toggle clamps, t-track, knobs) and build the wooden body yourself. This approach gives you the accuracy of metal components at a fraction of the cost of a fully premade jig.
How to Make Your Own Woodworking Jigs
Making your own jigs is one of the most satisfying parts of setting up a workshop. The process is the same regardless of the jig type: design for your specific need, build from stable material, and test before committing to a real workpiece.
Basic process for building a shop jig:
- Define the task: What cut, hole, or joint does the jig need to produce? What tool will it guide?
- Sketch the design: Even a rough pencil sketch helps you think through how the jig will register against the workpiece and how the tool will move through it.
- Choose your material: 3/4-inch Baltic birch plywood is the standard for jig bodies. It is stable, flat, and holds screws well. MDF works for flat reference surfaces but is heavy and does not hold screws at edges.
- Cut and assemble: Use your most accurate tool (usually the table saw) to cut the jig parts. Accuracy in the jig body directly determines accuracy in your work.
- Add hardware: Toggle clamps, T-track, and star knobs from a hardware store make jigs adjustable and safe to use.
- Test on scrap: Always run the jig on scrap material first. Check the result with a square or calipers before using it on your actual project.
- Label and store: Write the jig’s purpose and any relevant settings directly on the jig body with a marker.
For visual inspiration, the YouTube channel compilation 11 Woodworking Jigs So Simple You’ll Regret Not Building Them Sooner walks through a range of shop-built jigs that any beginner can build in a weekend.
Woodworking Jigs for Dovetails and Joinery
Dovetail joints and other precision joinery are where jigs make the biggest difference. A dovetail cut freehand requires years of practice. With a dovetail jig, a beginner can produce acceptable results on the first attempt.
Dovetail jigs guide a router through a template to cut both the pins and tails of a dovetail joint simultaneously. The most common style is the through-dovetail, used for box corners and drawer fronts. Half-blind dovetails, used for drawer fronts where the joint should not be visible from the front, require a slightly more complex jig setup.
Key dovetail jig options for beginners:
- Porter-Cable 4210: A reliable entry-level jig that handles through and half-blind dovetails. It costs around $80 and is widely available.
- Leigh D4R Pro: A more flexible jig that allows variable spacing between pins and tails, giving a more handmade look. It costs around $150 to $200 and is worth the investment if you plan to build a lot of drawer boxes.
Dowel jigs are the workhorses of basic joinery. They are used to drill perfectly aligned holes for wooden dowels, which reinforce butt joints and edge-to-edge glue-ups. A self-centering model like the Milescraft 1323 or the Veritas Doweling Jig is worth the extra $10 to $20 over a basic model because it eliminates the step of measuring center manually.
Pocket hole jigs are technically a joinery jig too, and they deserve mention here because they have largely replaced dowels for many furniture-building applications. The joint is not as strong as a mortise and tenon, but it is fast, reliable, and strong enough for most furniture. If you are building popular woodworking projects like face-frame cabinets or bed frames, a pocket hole jig is non-negotiable.
Woodworking Jigs for Table Saw vs. Band Saw
Table saw jigs and band saw jigs serve different purposes and are not interchangeable. Understanding which jig works with which tool saves you from buying the wrong thing.
Table saw jigs are designed to work with the saw’s miter slot and fence system. The most important ones are:
- Crosscut sled: Rides in the miter slots and supports wide boards for accurate 90-degree crosscuts. Far more accurate than the stock miter gauge.
- Tenon jig: Clamps to the fence and holds a board vertically so you can cut tenon cheeks safely and accurately. Can be angled from 45 to 90 degrees for angled tenons.
- Tapering jig: Holds a board at a fixed angle to the blade for cutting tapered legs.
- Box joint jig: Uses a dado stack and an indexing pin to cut evenly spaced box (finger) joints.
Band saw jigs are used for curves, resawing, and circle cutting:
- Circle-cutting jig: A simple pivot point jig that lets you cut perfect circles on the band saw.
- Resaw fence: A single-point fence that compensates for blade drift when resawing thick stock into thinner boards.
- Featherboard: Used on the band saw the same way as the table saw, to keep consistent pressure against the fence.
The key difference: table saw jigs prioritize straight-line accuracy and angle control. Band saw jigs prioritize curve control and consistent thickness. If you are building furniture, you will use table saw jigs far more often. If you are doing scroll work, instrument making, or decorative pieces, band saw jigs become more important.
How to Use a Pocket Hole Jig Correctly
A pocket hole jig is the fastest way to join two pieces of wood, but a few setup errors will give you weak joints or misaligned surfaces. Here is how to use one correctly:
- Set the depth collar: Match the drill bit’s depth collar to your material thickness. Most jigs have a chart printed on them or in the manual. For 3/4-inch material, the collar goes to the “3/4” mark.
- Set the jig clamp: Position the jig so the guide holes are centered on the thickness of your board. Tighten the clamp firmly. If the jig shifts during drilling, the hole angle will be off.
- Drill the pocket hole: Use the stepped drill bit that came with the jig. Drill at a steady, moderate speed. Let the bit do the work. Forcing it causes tearout.
- Choose the right screw: Pocket hole screws are coarse-threaded and self-tapping. Use the length specified for your material thickness (usually 1-1/4 inch for 3/4-inch material).
- Clamp the joint before driving the screw: Without a clamp, the screw will pull the boards apart slightly as it drives. A face clamp or a Kreg right-angle clamp holds everything flush.
- Drive the screw: Use a square-drive (Robertson) bit for the best grip. Drive until snug, not overtightened.
Common mistakes: using the wrong screw length, skipping the clamp, and not matching the depth collar to material thickness. All three produce joints that look fine until stress is applied.
Best Woodworking Jigs for Furniture Making
Furniture making demands accuracy at every stage, from rough dimensioning to final assembly. The jigs that matter most for furniture are the ones that handle joinery, leg tapers, and panel assembly.
The top jigs for furniture making, based on Woodsmith Plans’ jig and fixture resources, are:
- Pocket hole jig: For face frames, drawer boxes, and case assembly.
- Mortise and tenon jig: For chair legs, table aprons, and any structural joint that needs maximum strength.
- Tapering jig: For furniture legs with a classic taper.
- Crosscut sled: For cutting parts to consistent length.
- Router table fence with featherboard: For shaping edges on tabletops, drawer fronts, and cabinet doors.
- Doweling jig: For aligning tabletop panels during glue-up.
If you are serious about furniture, also consider an Incra-style fence system for your router table. It allows micro-adjustable positioning for joinery like box joints and raised panel doors, and it replaces several individual jigs with one adjustable system.
For more inspiration on what furniture projects these jigs support, the furniture building plans section covers a wide range of project types from beginner to advanced.
Woodworking Jigs That Save the Most Time
Time savings from jigs are most dramatic when you are making multiples. The jigs below consistently deliver the biggest return on the time you invest in setting them up:
Pocket hole jig: A joint that would take 20 minutes to lay out, drill, and fit as a dowel joint takes about 90 seconds with a pocket hole jig. For a cabinet with 20 face frame joints, that is roughly six hours saved.
Crosscut sled: Accurate crosscuts without a sled require careful layout, a marking knife, and a hand saw or careful miter gauge work. A sled reduces a precise crosscut to a 10-second operation.
Router table with fence: Profiling edges by hand with a handheld router and guide requires constant repositioning and careful clamping. A router table with a fence lets you run all your parts in a continuous pass at consistent depth and distance.
Drill press fence and stop block: When drilling a series of holes at the same position (for shelf pin holes, for example), a stop block on the drill press fence means you position once and drill all the holes without re-measuring.
Box joint jig: Cutting box joints by hand is slow and prone to error. A box joint jig on the table saw with a dado stack produces perfect, consistent joints in minutes. For anyone building woodworking projects that involve boxes, drawers, or small cabinets, this jig pays for itself quickly.
Woodworking Jigs for Small Workshop Spaces
Small workshops benefit from jigs that serve multiple purposes and store flat against a wall. The goal is maximum function per square foot.
Best jigs for small spaces:
- Crosscut sled (foldable or storable): Build it thin (3/4-inch plywood) and hang it on a wall hook when not in use.
- Pocket hole jig: Compact and handheld. The Kreg Jig K4 fits in a shoebox.
- Combination square used as a marking jig: Zero additional storage footprint.
- Featherboards (magnetic or clamp-on): Clamp to the tool when needed, remove and hang on a pegboard when done.
- Router edge guide: Attaches to the router itself and stores with it.
Avoid large, dedicated jig stations if your shop is under 200 square feet. Instead, build jigs that attach to tools you already own or that hang flat on a pegboard wall. A French cleat wall system is one of the most space-efficient ways to store a growing jig collection.
For a broader look at how to equip a small shop, the equipment used in woodworking guide covers tool selection with space constraints in mind.
Common Mistakes People Make With Woodworking Jigs
Even a well-designed jig produces bad results if it is used incorrectly. These are the mistakes that come up most often for beginners:
Not clamping the jig securely. A jig that shifts even 1/32 of an inch mid-cut ruins the workpiece. Always use a clamp, even if the jig feels stable by hand.
Skipping the test cut. Every jig setup should be tested on scrap before touching the actual workpiece. Material thickness varies slightly between boards, and a jig set for one board may be slightly off for another.
Using the wrong jig for the material. A pocket hole jig set for 3/4-inch stock will produce a weak joint in 1/2-inch stock. Always reset the depth collar and screw length when changing material thickness.
Not squaring the jig to the workpiece. A crosscut sled that is not perfectly square to the blade will produce slightly angled cuts that compound across a project. Check the sled’s squareness periodically with a reliable square.
Relying on the jig to fix a bad setup. A jig guides a tool accurately, but it cannot compensate for a blade that is not parallel to the fence or a drill press table that is not square to the bit. Fix the machine setup first.
Building jigs from unstable material. Solid wood jigs can warp with humidity changes. Use Baltic birch plywood or MDF for jig bodies wherever possible.
When Not to Use a Woodworking Jig
Jigs are not always the right tool. There are situations where setting up a jig costs more time than it saves, or where the jig actually limits what you can do.
Skip the jig when:
- You are making a single, one-off cut that would take longer to set up a jig for than to simply measure and cut carefully.
- The shape is too irregular for a jig to register accurately against.
- You are doing freehand carving, shaping, or sculpting where the design is intentionally variable.
- The project requires a custom angle or dimension that falls outside the jig’s adjustment range.
- You are developing hand skills intentionally. Cutting dovetails by hand, for example, builds a level of spatial and tactile understanding that a jig bypasses. If skill development is the goal, the jig is counterproductive.
A jig is a production tool at heart. It shines when you need consistency across multiple identical parts. When you need flexibility, creativity, or deliberate skill practice, put the jig away.
FAQ: Woodworking Jigs
What is the most useful woodworking jig for a beginner?
The pocket hole jig is the most immediately useful jig for a beginner. It produces strong, hidden joints in under two minutes and works on nearly every furniture and cabinet project. The Kreg Jig K4 is the most widely recommended entry-level model.
Can I make woodworking jigs from scrap wood?
Yes, and many of the best shop jigs are made from scrap plywood or MDF. A crosscut sled, tapering jig, featherboard, and shooting board can all be built from offcuts at no material cost. Use Baltic birch plywood for the most stable results.
How do I know which jig to use for a specific cut?
Match the jig to the tool and the type of cut. Pocket hole jigs go with drills. Dovetail jigs go with routers. Crosscut sleds and tenon jigs go with the table saw. If you are unsure, check the project’s woodworking plans, which usually specify the recommended jig or method.
Are expensive jigs worth it for a hobbyist?
Not always. A $30 Kreg Jig Mini produces the same joint as a $170 Kreg Foreman, just more slowly. Spend more on jigs only when the cheaper version genuinely limits what you can do, or when you are making enough parts that the speed difference matters.
How do I store woodworking jigs in a small shop?
Hang flat jigs (sleds, tapering jigs) on wall hooks or a French cleat system. Store small handheld jigs (pocket hole jig, dowel jig) in labeled bins or a drawer. Keep frequently used jigs within arm’s reach of the tool they work with.
What material is best for building homemade jigs?
3/4-inch Baltic birch plywood is the standard choice. It is dimensionally stable, flat, and holds screws and hardware well. MDF works for flat reference surfaces but is heavy and does not hold screws at edges. Avoid standard construction plywood, which warps and is rarely truly flat.
Do woodworking jigs wear out?
Wooden jigs do wear over time, especially at the contact surfaces where tools rub. You can extend jig life by adding hardwood wear strips at high-contact points or by facing guide surfaces with plastic laminate. Metal jigs last much longer but cost more.
Is a dovetail jig necessary for drawer making?
Not strictly necessary, but it makes drawer making much faster and more consistent. Drawers can also be built with box joints (easier to cut), pocket hole joints (fastest), or simple rabbeted joints. Dovetails are the strongest and most traditional, but the joint type depends on the project’s requirements and your skill level.
What is the difference between a jig and a fixture?
A jig guides the cutting tool. A fixture holds the workpiece in position but does not guide the tool. In practice, most woodworkers use the terms interchangeably, and many shop-built devices do both simultaneously.
Can woodworking jigs be used with hand tools?
Yes. A shooting board is a classic hand-tool jig that guides a hand plane for accurate end-grain trimming. Mortise guides, marking gauges, and dovetail markers are all hand-tool jigs. Jigs are not limited to power tools.
How do I check if my jig is accurate?
Always test on scrap first. For angle-dependent jigs (crosscut sled, tenon jig), use a reliable engineer’s square or a digital angle gauge. For hole-position jigs (dowel jig, pocket hole jig), drill a test hole and check alignment before drilling your actual workpiece.
Where can I find plans for building my own jigs?
Woodsmith Plans has a dedicated jig and fixture section with detailed plans. The Woodwork Starter published a thorough 2025 guide covering 15 essential jig plans. YouTube is also an excellent free resource for visual walkthroughs.
Conclusion
Woodworking jigs are not a shortcut. They are a system. They let you focus your attention on the craft itself rather than on measuring and re-measuring the same setup over and over. For beginners, a small collection of well-chosen jigs closes the gap between intention and result faster than almost any other investment in the shop.
Start with a pocket hole jig and a shop-built crosscut sled. Add a dowel jig and a dovetail jig when your projects call for them. Build what you can from scrap, buy what needs to be precise, and test everything on scrap before it touches a real workpiece. That approach will serve you well whether you are building your first shelf or your fiftieth cabinet.
The more you use jigs, the more you will recognize where they help and where they get in the way. That judgment, more than any single tool, is what separates a thoughtful woodworker from someone who just owns a lot of equipment.
Products, Tools, and Resources
These are tools and resources worth considering based on real workshop use, not affiliate rankings:
Kreg Jig K4 Pocket Hole System (around $50): The most practical entry-level pocket hole jig. Handles material from 1/2 inch to 1-1/2 inches thick and comes with a face clamp. Available at most hardware stores and online.
POWERTEC 12 Inch Dovetail Jig (around $229): A reliable, no-frills dovetail jig that handles through and half-blind dovetails. A good first dovetail jig before committing to a more expensive Leigh model.
Milescraft 1323 Self-Centering Dowel Jig (around $35): Automatically centers on board thickness, which removes the most common source of dowel alignment error. Works with standard 1/4-inch and 3/8-inch dowels.
Baltic Birch Plywood (3/4 inch, 5×5 sheet): The best material for building your own jigs. Available at most hardwood dealers and some big-box stores. One sheet will build a crosscut sled, a tapering jig, and several featherboards with material to spare.
Woodsmith Plans Jig and Fixture Library (woodsmithplans.com): Detailed, tested plans for shop-built jigs. Worth a subscription if you plan to build out your shop systematically.
Woodworking Online Training (woodworkingguru.com): Structured courses covering tool use, joinery, and project planning for beginners who want guided instruction alongside their jig work.
For a broader look at the tools that complement your jig collection, the various tools used for woodworking guide is a practical starting point.
References
- Home Depot. “What Is a Woodworking Jig.” https://www.homedepot.com/c/ab/what-is-a-woodworking-jig/9ba683603be9fa5395fab901ae9d659c
- Woodcraft. “Woodworking Jigs for Precision and Repeatability.” https://www.woodcraft.com/collections/woodworking-jigs
- Woodsmith Plans. “Jigs and Fixtures.” https://www.woodsmithplans.com/category/jigs-and-fixtures/
- The Woodwork Starter. “15 Essential Woodworking Jig Plans (2025 Guide).” https://woodworkstarter.com/blog/15-essential-woodworking-jig-plans-2025-guide/
- Real Woodwork Plans. “Woodworking Jigs: The Complete Guide to Shop Jigs.” https://realwoodworkplans.com/woodworking-jigs/
- YouTube. “11 Woodworking Jigs So Simple You’ll Regret Not Building Them Sooner.” https://www.youtube.com/watch?v=NN28myW9-qo